Resultados de busca
302 results found with an empty search
- Human Growth Hormone: Side Effects - A Comprehensive Guide [2025]
Human Growth Hormone (HGH) has gained significant attention in recent years for its potential benefits in anti-aging, muscle growth, and performance enhancement. However, like any powerful substance, it comes with potential risks and side effects. This comprehensive guide will explore the various side effects associated with HGH use, providing valuable insights for those considering or currently using this hormone. In this article, we'll delve into the science behind HGH, its approved medical uses, and the potential consequences of its misuse or overuse. We'll cover both short-term and long-term side effects, discuss the differences between natural and synthetic HGH, and provide guidance on how to minimize risks if you're using HGH under medical supervision. Whether you're an athlete, a healthcare professional, or simply someone interested in the topic, this guide will equip you with the knowledge to understand the potential risks associated with HGH use. Table of Contents What is Human Growth Hormone? Approved Medical Uses of HGH Short-Term Side Effects of HGH Long-Term Side Effects of HGH HGH and Cancer Risk Psychological Side Effects Side Effects in Different Age Groups Natural vs. Synthetic HGH: Differences in Side Effects Minimizing Risks: Best Practices for HGH Use Legal and Ethical Considerations Conclusion: Weighing the Risks and Benefits What is Human Growth Hormone? Human Growth Hormone, often abbreviated as HGH or GH, is a peptide hormone produced by the pituitary gland. It plays a crucial role in human development, cell regeneration, and growth. This hormone is particularly active during childhood and adolescence, where it promotes the growth of bones and muscles. In adults, HGH continues to play important roles in metabolism, body composition, and maintaining healthy tissue. The production of HGH in the body follows a circadian rhythm, with the highest levels typically released during sleep. Various factors can influence HGH production, including age, diet, exercise, stress, and sleep patterns. As we age, the natural production of HGH tends to decline, which has led to interest in HGH supplementation as a potential anti-aging treatment. Synthetic HGH, created through recombinant DNA technology, has been available since 1985. This synthetic version is molecularly identical to the natural hormone produced by the pituitary gland. While it was initially developed for medical use in children with growth hormone deficiency, its application has expanded to various other medical conditions and, controversially, to enhancement purposes in sports and anti-aging treatments. Understanding the nature and function of HGH is crucial when considering its potential side effects. The hormone's wide-ranging influence on the body means that its misuse or overuse can lead to significant and sometimes unexpected consequences. In the following sections, we'll explore these side effects in detail, providing a comprehensive overview of the risks associated with HGH use. Approved Medical Uses of HGH Before delving into the side effects of Human Growth Hormone, it's important to understand its approved medical uses. HGH therapy is prescribed for several specific conditions where the benefits are deemed to outweigh the potential risks. These approved uses have been established through extensive clinical research and are regulated by health authorities such as the FDA in the United States. The primary approved use of HGH is for children with growth hormone deficiency (GHD). In these cases, HGH therapy can help promote normal growth and development. It's also approved for children with conditions that impair growth, such as Turner syndrome, Prader-Willi syndrome, chronic kidney disease, and children born small for gestational age who fail to catch up in growth by age two. In adults, HGH therapy is approved for growth hormone deficiency, which can occur due to pituitary tumors or their treatment. It's also used in the treatment of short bowel syndrome, a condition where nutrients are not properly absorbed due to severe intestinal disease or the surgical removal of a large portion of the small intestine. Another approved use is for muscle wasting associated with HIV/AIDS. In this context, HGH can help maintain lean body mass and reduce the loss of muscle tissue. This application highlights the hormone's potential in treating conditions involving significant muscle loss or metabolic disturbances. It's crucial to note that these approved uses involve carefully monitored dosages and regular medical oversight. The risks and benefits are carefully weighed for each individual patient, and treatment is adjusted based on response and any side effects that may occur. This medical approach to HGH use is vastly different from its unsupervised use for enhancement purposes, which can lead to a higher risk of side effects. Understanding these approved uses provides context for the potential benefits of HGH when used appropriately. However, it's the use of HGH outside of these approved contexts – often in higher doses or without proper medical supervision – that frequently leads to the side effects we'll discuss in the following sections. This contrast underscores the importance of using HGH only under proper medical guidance and for approved medical conditions. Short-Term Side Effects of HGH The use of Human Growth Hormone, even when prescribed for legitimate medical reasons, can lead to a range of short-term side effects. These effects are typically more common when HGH is used in high doses or without proper medical supervision. It's important to note that not everyone will experience these side effects, and their severity can vary from person to person. One of the most common short-term side effects of HGH use is fluid retention, also known as edema. This can manifest as swelling in the arms and legs, and can sometimes lead to joint pain or carpal tunnel syndrome. The excess fluid retention can also cause muscle pain and stiffness, particularly in the hands and feet. These symptoms are often more pronounced at the beginning of treatment and may subside as the body adjusts to the hormone. Another frequent short-term side effect is headaches. Some users report experiencing headaches, ranging from mild to severe, especially in the early stages of HGH use. These headaches are thought to be related to the hormonal changes occurring in the body and often diminish over time. However, persistent or severe headaches should always be reported to a healthcare provider. Insulin resistance is another potential short-term side effect of HGH use. Growth hormone can interfere with the body's ability to regulate blood sugar levels, potentially leading to increased insulin resistance. This can result in elevated blood sugar levels, which is particularly concerning for individuals with or at risk for diabetes. Regular monitoring of blood glucose levels is crucial for those using HGH. Some users may experience mood changes or increased irritability. While not as commonly reported as physical side effects, these psychological changes can be significant for some individuals. The exact mechanism behind these mood alterations is not fully understood, but it's thought to be related to the hormone's effects on brain chemistry. Lastly, some individuals may experience injection site reactions when using synthetic HGH. These can include pain, redness, or swelling at the site of injection. While usually minor, these reactions can be bothersome and may require adjusting injection techniques or sites. It's important to emphasize that these short-term side effects are generally manageable and often subside as the body adjusts to HGH therapy. However, they should always be reported to and monitored by a healthcare provider. Proper dosing, administration, and medical oversight can help minimize these short-term effects and ensure the safe use of HGH for those who medically require it. Long-Term Side Effects of HGH While short-term side effects of Human Growth Hormone use are generally manageable, the long-term effects can be more serious and potentially irreversible. These long-term side effects are of particular concern in cases of prolonged use, especially when HGH is used in high doses or without proper medical supervision. Understanding these potential long-term consequences is crucial for anyone considering or currently using HGH. One of the most significant long-term concerns associated with HGH use is the increased risk of developing or exacerbating diabetes. Prolonged use of HGH can lead to persistent insulin resistance, which over time may progress to type 2 diabetes. This risk is particularly high in individuals who already have risk factors for diabetes, such as obesity or a family history of the disease. Regular monitoring of blood glucose levels and insulin sensitivity is essential for long-term users of HGH. Another serious long-term side effect is the potential for abnormal growth of bones and organs. In adults, whose growth plates have already fused, this can manifest as a condition called acromegaly. Acromegaly is characterized by the enlargement of facial features, hands, and feet. It can also lead to the enlargement of internal organs, including the heart, which can have serious health implications. These changes can be irreversible even after discontinuation of HGH use. Cardiovascular risks are another area of concern with long-term HGH use. Some studies have suggested an increased risk of cardiovascular diseases, including hypertension and heart failure, in individuals using HGH over extended periods. The exact mechanisms are not fully understood, but it's thought to be related to the hormone's effects on heart muscle growth and metabolic changes. Long-term use of HGH has also been associated with an increased risk of certain types of cancer, which we'll explore in more detail in a later section. While the direct causal relationship is still a subject of ongoing research, the potential for increased cancer risk is a serious consideration for long-term HGH users. Joint and muscle pain can become a chronic issue with prolonged HGH use. While often manageable in the short term, persistent joint pain and swelling can lead to more serious musculoskeletal problems over time. This can be particularly problematic for athletes or individuals using HGH for its purported performance-enhancing effects. Lastly, there's the potential for dependency on external HGH. Long-term use of synthetic HGH can potentially suppress the body's natural production of the hormone. This means that once a person stops using synthetic HGH, they may experience symptoms of growth hormone deficiency, as their body has reduced its natural production. These long-term side effects underscore the importance of using HGH only under strict medical supervision and for approved medical conditions. The risks associated with long-term use, especially for enhancement purposes, can far outweigh any perceived benefits. Anyone considering long-term HGH use should have a thorough discussion with a healthcare provider about the potential risks and alternatives. HGH and Cancer Risk The relationship between Human Growth Hormone and cancer risk is a complex and controversial topic that has been the subject of numerous studies. While the exact nature of this relationship is still not fully understood, there are several important considerations regarding HGH use and its potential impact on cancer development or progression. One of the primary concerns is that HGH stimulates cell growth and division, which are fundamental processes in cancer development. Growth hormone and its mediator, Insulin-like Growth Factor 1 (IGF-1), are known to promote cell proliferation and inhibit cell death. In normal tissues, this is part of the hormone's role in growth and repair. However, in the context of cancer, these same mechanisms could potentially accelerate the growth of existing tumors or promote the development of new ones. Several studies have suggested a potential link between elevated levels of IGF-1 (which is increased by HGH) and an increased risk of certain cancers, particularly colorectal, breast, and prostate cancers. For example, a study published in The Lancet found that men with high levels of IGF-1 had an increased risk of prostate cancer. Similarly, research has indicated a possible association between elevated IGF-1 levels and breast cancer risk in premenopausal women. It's important to note, however, that these studies show correlation rather than direct causation. The relationship between HGH, IGF-1, and cancer is complex and likely influenced by many factors, including genetics, lifestyle, and overall health status. Additionally, most of these studies have looked at naturally occurring levels of growth hormone and IGF-1, not necessarily the effects of exogenous HGH supplementation. For individuals with a history of cancer or those at high risk for certain types of cancer, the use of HGH requires careful consideration and close medical supervision. In some cases, the potential risks may outweigh the benefits of HGH therapy. This is particularly true for cancers that are known to be hormone-sensitive. On the other hand, it's worth noting that HGH is sometimes used in the treatment of certain conditions related to cancer. For example, it's approved for use in treating muscle wasting in HIV/AIDS patients, which can occur as a result of the disease itself or its treatments. In these cases, the benefits of HGH in maintaining muscle mass and quality of life are considered to outweigh the potential risks. The scientific community continues to study the relationship between HGH and cancer risk. Current guidelines recommend careful screening and monitoring for cancer in patients receiving HGH therapy, especially those with known risk factors. For individuals using HGH for non-medical purposes, the potential increased cancer risk is a serious consideration that should not be overlooked. In conclusion, while the exact nature of the relationship between HGH and cancer risk is still being elucidated, there is enough evidence to warrant caution. Anyone considering HGH use, especially long-term, should have a thorough discussion with their healthcare provider about their individual risk factors and the potential implications for cancer risk. Regular monitoring and screening may be necessary for those undergoing HGH therapy to ensure early detection of any potential issues. Psychological Side Effects While much attention is given to the physical side effects of Human Growth Hormone use, the psychological impacts are equally important to consider. These effects can range from subtle mood changes to more significant alterations in mental state and behavior. Understanding these potential psychological side effects is crucial for anyone using or considering the use of HGH. One of the more commonly reported psychological effects of HGH use is mood swings. Users may experience sudden and unpredictable changes in their emotional state, ranging from euphoria to irritability or depression. These mood fluctuations can be particularly pronounced in the early stages of HGH use as the body adjusts to the hormonal changes. For some individuals, these mood swings can be severe enough to impact their daily life and relationships. Anxiety is another psychological side effect that has been associated with HGH use. Some users report feeling more anxious or experiencing increased levels of stress. This anxiety can manifest in various ways, from general unease to more specific worries about health or body image. The exact mechanism behind this increased anxiety is not fully understood, but it's likely related to the complex interactions between hormones and neurotransmitters in the brain. Conversely, some HGH users report experiencing improved mood and a sense of well-being. This positive psychological effect is often cited as one of the reasons for its popularity in anti-aging treatments. Users may feel more energetic, confident, and optimistic. However, it's important to note that these positive effects can sometimes lead to a psychological dependence on the hormone, with users feeling that they need HGH to maintain their improved mood and outlook. Sleep disturbances are another potential psychological side effect of HGH use. While HGH is naturally released in larger amounts during sleep, exogenous HGH can sometimes disrupt normal sleep patterns. Some users report difficulty falling asleep or staying asleep, which can lead to daytime fatigue and further mood disturbances. On the other hand, some users experience improved sleep quality, highlighting the variable nature of HGH's effects on different individuals. In rare cases, more severe psychological effects have been reported. These can include symptoms of mania or hypomania, characterized by excessive energy, reduced need for sleep, and sometimes grandiose thinking. While uncommon, these effects underscore the powerful impact that hormonal changes can have on mental state. It's also worth considering the psychological impact of the physical changes induced by HGH. For individuals using HGH for its body-altering effects, such as increased muscle mass or reduced body fat, the rapid changes in physical appearance can have significant psychological implications. This can range from improved self-esteem and body image to, in some cases, body dysmorphic concerns or an unhealthy preoccupation with physical appearance. The psychological effects of HGH use can be particularly complex in athletes or bodybuilders using the hormone for performance enhancement. The pressure to perform and the ethical considerations of using a potentially banned substance can lead to increased stress, anxiety, and in some cases, symptoms of depression. It's crucial to note that the psychological effects of HGH can vary greatly from person to person. Factors such as dosage, duration of use, individual brain chemistry, and pre-existing mental health conditions can all influence how an individual responds psychologically to HGH use. For those using HGH under medical supervision, it's important to discuss any psychological changes with their healthcare provider. Adjustments in dosage or complementary treatments may be necessary to manage these side effects. For individuals using HGH without medical oversight, the risk of experiencing significant psychological effects is higher, and seeking professional help is advisable if any concerning symptoms develop. In conclusion, while the physical side effects of HGH often take center stage, the potential psychological impacts should not be overlooked. These effects can significantly impact an individual's quality of life and overall well-being. Anyone considering or currently using HGH should be aware of these potential psychological side effects and monitor their mental health closely. As with any powerful hormone or medication, the key to safe use lies in proper medical supervision, honest communication about side effects, and a balanced consideration of the risks and benefits. Side Effects in Different Age Groups The side effects of Human Growth Hormone can vary significantly depending on the age group of the user. This variation is due to the different physiological states and hormone levels naturally present at different life stages. Understanding these age-specific side effects is crucial for both medical professionals prescribing HGH and individuals considering its use. In children and adolescents, the use of HGH is primarily for treating growth disorders. While generally well-tolerated in this age group when used appropriately, there are specific concerns to be aware of. One of the most significant risks is the potential for accelerated bone age advancement. This can lead to premature closure of growth plates, potentially resulting in shorter adult height – ironically counteracting the intended effect of the treatment. Additionally, children on HGH therapy may experience increased risk of scoliosis, especially during rapid growth periods. Adolescents using HGH may also experience more pronounced side effects related to fluid retention and joint pain. This is particularly noticeable during growth spurts when the body is already undergoing rapid changes. There's also a concern about the potential impact on glucose metabolism, with some studies suggesting an increased risk of insulin resistance and type 2 diabetes in adolescents receiving HGH therapy. For young adults (20s to 30s), who might use HGH for athletic performance enhancement or bodybuilding, the side effects can be quite different. In this age group, where natural HGH production is still relatively high, exogenous HGH can lead to more pronounced effects on muscle growth and fat loss. However, this also comes with increased risks of side effects such as joint pain, carpal tunnel syndrome, and increased sweating. There's also a higher risk of acromegaly-like symptoms developing if HGH is used in high doses over extended periods. Middle-aged adults (40s to 50s) using HGH, often for anti-aging purposes, may experience a mix of positive and negative effects. While some report improvements in energy levels, skin quality, and body composition, the risk of side effects increases. These can include worsening of age-related conditions such as hypertension and diabetes. The impact on cardiovascular health becomes a more significant concern in this age group, with potential increased risks of heart disease and stroke. In older adults (60 and above), the use of HGH requires particularly careful consideration. While some studies have shown potential benefits in terms of muscle mass and bone density, the risks are also more pronounced. Older adults are more susceptible to fluid retention, which can exacerbate conditions like congestive heart failure. The risk of diabetes and glucose intolerance is also higher in this age group. Additionally, there's an increased concern about the potential for HGH to promote the growth of undiagnosed cancers, which are more common in older populations. It's worth noting that in all age groups, but particularly in older adults, the interaction of HGH with other medications becomes a significant consideration. Many older adults are on multiple medications, and the addition of HGH can potentially interfere with these treatments or exacerbate certain conditions. For postmenopausal women, HGH use presents unique considerations. While some women report improvements in skin elasticity and body composition, there's also an increased risk of carpal tunnel syndrome and joint pain. The interaction of HGH with hormone replacement therapy, which many postmenopausal women undergo, is an area that requires careful monitoring. In all age groups, but particularly in children and adolescents, there's also the consideration of long-term effects that may not be immediately apparent. The full impact of HGH use on long-term health outcomes, especially when used for non-medical purposes, is not yet fully understood and continues to be an area of ongoing research. It's crucial to emphasize that the use of HGH should always be under strict medical supervision, regardless of age. The dosage and duration of treatment need to be carefully tailored to the individual's age, health status, and specific medical condition. Regular monitoring for side effects and adjustments to the treatment plan are essential to minimize risks and maximize benefits. In conclusion, while HGH can offer significant benefits in certain medical conditions, its side effects can vary widely depending on the age of the user. From the risk of altered growth patterns in children to the potential exacerbation of age-related conditions in older adults, each age group presents unique challenges and considerations. This underscores the importance of individualized treatment plans and the need for ongoing research into the long-term effects of HGH use across different age groups. Conclusion: Weighing the Risks and Benefits As we conclude our comprehensive exploration of Human Growth Hormone and its side effects, it's clear that the use of HGH is a complex issue with no simple answers. The decision to use HGH, whether for medical or enhancement purposes, requires careful consideration of numerous factors, including potential benefits, risks, legal status, and ethical implications. For individuals with diagnosed growth hormone deficiencies or other approved medical conditions, HGH therapy can be life-changing. Under proper medical supervision, it can address significant health issues and improve quality of life. In these cases, the benefits often outweigh the risks, though careful monitoring and management of potential side effects remain crucial. However, for those considering HGH for off-label uses such as anti-aging or athletic enhancement, the risk-benefit analysis becomes much more complicated. While the allure of improved physical performance or a more youthful appearance is understandable, the potential long-term health risks and legal consequences are significant. The side effects we've discussed, ranging from fluid retention and joint pain to more serious concerns like increased cancer risk and metabolic disturbances, cannot be taken lightly. It's important to remember that many of the purported benefits of HGH for enhancement purposes are based on limited or anecdotal evidence. The long-term effects of using HGH in healthy individuals are not fully understood, and the potential for unforeseen consequences remains a concern. For athletes, the use of HGH not only poses health risks but also ethical and professional consequences. The ban on HGH in most sports means that its use can jeopardize careers and reputations, in addition to potentially harming long-term health. The legal landscape surrounding HGH use adds another layer of complexity. The restricted legal status of HGH in many countries means that obtaining and using it without a prescription can lead to legal troubles. Moreover, purchasing HGH from unregulated sources carries additional risks of receiving counterfeit or contaminated products. From an ethical standpoint, the use of HGH for enhancement raises questions about fairness, coercion, and the medicalization of natural processes like aging. These considerations extend beyond individual choices to impact broader societal values and norms. For those who are prescribed HGH for legitimate medical reasons, adhering to best practices is essential. This includes: Using HGH only under close medical supervision Following prescribed dosages and administration protocols Undergoing regular health screenings and monitoring Being vigilant about potential side effects and reporting them promptly Maintaining a healthy lifestyle to support overall well-being For individuals considering HGH for non-medical purposes, it's crucial to: Thoroughly research and understand the potential risks and legal implications Consult with healthcare professionals about safer alternatives Consider the long-term consequences, both health-wise and ethically Be wary of unsubstantiated claims and unrealistic expectations In the broader context, ongoing research into HGH and its effects is vital. As our understanding of this powerful hormone grows, it may lead to safer, more targeted therapies and potentially open up new legitimate uses while clarifying the risks of off-label use. Education also plays a critical role. Accurate, accessible information about HGH – its benefits, risks, and legal status – is essential for informed decision-making at both individual and policy levels. Ultimately, the decision to use HGH is a personal one, but it should be made with a full understanding of the potential consequences. For most individuals, especially those without diagnosed hormone deficiencies, the risks of HGH use likely outweigh the potential benefits. Alternative methods of achieving fitness, performance, and health goals – through proper nutrition, exercise, and lifestyle choices – often provide safer, more sustainable results. As we navigate the complex landscape of human enhancement and medical treatments, it's crucial to approach powerful substances like HGH with caution, respect, and a commitment to evidence-based practices. By doing so, we can harness the benefits of medical advancements while minimizing risks and upholding ethical standards. See More:⤵ Anavar for Women Top 5 steroids for weight loss Top 6 Steroids for Women - A Comprehensive Guide Top 5 Steroids for Your First Cycle SARMS: COMPLETE AND ULTIMATE GUIDE FOR BEGINNERS Novaldex: Uses, Side Effects, Dosage, and Interactions Arimidex: Everything You Need to Know About Clomid: Everything You Need to Know About Testolone (RAD-140): A Comprehensive Guide Nandrolona: A Powerful Steroid Turinabol: Exploring the Benefits, Side Effects, and Alternatives HGH: The Potential Side Effects MK-2866 (Ostarine): Benefits, Side Effects, and Considerations Anavar: Discover 10 benefits of this anabolic steroid Winstrol Cycle: The Ultimate Guide Anastrozole: Benefits, Side Effects, and Uses Sustanon 250: Everything You Need to Know Trenbolone: The Ultimate Guide to This Powerful Steroid Testosterone Cypionate Cycle: Beginner's Guide Anavar Side Effects: The Ultimate Guide Deca-Durabolin: The Pros and Cons of This Powerful Steroid Proviron: Complete Guide Primobolan: Steroid for Lean Muscle Gains Dianabol: Ultimate Guide Anadrol: The Ultimate Guide to this Powerful Steroid Equipoise: Understanding Dosages and Side Effects for Safe Use Testosterone Undecanoate: What You Need to Know Testosterone Cypionate: Dosage and Cycle Length Recommendations Testosterone Enanthate: Cycles, Dosage and Benefits Testosterone Propionate: Complete Guide
- Booty Training: A Complete Guide
Hey there, ladies! Are you ready to take your booty game to the next level? Whether you're looking to build a stronger, more powerful backside or simply want to rock a pair of jeans like nobody's business, booty training is the key to unlocking your glute potential. As women, we know that having a strong and shapely booty is about more than just aesthetics. It's about feeling confident, empowered, and ready to take on the world. And with the right training techniques and a little bit of dedication, anyone can achieve the booty of their dreams. But let's be real – booty training can be intimidating, especially if you're new to the game. With so many different exercises, techniques, and programs out there, it can be hard to know where to start. That's why we've put together this complete guide to booty training, specifically tailored for women like you. In this guide, we'll cover everything you need to know to build a stronger, more powerful, and more beautiful backside. From the best exercises for targeting your glutes to the importance of proper form and technique, we'll give you all the tools you need to succeed. We'll also dive into the science behind booty training, exploring how your glutes work and why they're so important for overall health and fitness. Plus, we'll share some insider tips and tricks for maximizing your results and avoiding common mistakes. So whether you're a seasoned gym-goer or a total beginner, this guide is for you. We'll break down the basics of booty training in a way that's easy to understand and even easier to implement. And with a little bit of hard work and dedication, you'll be well on your way to the booty of your dreams. So what are you waiting for, ladies? Let's get started on this journey to unleashing your glute potential and building the strong, powerful, and beautiful booty you deserve. Trust us – your backside (and your confidence) will thank you! Booty Training: Muscle Worked Ladies, let's talk about booty training! If you're looking to take your fitness journey to the next level, understanding the importance of your glutes is crucial. The gluteal muscles, consisting of the gluteus maximus, medius, and minimus, are not only essential for achieving that coveted shapely appearance but also play a vital role in movement, stability, and overall physical performance. When it comes to booty training, the gluteus maximus is the star of the show. As the largest and strongest muscle in the human body, it is responsible for powerful hip extension movements like rising from a squat, climbing stairs, or propelling yourself forward during running. By focusing on exercises that target the gluteus maximus, you can build strength, improve your power output, and enhance your overall athletic performance. But let's not forget about the unsung heroes of the glutes – the gluteus medius and minimus. These smaller but equally important muscles are crucial for hip stabilization and abduction, which means they help keep your pelvis aligned and stable during single-leg movements like walking, running, or lunging. By incorporating exercises that target these muscles, you can improve your balance, reduce the risk of injuries in your lower back and knees, and create a well-rounded booty training routine. To effectively engage all three gluteal muscles, it's important to include a variety of exercises in your booty training program. Squats, lunges, deadlifts, and hip thrusts are all excellent choices that can help you build strength, improve your muscle tone, and create that enviable shapely appearance. By mixing up your routine and challenging your glutes from different angles, you can ensure that you're targeting all areas of your booty for optimal results. But booty training isn't just about the exercises you perform in the gym. To truly maximize your results, it's important to take a holistic approach that includes proper nutrition, rest, and recovery. Fueling your body with the right nutrients and allowing adequate time for muscle repair and growth can make a significant difference in your progress and help you avoid plateaus or setbacks. Incorporating mobility and flexibility work into your booty training routine is also essential for maintaining healthy, functional glutes. Stretching exercises can help improve your range of motion, reduce muscle tension, and prevent imbalances that can lead to injuries or suboptimal performance. By taking a well-rounded approach to your booty training, you can create a strong, flexible, and resilient set of glutes that will support you in all your physical endeavors. So, ladies, are you ready to unlock the full potential of your glutes? By mastering the art of booty training, you can not only achieve the shapely appearance you desire but also improve your overall physical performance, reduce your risk of injuries, and feel confident and empowered in your own body. Let's dive into the world of booty training together and discover just how amazing your glutes can be! Why Focus on Glute-Specific Exercises? (credits: GAINSBYBRAINS Channel) When it comes to booty training, many women wonder why they should focus on glute-specific exercises rather than relying on general lower body workouts . The answer lies in the unique importance of the gluteal muscles and the benefits that targeted training can provide. First and foremost, glute-specific exercises are essential for building strength and size in the gluteal muscles. While compound movements like squats and lunges do engage the glutes to some extent, they often prioritize other muscle groups like the quadriceps. By incorporating exercises that specifically target the glutes, such as hip thrusts and glute bridges, you can ensure that your booty training is as effective as possible. Moreover, targeted booty training can help address muscle imbalances and weaknesses that may be holding you back in your overall fitness journey. Many women tend to have weaker glutes compared to their quads or hamstrings, which can lead to issues like lower back pain, knee injuries, or poor posture. By focusing on glute-specific exercises, you can bring balance to your lower body and create a strong, stable foundation for all your movements. Glute-specific training is also crucial for enhancing athletic performance. Whether you're a runner, a cyclist, or a weightlifter, having strong, powerful glutes can make a significant difference in your speed, endurance, and overall power output. By incorporating targeted booty training into your routine, you can improve your ability to generate force and propel yourself forward, leading to better performance in your chosen sport or activity. In addition to the functional benefits, focusing on glute-specific exercises can also help you achieve the aesthetic results you desire. The glutes are a key component of a shapely, attractive lower body, and targeted training can help you build the round, firm booty of your dreams. By emphasizing exercises that isolate and activate the glutes, you can maximize your muscle growth and create a more pronounced, defined appearance. Another reason to prioritize glute-specific training is the potential for increased fat loss. The glutes are a large, metabolically active muscle group, which means they can help you burn more calories and fat both during and after your workouts. By incorporating challenging booty exercises into your routine, you can boost your metabolism, increase your overall calorie burn, and promote a leaner, more toned physique. Glute-specific training is also important for preventing and rehabilitating injuries. Weak or imbalanced glutes can contribute to a range of issues, from lower back strain to knee pain to IT band syndrome. By strengthening and stabilizing the glutes through targeted exercises, you can reduce your risk of these common injuries and promote better overall alignment and function in your lower body. Moreover, focusing on glute-specific exercises can be a great way to add variety and challenge to your booty training routine. Rather than relying on the same few compound movements over and over, incorporating a range of glute-specific exercises can help keep your workouts fresh , engaging, and effective. From single-leg variations to resistance band work to plyometric movements, there are countless ways to target and challenge your glutes in new and exciting ways. Finally, prioritizing glute-specific training can have a profound impact on your overall confidence and self-esteem. When you feel strong, capable, and proud of your physical achievements, it can translate into improved confidence in all areas of your life. By setting and achieving goals in your booty training journey , you can cultivate a sense of empowerment and self-assurance that radiates from the inside out. Top Exercises for Glutes (credits: Channel Krissy Cela) When it comes to booty training, choosing the right exercises is essential for achieving strong, well-defined glutes. The gluteal muscles, consisting of the gluteus maximus, medius, and minimus, require targeted workouts to ensure optimal strength and aesthetics. This section will explore the top exercises renowned for their effectiveness in booty training, addressing both functionality and form. Squats are often considered the king of booty training exercises. This compound movement engages the gluteus maximus, hips, thighs, and core, making it a crucial addition to any glute-focused training regimen. To maximize glute activation during squats, aim to squat down to at least parallel or slightly below while keeping the weight in your heels, ensuring that your glutes are driving the movement. Hip Thrusts have gained immense popularity in booty training due to their direct impact on the glutes. By positioning your shoulders on a bench and thrusting your hips upwards with weights placed on your lap, you create an intense contraction in the glute muscles. This exercise specifically targets the gluteus maximus, helping you achieve that coveted shapely booty while improving hip mobility and strength. Deadlifts, especially the Romanian deadlift, are excellent for engaging the entire posterior chain, with a strong emphasis on the glutes. This hinge movement involves bending at the hips while keeping the legs relatively straight, effectively activating the glutes and hamstrings. Incorporating deadlifts into your booty training routine can significantly enhance glute strength and muscular development. Lunges, in all their variations, are fantastic for booty training . Whether you're performing stationary lunges, walking lunges, or reverse lunges, this exercise targets the glutes, quads, and hamstrings. Lunges not only improve muscular balance and coordination but also stimulate the stabilizing muscles in the glutes, particularly the gluteus medius and minimus. Step-Ups are a simple yet effective booty training exercise. Using a bench or a step, this movement mimics everyday activities like climbing stairs, focusing on the gluteus maximus and hamstrings. Step-ups are beneficial for building strength and power in the glutes, with the added advantage of improving balance and stability. Glute Bridges are a foundational booty training exercise performed with the back on the ground, making them accessible for beginners. This exercise primarily targets the gluteus maximus, enhancing hip extension, which is vital for overall glute health and performance. Glute bridges are a staple in many booty training routines . Cable Kickbacks are a popular isolation exercise in booty training, particularly effective in targeting the gluteus maximus. By attaching a cable to your ankle and kicking back against the resistance, you can achieve a deep contraction in the glutes. This exercise is excellent for sculpting and defining the gluteal muscles, adding that extra pop to your booty. Bulgarian Split Squats are a challenging variation of the traditional squat that significantly targets the glutes. By elevating one foot on a bench behind you and squatting down with the other leg, you create an intense booty training workout for the gluteus maximus, along with the quads and hamstrings. This exercise is known for its ability to build strength and improve muscular imbalances. Incorporating these exercises into your booty training routine can lead to significant improvements in glute strength, shape, and functionality. Each exercise targets the glutes from different angles and intensities, ensuring a comprehensive workout for all three gluteal muscles. By focusing on these top booty training exercises, you can achieve a strong, well-defined posterior that not only looks impressive but also enhances your overall physical performance. How Incorporate Glute Exercises Into Your Routine (Credits: ATHLEAN-X™) Incorporating booty training into your fitness routine is essential for building a strong, well-rounded physique. The glutes are not only crucial for aesthetic appeal but also play a significant role in overall body strength, stability, and performance. This section will guide you through effective strategies to seamlessly integrate booty training exercises into your workout regimen , ensuring optimal development and functionality of the gluteal muscles. Starting with the basics, understanding the anatomy and function of the glutes is key to effective booty training. The glutes consist of three primary muscles: the gluteus maximus, medius, and minimus. Each plays a unique role in hip movement and stabilization. To target these muscles effectively, a variety of booty training exercises should be employed, focusing on movements that engage these muscles through their full range of motion. One effective booty training strategy is to begin your workout with compound glute exercises. Movements such as squats and deadlifts engage multiple muscle groups, including the glutes, and serve as an excellent foundation for your booty-focused training. Starting with these exercises ensures that your glutes are activated from the beginning, allowing for more effective engagement throughout the workout. Incorporating unilateral exercises, such as lunges and single-leg deadlifts, is another crucial step in booty training. These exercises target one side of the body at a time, helping to correct imbalances and further isolate the glute muscles. Unilateral movements are particularly effective for engaging the smaller glute muscles, like the gluteus medius and minimus, which are essential for hip stability and alignment. Dedicated glute activation exercises should also be a staple in your booty training routine. Movements like glute bridges and hip thrusts specifically target the gluteus maximus, the largest of the glute muscles. Performing these exercises early in your workout can help "wake up" the glutes, ensuring they are fully engaged in subsequent exercises. Varying your exercises and incorporating different equipment can also enhance your booty training. Utilizing resistance bands, dumbbells, barbells, and machines can introduce new challenges and stimuli to the glutes, promoting growth and strength. Exercises like banded walks or cable kickbacks add variety and can target the glutes from unique angles. Frequency and volume are crucial factors in integrating booty training exercises into your routine. For optimal results, aim to include glute-specific exercises at least two to three times per week. Adjusting the volume of work, through either the number of exercises, sets, or repetitions, depending on your fitness level and goals, is essential for continuous progress in your booty training journey. Progressive overload is a key principle in strength training and applies to booty training as well. Gradually increasing the resistance, volume, or intensity of your glute workouts over time will challenge the muscles, leading to growth and strength improvements. Tracking your workouts and making incremental adjustments ensures consistent progress in your booty training. Finally, recovery and nutrition play vital roles in the effectiveness of your booty training exercises. Adequate rest between glute workouts allows for muscle repair and growth, while proper nutrition supports recovery and provides the energy needed for optimal performance. Incorporating a balanced diet rich in protein, carbohydrates, and healthy fats will complement your booty training efforts, helping you achieve stronger, more defined glutes. By following these strategies and consistently applying them to your fitness routine, you can effectively incorporate booty training exercises that will enhance not only the aesthetics of your lower body but also its performance and strength. Remember, consistency is key, and with dedication to your booty training, the results will follow. See More Exercises: ⤵ Barbell Hack Squat exercise. Bodyweight Lunge exercise Barbell Sumo Squat exercise Dumbbell Good Morning exercise Dumbbell Walking Lunge Dumbbell Squat: Your Comprehensive Guide How To Do Reverse Lunges How To Do Good Morning Exercise Mastering Lateral Lunges for Stronger, More Agile Legs Single Leg Hip Thrust: Your Step-by-Step Guide Leg Press: Unleashing Leg Power Leg Extensions: The Ultimate Guide to Mastering Seated Leg Curl: Your Ticket to Sculpted Legs Bulgarian Split Squats: Mastering Leg Gains Russian Squat Program Dumbbell Thruster: Unleashing Full-Body Power Best Leg Workout Arnold Leg Workout How To Do The Leg Curl
- Circuit Training: A Dynamic Guide
Welcome to the dynamic world of circuit training, a high-octane fitness phenomenon that's reshaping how we think about exercise. Circuit training, a method where you rotate through a series of exercises with minimal rest, has surged in popularity across gyms and workout routines worldwide. This versatile and fast-paced workout not only caters to those on a tight schedule but also promises a full-body workout that's hard to beat. The allure of circuit training lies in its dual-power capability to bolster cardiovascular health while simultaneously enhancing muscle endurance. By engaging in a circuit, you're not just burning calories; you're embarking on a comprehensive conditioning journey that elevates your heart rate and challenges your muscles in every session. It's a workout that doesn't discriminate, offering scalable exercises that beginners can tackle with the same vigor as seasoned gym veterans. As we dive into the nuts and bolts of circuit training, you'll discover how to tailor a circuit that aligns with your fitness goals, the secrets behind crafting a routine that keeps you hooked, and the key strategies to prevent plateaus. Whether you're in pursuit of variety, efficiency, or just a fresh challenge, this guide will equip you with the knowledge to revolutionize your workout regimen. Stay tuned as we unpack everything you need to know to master circuit training, from foundational principles to pro tips for maximizing your workout. Prepare to sweat, sculpt, and soar to new heights of fitness efficiency. Let's get you primed for the circuit – your ultimate fitness game-changer awaits! Understanding Circuit Training Credits: nourishmovelove Circuit training, often hailed as a holistic workout program, marries the intensity of high-intensity interval training (HIIT) with the muscle-building prowess of resistance exercises. This fitness regimen is characterized by a series of exercises, or 'stations,' executed in quick succession, typically with little to no rest in between. Each station is designed to target different muscle groups, thereby ensuring a full-body workout within a condensed timeframe. The benefits of regular exercise are well encapsulated in circuit training as it blends both cardiovascular and strength elements, keeping the heart rate elevated throughout. This approach not only burns calories efficiently but also strengthens and tones the body, making it a multifaceted form of physical activity. Unlike traditional workouts that focus on one specific area of fitness—such as strength training in isolation or prolonged cardiovascular activities—circuit training introduces variety and intensity to a workout program. By engaging multiple muscle groups through a diverse range of movements, participants can avoid the common workout plateau and continue to see improvements in their fitness levels. The rapid transition between different exercises keeps the mind engaged and the body adapting, which is a cornerstone of the circuit training methodology. Tracing the origins of circuit training takes us back to the early 1950s, where it emerged as a method to efficiently train military personnel in the United Kingdom. It was designed to promote general fitness among soldiers by combining vigorous aerobic exercises with strength training, thereby preparing them for the physical challenges of military endeavors. Since then, circuit training has evolved and permeated the civilian fitness world due to its adaptability and effectiveness. The science underpinning the effectiveness of circuit training is robust, with studies showing significant improvements in cardiovascular health, muscle endurance, and metabolic rate. The structure of a circuit training session—oscillating between bursts of high-intensity effort and brief periods of rest or lower-intensity work—capitalizes on the principles of HIIT. This method is known to create an 'afterburn effect,' clinically referred to as excess post-exercise oxygen consumption (EPOC), which increases the rate at which the body burns calories even after the workout has concluded. Furthermore, the resistance exercises incorporated into circuit training are pivotal for building and maintaining lean muscle mass. As muscle tissue requires more energy to maintain than fat tissue, individuals with higher muscle mass often experience a more favorable body composition and metabolic rate. This synergy between cardiovascular exertion and resistance training not only enhances physical fitness but also supports better overall health, aligning with the widely advocated benefits of regular exercise. By integrating a diverse array of exercises that can be modified to suit various fitness levels and goals, circuit training is an inclusive physical activity. Whether it's jumping jacks, push-ups, or weightlifting, each component of the workout is selected to ensure that participants are constantly pushing their limits, yet able to perform exercises that are appropriate to their individual capabilities. In essence, circuit training stands out as a versatile and comprehensive workout program that caters to those seeking to maximize their time spent exercising while enjoying the wide-ranging benefits of regular physical activity. It challenges the conventional norms of working out by combining speed, power, and endurance into a singular, effective training session. As the circuit training session progresses, participants move from one station to the next, each transition maintaining the tempo and intensity that defines the program. This continuous movement is key to keeping the metabolic furnace burning, making the workout exceptionally effective for weight loss and cardiovascular conditioning. By maintaining minimal rest between stations, circuit training creates a condition that demands more from the cardiovascular system, similar to traditional aerobic exercises, but with the added benefit of resistance training. The versatility of circuit training also lies in its scalability. Exercises can be easily adjusted to cater to different levels of fitness, allowing both novices and seasoned athletes to challenge themselves within the same framework. This scalability ensures that the workout remains accessible yet challenging, as individuals can increase the intensity of the exercises or the duration of each station as their fitness improves. Moreover, the circuit training format fosters a sense of community and motivation that is sometimes absent in more solitary workout routines. The shared experience of moving through the workout stations often creates a camaraderie among participants, which can lead to increased motivation and a consistent commitment to the workout program. This social aspect is an invaluable byproduct of circuit training, as it can lead to higher levels of physical activity adherence. In the context of the benefits of regular exercise, circuit training is particularly effective due to its comprehensive nature. It addresses several components of fitness—cardiovascular endurance, muscular strength, flexibility, and body composition. Regularly engaging in such a multifaceted routine promotes overall health and well-being, echoing the recommendations of health professionals for a balanced approach to physical fitness. Circuit training's time efficiency is another significant advantage. In today's fast-paced world, finding time for regular physical activity can be challenging. Circuit training sessions are typically shorter than traditional workouts, often lasting no more than 30 to 45 minutes. Despite the shorter duration, the intensity and variety of exercises ensure that the time spent is maximized for health benefits. The emphasis on functional movements within circuit training also translates to real-world benefits. The exercises often mimic everyday movements, enhancing participants' ability to perform daily activities with greater ease and reduced risk of injury. This functional fitness aspect is increasingly valued as it leads to a higher quality of life and improved physical capability. Finally, the psychological benefits of regular exercise, such as improved mood and reduced stress, are also prevalent in circuit training. The fast pace and varied exercises can act as a distraction from stressors, providing a mental break that complements the physical exertion. The endorphin rush commonly associated with high-intensity exercise can create a sense of euphoria known as the "runner's high," which is often reported by those who engage in circuit training. In conclusion, circuit training stands as a testament to the ingenuity of fitness programming, offering a time-efficient, adaptable, and highly effective workout regimen. It encapsulates the benefits of regular exercise in a format that respects the individual's time and fitness level while promoting a healthier, more active lifestyle. Whether you're aiming to improve your cardiovascular health, build muscle, or simply enjoy the multifaceted advantages of physical activity, circuit training offers a pathway to achieving those goals with vigor and variety. The Components of a Circuit Training Workout Credits: julia.reppel A well-designed circuit training workout is a symphony of movement, strategically composed to ensure each part of the body is engaged and every aspect of fitness is challenged. To create this balanced physical odyssey, exercise selection is paramount. The chosen exercises must not only target the upper body, lower body, and core but also intersperse elements of cardiovascular exertion for a holistic effect. For instance, a circuit might include push-ups or dumbbell rows for upper body strength, squats or lunges for the lower body, planks or Russian twists for the core, and jumping jacks or high knees for cardio. This variety ensures that each circuit round provides a full-body workout, engaging different muscle groups and energy systems, which is crucial for the benefits of regular exercise. Timing and transition are the framework within which the intensity of circuit training is modulated. Typically, each exercise within a circuit is performed for a set duration—often ranging from 30 seconds to a minute—followed by a brief rest period or transition time of about 15 to 30 seconds before moving on to the next station. This brisk pace helps maintain an elevated heart rate throughout the session, fostering cardiovascular benefits while the muscles undergo strength training. It's a delicate balance that keeps the body in a state of motion and readiness, minimizing downtime but allowing for necessary recovery. Sequencing exercises for maximum impact is akin to constructing an intricate puzzle where each piece must fit perfectly to achieve the desired outcome. To maximize fat burning, it's beneficial to alternate between exercises that elevate the heart rate and those that allow for a slight recovery, effectively employing the principles of high-intensity interval training (HIIT). Muscle building is optimized by placing demanding resistance exercises early in the sequence when energy levels are highest, allowing for maximum effort and proper form. A strategic sequence might begin with a burst of cardio, such as burpees, followed by a strength exercise like squats, then moving to a core-focused movement, and concluding with a lower-intensity cardio exercise to allow for partial recovery while keeping the heart rate up. This sequence ensures that muscles are neither overworked nor under-stimulated, promoting an environment conducive to both fat loss and muscle gain within the framework of a circuit training session. Designing Your Circuit Training Routine Credits: julia.reppel esigning your circuit training routine can unlock the circuit training benefits of regular exercise, boosting both your health and fitness levels. Let’s delve into how to structure your circuit based on your experience, from beginner to advanced, ensuring each workout program is tailored to your needs. Beginner Circuits A beginner’s circuit should introduce new enthusiasts to the fundamentals of physical activity without overwhelming them. Here is a step-by-step guide to a simple circuit: Bodyweight Squats - Stand with feet shoulder-width apart and perform a basic squat for 30 seconds. Incline Push-ups - Use a sturdy table to perform push-ups for 30 seconds, reducing the strain on your upper body. Bent-over YTWLs - Without weights, mimic the letters with arm movements to improve posture for 30 seconds each. Glute Bridges - Lie on your back and lift your hips to strengthen your glutes for 30 seconds. Rest - Take a 30-second rest period to catch your breath and prepare for the next round. Repeat this circuit 2-3 times, focusing on form and technique to build a solid foundation. Intermediate Circuits Those with some fitness experience can handle a more challenging circuit that increases the intensity and incorporates light weights: Dumbbell Deadlifts - Hold light dumbbells and perform deadlifts for 45 seconds to target the lower back and hamstrings. Push-ups - Perform standard push-ups for 45 seconds to strengthen the chest and arms. Dumbbell Rows - Bent over with dumbbells to work the back muscles for 45 seconds on each side. Russian Twists - Hold a single dumbbell with both hands and twist your torso for 45 seconds, engaging the core. Short Rest - Allow for a 15-second rest period to maintain a higher intensity. Complete this circuit 3-4 times, gradually increasing the weight as you get stronger. Advanced Circuits For advanced individuals, an intense circuit with plyometrics and heavier weights can provide a significant challenge: Plyometric Box Jumps - Find a stable platform and perform box jumps for 60 seconds to enhance explosiveness. Kettlebell Swings - Swing a heavy kettlebell for 60 seconds to engage the entire posterior chain. Weighted Lunges - Holding heavier dumbbells at your sides, perform lunges for 60 seconds for each leg. Clap Push-ups - Introduce an explosive element to your push-ups for 60 seconds to target fast-twitch muscle fibers. Minimal Rest - Keep the rest periods to a bare minimum, around 10-15 seconds, to push endurance limits. This advanced circuit should be repeated 4-5 times, with the aim of increasing weights or reps as you progress. Equipment and Space Circuit training's adaptability is part of its appeal, requiring minimal equipment and space. For small spaces, focus on bodyweight exercises or those that use compact equipment like dumbbells and kettlebells. If you're limited to a small room or apartment, exercises such as jumping jacks, push-ups, squats, and crunches can be easily accommodated. This ensures that your workout program doesn't falter due to space limitations, allowing you to maintain consistent physical activity and enjoy the benefits of regular exercise. By customizing your circuit training routine to align with your fitness level and available resources, you can effectively integrate this form of physical activity into your lifestyle, ensuring you reap the full spectrum of benefits that regular exercise has to offer. Tips to Enhance Your Circuit Training Credits: NateBowerFitness Enhancing your circuit training with weights is a strategic method to up the ante of your workout intensity and muscle-building capacity. Introducing small free weights into your routine with exercises like lunges and squats adds a layer of resistance that can significantly boost strength gains. It's crucial to start with a comfortable weight that doesn't compromise your form and to progressively increase the load to continuously challenge your muscles. For those who prefer a less rigid approach, resistance bands offer a dynamic alternative, serving a dual purpose of providing resistance and assisting in exercises depending on how they're used. They can be looped around your thighs during squats or used for upper body exercises such as bicep curls and tricep extensions. To amplify calorie burn and enhance cardiovascular health, cardio elements can be seamlessly woven into your circuit. By interspersing energetic activities like jumping rope, executing high knees, or performing burpees between your strength exercises, you effectively transform your workout into a high-intensity interval training session. For those with a penchant for cardio, integrating short bursts of sprinting or using equipment such as a stationary bike for intense intervals can add a refreshing challenge to the circuit. Monitoring your progress is an integral part of any fitness journey. By meticulously logging details such as the exercises performed, the weight used, the number of reps, and your overall session sentiment, you create a valuable repository of data that reflects your journey. This practice can help in recognizing patterns, understanding plateaus, and celebrating improvements. As your fitness level advances, you might notice you're capable of increasing the number of reps or lifting heavier weights, or perhaps your endurance has improved, allowing you to sustain a higher intensity for longer durations. It's important to also periodically check in with objective measurements, be it body composition, fitness tests, or even how well your clothes fit, to gain a holistic view of your progress. Celebrating every improvement, no matter how small, serves as a motivational catalyst, propelling you towards your next set of fitness milestones. Maintaining a detailed log of your fitness journey is a critical component when it comes to circuit training. Whether you're using a traditional paper journal or a digital app, keeping track of workouts provides invaluable insights into your progress. It helps in recognizing patterns, understanding plateaus, and allows for the celebration of achievements. Over time, you may notice the ability to increase reps, up the weight in your sets, or that your endurance has improved, enabling you to sustain a higher intensity for longer periods. Don't overlook the less tangible aspects of progress, such as enhancements in the quality of movement, balance, and flexibility. Assessing overall well-being and energy levels can be just as revealing as more traditional physical metrics. Self-care and recovery are crucial aspects that should be monitored as well. Ensure you're allocating adequate time for muscle rest and recuperation, as this is as important as the workouts themselves for achieving optimal results. Circuit training is not just about the effort you put in during the workout but also about understanding and respecting your body, recognizing the signals it sends, and adjusting your routine as necessary to prevent injuries and promote healthy longevity in your training regime. By balancing all these elements, you'll establish a comprehensive training program that will not just transform your body but also strengthen your mind and enhance your overall health. This is what makes circuit training such a powerful tool for health and wellness maintenance. Overcoming Common Challenges Credits: NateBowerFitness Overcoming common challenges in circuit training is crucial to ensure continuous improvement and to maintain motivation. As with any fitness regimen, encountering obstacles is part of the journey. By addressing these challenges head-on, you can keep your workouts effective and your commitment strong. Avoiding boredom in your circuit training can be achieved through creativity and variation. Keep your sessions fresh by mixing up exercises, incorporating new equipment, or changing the environment. Introduce themed workouts or set mini-challenges to complete within the circuit. Music can be a powerful motivator, so consider crafting playlists that energize your routine. Additionally, partner workouts or group fitness classes can add a social element that keeps things interesting and engaging. Dealing with plateaus requires a strategic approach to push your body beyond its comfort zone. When progress seems to stall, it's essential to vary the intensity, volume, or type of exercise. Implementing progressive overload by increasing weights, adjusting rest periods, or adding more complex movements can stimulate muscle adaptation. Also, consider cross-training with different activities to challenge your body in new ways and provide a mental break from the routine. Safety considerations are paramount to ensure the longevity of your fitness journey. Maintaining proper form and technique is critical in preventing injuries, especially as you introduce new exercises or increase the intensity of your workouts. Take the time to learn the correct form, either through professional instruction or reliable fitness resources. Listen to your body and be aware of the difference between pushing your limits and pushing too far. Rest and recovery are also part of safety—ensure you're allowing your body adequate time to heal and adapt. In conclusion, overcoming the common challenges of circuit training involves a blend of innovation, strategic adjustments, and a commitment to safety. By keeping workouts fresh, pushing through plateaus with smart modifications, and prioritizing proper form and rest, you can continue to reap the benefits of circuit training while minimizing the risk of burnout or injury. This balanced approach will help to sustain both your physical progress and your enthusiasm for the journey ahead. Conclusion In conclusion, circuit training presents a dynamic and flexible approach to fitness that can cater to a variety of goals and preferences. We've discussed the importance of keeping workouts fresh to avoid boredom by infusing creativity into your routine, whether through new exercises, changing environments, or the inclusion of music and social elements. We've also explored strategies for overcoming plateaus, emphasizing the need to vary your training intensity and introduce new activities to continue making progress. Safety is a non-negotiable aspect of circuit training, and we've underscored the critical nature of proper form and technique. This not only ensures that you are getting the most out of your workouts but also that you are doing so without risking injury. Remember, listening to your body and integrating rest and recovery is a sign of strength, not weakness. Circuit training is a journey, and like any journey, it starts with a single step. I encourage you to begin at your own pace, respecting your body's limits while also challenging yourself to grow stronger. There's no one-size-fits-all in fitness, and the beauty of circuit training lies in its adaptability to your unique needs and circumstances. Now, I invite you to take the leap and start your circuit training adventure. Share your experiences, triumphs, and questions in the comment section below. Whether you're a seasoned athlete or just starting out, your story can inspire others, and you might find the motivation and support you're looking for right here in our community. Let's embark on this fitness journey together—your circuit awaits!
- 💉💥 Winstrol: The Ultimate Guide
Winstrol, also known by its chemical name stanozolol, has long been a subject of fascination and controversy in the world of sports and bodybuilding. This powerful anabolic steroid has gained notoriety for its performance-enhancing capabilities and its role in numerous high-profile doping scandals. First developed in the 1960s, Winstrol quickly became popular among athletes and bodybuilders due to its ability to promote lean muscle growth, enhance strength, and improve overall athletic performance without significant water retention. Its reputation for producing a "dry" and vascular appearance has made it a go-to choice for those seeking to achieve a chiseled physique. However, the use of Winstrol is not without its controversies and risks. As a controlled substance in many countries, including the United States, its use without a prescription is illegal. Furthermore, it is banned by most sports organizations worldwide, including the International Olympic Committee and professional sports leagues. Despite its illegal status and potential health risks, Winstrol continues to be used by some athletes and bodybuilders seeking to gain a competitive edge. This has led to ongoing debates about its efficacy, safety, and ethical implications in sports. In this comprehensive article, we will delve deep into the world of Winstrol, exploring its benefits, side effects, typical usage patterns, and the controversies surrounding it. We'll examine the science behind this potent steroid, discuss its impact on athletic performance, and address the legal and health considerations that come with its use. Whether you're an athlete, a fitness enthusiast, or simply curious about performance-enhancing substances, this article aims to provide a balanced and informative look at Winstrol. We'll separate fact from fiction, address common misconceptions, and provide the knowledge needed to make informed decisions about this powerful yet controversial substance. As we embark on this exploration of Winstrol, it's crucial to approach the topic with an open mind and a critical eye. While we'll discuss the potential benefits that have made Winstrol popular, we'll also shine a light on the serious risks and legal consequences associated with its use. Our goal is to present a comprehensive overview that allows readers to understand the full picture of what Winstrol is, how it works, and the implications of its use in sports and bodybuilding. Sumário: Introduction to Winstrol What is Winstrol? Benefits of Winstrol Side Effects and Risks of Winstrol Winstrol Cycles and Dosages in Sports Post Cycle Therapy (PCT) for Winstrol Winstrol in Different Sports Frequently Asked Questions (FAQ) Conclusion Disclaimer: This article is for informational purposes only and does not encourage or endorse the use of illegal substances. The use of anabolic steroids without a valid prescription is illegal and can cause serious health risks. Always consult with a qualified healthcare professional before considering the use of any performance-enhancing drugs. Introduction to Winstrol Winstrol, a name that resonates through gyms, locker rooms, and sports arenas worldwide, has long been a subject of intense debate and fascination in the realm of performance enhancement. This powerful anabolic steroid, known scientifically as stanozolol, has carved out a unique niche in the world of bodybuilding and athletics, earning both praise for its effectiveness and notoriety for its associated risks and legal implications. First synthesized in the 1960s, Winstrol quickly gained popularity among athletes and bodybuilders for its remarkable ability to enhance performance and sculpt the physique. Unlike many other anabolic steroids, Winstrol is renowned for its capacity to promote lean muscle growth and strength gains without the significant water retention often associated with other compounds. This characteristic has made it a favored choice for those seeking to achieve a dry, vascular appearance, particularly in sports where weight categories play a crucial role. The allure of Winstrol extends beyond just aesthetic benefits. Athletes across various disciplines have turned to this substance for its potential to boost speed, endurance, and overall athletic performance. From track and field to swimming, and even in strength-based sports, Winstrol has left an indelible mark on the landscape of competitive athletics. However, this widespread use has also led to numerous high-profile doping scandals, further fueling the controversy surrounding its use. It's crucial to understand that Winstrol is not a substance to be taken lightly. As a Schedule III controlled substance in the United States and a banned substance in most professional sports organizations worldwide, including the International Olympic Committee, its use without a valid prescription is illegal. This legal status, combined with the potential health risks associated with its use, places Winstrol at the center of ongoing ethical and medical debates. Despite the legal restrictions and health concerns, the underground use of Winstrol persists, driven by the promise of enhanced athletic performance and physical transformation. This continued use underscores the importance of comprehensive education about the substance, its effects, and the potential consequences of its misuse. In this extensive exploration of Winstrol, we will delve deep into every aspect of this controversial steroid. From its chemical composition and mechanism of action to its purported benefits and documented side effects, we aim to provide a thorough and balanced examination. We'll discuss typical usage patterns in sports and bodybuilding, explore the intricacies of post-cycle therapy, and address the legal landscape surrounding its use. Moreover, we'll tackle the burning questions that often arise in discussions about Winstrol. Is it truly as effective as its proponents claim? What are the short-term and long-term health implications? Are there safer alternatives that can provide similar benefits? By addressing these questions and more, we hope to equip readers with the knowledge needed to make informed decisions and understand the broader implications of Winstrol use in sports and society. As we embark on this comprehensive journey through the world of Winstrol, it's important to approach the topic with both curiosity and caution. While we'll examine the potential benefits that have made Winstrol a staple in some athletic circles, we'll also shine a light on the serious risks and ethical considerations that come with its use. Our goal is to present an unbiased, scientifically-grounded overview that allows readers to grasp the full complexity of Winstrol – its history, its effects, and its place in the ongoing dialogue about performance enhancement in sports. Whether you're an athlete, a fitness enthusiast, a healthcare professional, or simply someone interested in understanding the world of performance-enhancing substances, this article aims to provide valuable insights into Winstrol. By the end of this exploration, you'll have a comprehensive understanding of what Winstrol is, how it works, and the multifaceted implications of its use in the pursuit of athletic excellence and physical perfection. What is Winstrol? Winstrol is a synthetic anabolic steroid derived from dihydrotestosterone (DHT). This powerful compound has gained significant attention in the world of athletics and bodybuilding due to its unique properties and effects on the human body. To truly understand Winstrol, it's essential to delve into its chemical structure, historical development, and how it compares to other anabolic steroids. At its core, Winstrol is a modified form of testosterone, specifically engineered to enhance its anabolic (muscle-building) properties while reducing its androgenic (male hormone) effects. This modification gives Winstrol its distinctive characteristics, setting it apart from many other anabolic steroids. The chemical structure of Winstrol includes a unique pyrazol group attached to the androstane nucleus, which contributes to its stability and resistance to breakdown in the liver. This structural feature is crucial in understanding both its potency and its potential for hepatotoxicity. Historically, Winstrol was first developed in 1962 by Winthrop Laboratories, a subsidiary of Sterling Drug Inc. It was initially created for medical purposes, including the treatment of conditions such as anemia, hereditary angioedema, and muscle wasting diseases. The drug quickly gained FDA approval in 1962 for human use. However, its potential for performance enhancement was soon recognized, leading to its widespread adoption in the athletic community. What sets Winstrol apart from many other anabolic steroids is its ability to promote lean muscle growth and enhance strength without causing significant water retention or estrogenic side effects. This characteristic makes it particularly appealing to athletes in weight-class sports and bodybuilders seeking a defined, vascular appearance. Unlike steroids that aromatize (convert to estrogen) in the body, Winstrol does not contribute to the bloated appearance often associated with steroid use. Winstrol is available in two forms: oral tablets and an injectable aqueous suspension. The oral form is unique among anabolic steroids as it is one of the few that can be taken orally without significant loss of potency. This is due to its 17α-alkylation, a modification that allows it to survive first-pass metabolism in the liver. The injectable form, while less common, is favored by some users for its potentially reduced impact on liver function. Compared to other popular anabolic steroids like testosterone, Dianabol, or Trenbolone, Winstrol is often considered milder in terms of its overall anabolic effects. However, it's prized for its ability to increase strength and speed without adding significant bulk. This makes it particularly popular among athletes in sports where power-to-weight ratio is crucial, such as sprinting, swimming, and combat sports. In the body, Winstrol works by binding to androgen receptors, similar to other anabolic steroids. However, it also has the unique ability to reduce sex hormone-binding globulin (SHBG) levels. SHBG is a protein that binds to testosterone, reducing its bioavailability. By lowering SHBG levels, Winstrol can potentially increase the amount of free testosterone in the body, enhancing its overall anabolic effects. It's important to note that while Winstrol has legitimate medical uses, its use as a performance-enhancing drug is illegal without a prescription in many countries. The World Anti-Doping Agency (WADA) and most professional sports organizations have banned its use in competitive athletics. The detection of Winstrol in drug tests has led to numerous high-profile doping scandals over the years, further cementing its controversial status in the world of sports. Understanding Winstrol goes beyond just knowing its chemical structure or effects. It involves recognizing its place in the broader context of performance enhancement, its impact on athletic competition, and the ethical debates surrounding its use. As we continue to explore Winstrol in depth, we'll examine its benefits, risks, and the complex issues surrounding its use in sports and bodybuilding. Benefits of Winstrol for Athletes Winstrol has garnered significant attention in the athletic community due to its unique profile of benefits. While it's crucial to emphasize that the use of Winstrol for performance enhancement is illegal in most sports and carries potential health risks, understanding its purported benefits provides insight into why some athletes have been drawn to this controversial substance. One of the primary attractions of Winstrol for athletes is its ability to promote lean muscle growth without significant water retention. Unlike many other anabolic steroids that can cause a bloated appearance due to fluid retention, Winstrol is known for producing a dry, vascular look. This characteristic is particularly valuable in sports where weight categories are crucial, such as boxing, wrestling, and mixed martial arts. Athletes in these disciplines often seek ways to maximize strength and muscle mass while staying within their weight class, and Winstrol's properties align well with this goal. Strength enhancement is another key benefit attributed to Winstrol. Many users report significant increases in both overall strength and explosive power. This can translate to improved performance in a wide range of athletic activities, from sprinting and jumping to weightlifting. The strength gains associated with Winstrol are often described as "clean," meaning they come without the excessive bulk that might hinder performance in certain sports. This makes Winstrol particularly appealing to athletes in disciplines where power-to-weight ratio is critical, such as swimming, track and field, and gymnastics. Winstrol is also valued for its potential to enhance speed and agility. The increase in lean muscle mass, combined with reduced water retention, can lead to improvements in an athlete's speed and quickness. This benefit is especially prized in sports that require rapid movements and quick changes of direction, like soccer, basketball, and tennis. The ability to move faster without added bulk can provide a significant competitive advantage in many athletic scenarios. Another notable benefit of Winstrol is its reputation for improving muscle hardness and definition. This aesthetic effect is particularly sought after in bodybuilding and physique competitions. Winstrol can help athletes achieve a more chiseled, sculpted appearance, which is often desired on stage or in sports where physical appearance plays a role in judging or performance perception. Endurance athletes have also shown interest in Winstrol due to its potential to increase red blood cell production. A higher red blood cell count can enhance oxygen-carrying capacity in the blood, potentially leading to improved cardiovascular endurance. This effect could be beneficial in endurance-based sports like long-distance running, cycling, and swimming, where oxygen utilization is a key factor in performance. Winstrol's ability to reduce sex hormone-binding globulin (SHBG) levels in the body is another significant benefit for athletes. Lower SHBG levels can result in more free testosterone in the bloodstream, which can enhance the overall anabolic environment in the body. This can lead to better utilization of other anabolic hormones, potentially magnifying the effects of training and recovery. Recovery is another area where Winstrol is believed to offer benefits. Some athletes report faster recovery times between intense training sessions when using Winstrol. This could allow for more frequent or intense training, potentially leading to accelerated performance gains over time. It's important to note that Winstrol has also been used medically to treat certain conditions, such as hereditary angioedema and anemia. In these medical contexts, the benefits of Winstrol in promoting red blood cell production and protein synthesis are leveraged for therapeutic purposes. While these benefits may seem appealing, it's crucial to reiterate that the use of Winstrol for athletic performance enhancement is illegal in most sports and carries significant health risks. The potential benefits must be weighed against the legal consequences, ethical considerations, and potential short-term and long-term health effects. Furthermore, the effectiveness and safety of Winstrol can vary greatly depending on factors such as dosage, duration of use, individual physiology, and combination with other substances. What might be perceived as a benefit by one athlete could manifest as a serious side effect in another. In conclusion, while Winstrol offers a range of potential benefits that have made it attractive to some athletes – including lean muscle growth, strength enhancement, improved speed and agility, and aesthetic improvements – its use remains controversial and risky. As we continue to explore Winstrol, it's essential to consider these benefits in the context of the broader discussion about performance enhancement in sports, including the ethical implications and health consequences associated with its use. Side Effects and Risks of Winstrol While Winstrol (stanozolol) is often sought after for its performance-enhancing benefits, it's crucial to understand the significant side effects and risks associated with its use. These potential adverse effects range from mild discomforts to severe, life-threatening complications. As with any powerful anabolic steroid, the use of Winstrol carries substantial risks that must be carefully considered. One of the most concerning side effects of Winstrol is its impact on liver health. As an oral anabolic steroid, Winstrol is 17-alpha-alkylated, a modification that allows it to pass through the liver without being destroyed. However, this same property makes it potentially hepatotoxic. Prolonged use or high doses of Winstrol can lead to liver damage, including elevated liver enzymes, cholestatic jaundice, and in severe cases, liver failure. Athletes considering Winstrol use should be acutely aware of this risk, as liver health is crucial for overall wellbeing and athletic performance. Cardiovascular risks are another significant concern with Winstrol use. This steroid is known to negatively affect cholesterol levels, often decreasing high-density lipoprotein (HDL, or "good" cholesterol) while increasing low-density lipoprotein (LDL, or "bad" cholesterol). This shift in cholesterol balance can increase the risk of atherosclerosis, heart disease, and stroke. Additionally, Winstrol may contribute to an increase in blood pressure, further compounding cardiovascular risks. Hormonal imbalances are a common side effect of Winstrol use. Like many anabolic steroids, Winstrol can suppress the body's natural testosterone production. This suppression can lead to a range of symptoms, including decreased libido, erectile dysfunction, and testicular atrophy in men. In women, hormonal changes can cause virilization effects, such as deepening of the voice, increased body hair growth, and clitoral enlargement. These effects can be permanent, even after discontinuing Winstrol use. Joint and tendon issues are frequently reported by Winstrol users. Paradoxically, while Winstrol can increase muscle strength, it may simultaneously weaken connective tissues. This can lead to an increased risk of tendon ruptures and joint injuries, particularly when engaging in high-intensity or heavy-load activities. Athletes using Winstrol may find themselves more prone to injuries, which can significantly impact their training and performance. Skin problems are another common side effect of Winstrol use. Many users experience acne breakouts, which can be severe in some cases. The skin may also become oilier, and some individuals may develop male pattern baldness, especially if they are genetically predisposed to it. Psychological effects should not be overlooked when considering the risks of Winstrol. Some users report mood swings, increased aggression (often referred to as "roid rage"), and depression. These psychological changes can affect not only athletic performance but also personal relationships and overall quality of life. For female athletes, the risks of Winstrol use are particularly pronounced. In addition to the virilization effects mentioned earlier, women may experience menstrual irregularities, changes in breast size, and alterations in body fat distribution. These changes can be distressing and, in many cases, irreversible. It's important to note that the side effects of Winstrol can vary greatly depending on factors such as dosage, duration of use, individual physiology, and whether it's combined with other substances. What might be a minor side effect for one user could manifest as a severe complication in another. Long-term use of Winstrol can lead to additional health concerns. Prolonged suppression of natural testosterone production can result in hypogonadism, a condition where the body struggles to produce adequate levels of testosterone even after discontinuing steroid use. This can necessitate hormone replacement therapy and may have long-lasting effects on fertility and overall hormonal balance. The risk of dependency is another factor to consider. While Winstrol is not physically addictive in the same way as some recreational drugs, users can develop a psychological dependence on its effects. This can lead to continued use despite negative consequences, difficulty in stopping, and potential withdrawal symptoms when discontinuing use. It's crucial to emphasize that the use of Winstrol for performance enhancement is illegal in most sports and countries without a valid prescription. Beyond the health risks, users face potential legal consequences and the risk of disqualification from competitive sports if caught using this substance. In conclusion, while Winstrol may offer certain performance-enhancing benefits, these come at a potentially high cost to an athlete's health and wellbeing. The wide range of side effects and risks associated with Winstrol use – from liver damage and cardiovascular issues to hormonal imbalances and psychological effects – underscores the importance of informed decision-making in athletics. Athletes considering the use of any performance-enhancing substances should carefully weigh the potential benefits against these significant risks and consider safer, legal alternatives to achieve their athletic goals. Winstrol Cycles and Dosages in Sports The use of Winstrol (stanozolol) in sports, while illegal and potentially dangerous, follows certain patterns in terms of cycles and dosages. It's crucial to understand that this information is provided for educational purposes only, and the use of Winstrol without medical supervision is not recommended and is prohibited in most sports. Winstrol cycles typically range from 6 to 8 weeks, although some athletes may extend this to 10 weeks. The relatively short cycle length is due to Winstrol's potency and its potential for liver toxicity, especially in its oral form. Athletes often incorporate Winstrol into the latter part of their steroid cycles, particularly when preparing for competition, due to its ability to promote a lean, dry appearance. Dosages of Winstrol vary significantly between men and women, as well as between oral and injectable forms. For male athletes, oral Winstrol dosages typically range from 40 to 80 mg per day, with some advanced users reportedly using up to 100 mg daily. Injectable Winstrol is often used at slightly lower doses, usually between 50 to 100 mg every other day. It's important to note that higher doses increase the risk of side effects without necessarily providing proportional benefits. Female athletes, due to their increased sensitivity to androgens, typically use much lower doses of Winstrol. Oral dosages for women usually range from 5 to 10 mg per day, while injectable doses are often around 15 to 20 mg every other day. Even at these lower doses, women face a significant risk of virilization effects, which can be permanent. The practice of "stacking" Winstrol with other compounds is common among some athletes. Winstrol is often combined with other anabolic steroids to enhance its effects or to address some of its limitations. For instance, it might be stacked with testosterone to counteract the natural testosterone suppression caused by Winstrol. Other common stacking partners include Anavar for cutting cycles or Trenbolone for more aggressive muscle-building and fat loss. It's crucial to understand the differences between oral and injectable Winstrol. The oral form is 17-alpha-alkylated to survive first-pass liver metabolism, which contributes to its hepatotoxicity. Injectable Winstrol, while slightly less liver toxic, can cause significant discomfort at the injection site and is known for its painful administration. Athletes often structure their Winstrol cycles around their competition schedules. For instance, a bodybuilder might start a Winstrol cycle 6-8 weeks out from a competition to help achieve the lean, dry look desired on stage. Sprinters or swimmers might time their cycles to peak during important meets or tournaments. Post-cycle therapy (PCT) is a critical component following a Winstrol cycle. Because Winstrol suppresses natural testosterone production, a proper PCT protocol is essential to help restore hormonal balance and maintain gains. This typically involves the use of substances like Clomid or Nolvadex for several weeks after the Winstrol cycle ends. It's important to emphasize that the dosages and cycle lengths mentioned here are based on anecdotal reports and are not medically recommended or approved. The use of Winstrol, like any anabolic steroid, carries significant health risks, and these risks increase with higher doses and longer cycle lengths. Moreover, the effectiveness and safety of Winstrol can vary greatly between individuals. Factors such as age, gender, overall health, and concurrent use of other substances can all impact how an individual responds to Winstrol. What might be considered a "standard" dose for one athlete could be excessive and dangerous for another. The legality of Winstrol use in sports cannot be overstated. Its use is banned by all major sporting bodies, including the International Olympic Committee, and is illegal without a prescription in many countries. Athletes caught using Winstrol face not only health risks but also severe professional consequences, including disqualification, loss of titles, and damage to their reputation. In conclusion, while knowledge about Winstrol cycles and dosages is prevalent in certain athletic circles, it's crucial to approach this information with extreme caution. The potential performance benefits of Winstrol come with significant health risks and legal consequences. Athletes seeking to enhance their performance should prioritize legal, safe methods such as optimized training regimens, proper nutrition, and adequate recovery. Consultation with sports medicine professionals and coaches can provide safer, more sustainable approaches to improving athletic performance without resorting to banned substances like Winstrol. Post Cycle Therapy (PCT) for Winstrol Post Cycle Therapy, commonly referred to as PCT, is a critical phase following the use of anabolic steroids such as Winstrol (stanozolol). This process is designed to help the body recover its natural hormonal balance and mitigate potential side effects that can occur when discontinuing steroid use. While it's important to stress that the use of Winstrol without medical supervision is illegal and potentially dangerous, understanding PCT is crucial for harm reduction and educational purposes. The primary goal of PCT after a Winstrol cycle is to restore the body's natural testosterone production. Winstrol, like other anabolic steroids, suppresses the hypothalamic-pituitary-testicular axis (HPTA), which is responsible for the body's natural testosterone production. When an athlete stops using Winstrol, their body is often left in a state of low testosterone, which can lead to a range of negative effects including muscle loss, fat gain, decreased libido, and mood disturbances. A typical PCT protocol for Winstrol usually begins immediately after the cycle ends, as Winstrol has a relatively short half-life. The duration of PCT can vary but generally lasts between 4 to 6 weeks, depending on the length and intensity of the Winstrol cycle. Longer or more intense cycles may require extended PCT periods. The cornerstone of most PCT protocols following Winstrol use are Selective Estrogen Receptor Modulators (SERMs). The two most commonly used SERMs in PCT are Clomiphene Citrate (Clomid) and Tamoxifen Citrate (Nolvadex). These compounds work by blocking estrogen receptors in certain tissues, which signals the body to increase its production of luteinizing hormone (LH) and follicle-stimulating hormone (FSH). LH and FSH, in turn, stimulate the testes to produce more testosterone. A typical PCT protocol using SERMs might look like this: Weeks 1-2: Clomid 50mg daily or Nolvadex 40mg daily Weeks 3-4: Clomid 25mg daily or Nolvadex 20mg daily Some more advanced users might combine both Clomid and Nolvadex, although this approach is not necessary for most individuals and should only be considered under professional guidance. In addition to SERMs, some athletes incorporate human chorionic gonadotropin (hCG) into their PCT protocol. HCG mimics LH in the body and can help stimulate testosterone production more quickly. However, hCG use is more complex and carries its own risks, so it's often reserved for more severe cases of testosterone suppression or longer steroid cycles. Alongside pharmaceutical interventions, PCT for Winstrol should include lifestyle and dietary adjustments to support natural hormone production. This includes ensuring adequate intake of vitamins and minerals, particularly zinc and vitamin D, which play crucial roles in testosterone production. Consuming a diet rich in healthy fats, lean proteins, and complex carbohydrates can also support hormonal recovery. Proper sleep and stress management are equally important during PCT. Sleep is when the body produces much of its testosterone, so aiming for 7-9 hours of quality sleep per night is crucial. Stress management techniques such as meditation or yoga can help reduce cortisol levels, which can interfere with testosterone production. It's important to note that while PCT can help mitigate some of the negative effects of steroid use, it is not a guarantee against all potential health risks. Some effects of Winstrol, such as changes in lipid profiles or liver stress, may persist beyond the PCT period and require additional time and possibly medical intervention to fully resolve. Moreover, the effectiveness of PCT can vary greatly between individuals. Factors such as age, overall health, the duration and dosage of the Winstrol cycle, and whether other steroids were used concurrently can all impact how well an individual responds to PCT. Some users may find that their natural testosterone production recovers quickly, while others may struggle with low testosterone levels for an extended period, even with proper PCT. It's crucial to emphasize that PCT is not a solution that makes steroid use safe or legal. The best way to avoid the need for PCT is to abstain from using anabolic steroids like Winstrol in the first place. Athletes seeking to enhance their performance should focus on legal and safe methods such as optimizing their training regimen, nutrition, and recovery strategies. For those who have used Winstrol or other anabolic steroids, seeking professional medical advice is crucial. A healthcare provider can conduct necessary blood tests to assess hormone levels and overall health, and can provide personalized guidance on the most appropriate PCT protocol. In conclusion, while Post Cycle Therapy is a critical component for those who have used Winstrol, it should not be viewed as a green light for steroid use. The complexities and potential risks associated with both steroid use and PCT underscore the importance of prioritizing natural, legal methods for athletic enhancement. Understanding PCT is part of a broader educational approach to harm reduction, but the safest approach remains avoiding the use of performance-enhancing drugs altogether. Winstrol in Different Sports Winstrol, known scientifically as stanozolol, has gained notoriety across a wide spectrum of sports due to its unique properties and perceived performance-enhancing effects. While it's crucial to emphasize that the use of Winstrol is illegal in professional and amateur sports, understanding its prevalence in different athletic disciplines provides insight into the challenges facing modern sports and anti-doping efforts. In the realm of bodybuilding, Winstrol has long been a popular choice among competitors. Its ability to promote lean muscle mass without significant water retention makes it particularly attractive during the cutting phase of competition preparation. Bodybuilders often incorporate Winstrol into their regimens to achieve a more defined, vascular appearance on stage. The steroid's reputation for enhancing muscle hardness and definition aligns well with the aesthetic goals of bodybuilding competitions. However, it's important to note that the use of Winstrol, like all anabolic steroids, is strictly prohibited in natural bodybuilding competitions and carries significant health risks. Track and field athletics have seen numerous high-profile cases involving Winstrol use. Sprinters and jumpers, in particular, have been known to turn to this steroid for its potential to increase speed and explosive power without adding excessive bulk. The infamous case of Ben Johnson at the 1988 Seoul Olympics, where he tested positive for stanozolol after winning the 100-meter sprint, brought Winstrol into the global spotlight and forever changed the landscape of doping in athletics. Since then, anti-doping authorities have become increasingly vigilant in testing for Winstrol and other performance-enhancing substances in track and field events. In swimming and other water sports, Winstrol has been sought after for its ability to enhance strength and speed without significantly increasing body weight. The lean muscle gains associated with Winstrol use can be particularly advantageous in sports where power-to-weight ratio is crucial. Swimmers may perceive benefits in both sprint events, where explosive power is key, and in longer distances, where the increased red blood cell production attributed to Winstrol could potentially enhance endurance. Combat sports, including boxing, mixed martial arts, and wrestling, have also seen instances of Winstrol use. Athletes in these disciplines often need to balance strength and power with weight management, making Winstrol's properties appealing. The steroid's reputation for increasing strength without substantial weight gain can be particularly attractive to fighters trying to stay within specific weight classes while maximizing their power output. In the world of baseball, Winstrol gained infamy during the "steroid era" of the late 1990s and early 2000s. Several high-profile players were implicated in Winstrol use, drawn to its potential for enhancing bat speed and overall athletic performance without the dramatic muscle mass increases associated with some other steroids. The subsequent crackdown on performance-enhancing drugs in baseball has led to more stringent testing protocols, but the legacy of Winstrol use continues to impact discussions about records and achievements from that era. Endurance sports, such as cycling and long-distance running, have not been immune to Winstrol use. While it might seem counterintuitive for endurance athletes to use a steroid often associated with strength and power, Winstrol's potential to increase red blood cell production could theoretically enhance oxygen-carrying capacity and endurance. However, the cardiovascular risks associated with Winstrol use make it particularly dangerous for athletes in these high-cardio-demand sports. It's crucial to understand that the use of Winstrol in any sport not only violates anti-doping regulations but also poses significant health risks to athletes. The short-term performance gains that may be achieved through Winstrol use come at the cost of potential long-term health consequences, including liver damage, cardiovascular issues, and hormonal imbalances. Moreover, the ethical implications of Winstrol use in sports cannot be overstated. It undermines the principles of fair competition, potentially giving users an unfair advantage over clean athletes. This not only distorts the integrity of sporting achievements but also puts pressure on other athletes to consider using performance-enhancing substances to remain competitive. Sports governing bodies and anti-doping agencies have continually evolved their testing methods to detect Winstrol and other prohibited substances. The World Anti-Doping Agency (WADA) includes stanozolol on its list of prohibited substances, and athletes caught using it face severe penalties, including disqualification, loss of medals or titles, and lengthy bans from competition. In conclusion, while Winstrol has been used across a wide range of sports for its perceived performance-enhancing effects, its use represents a significant challenge to the integrity of athletic competition. The prevalence of Winstrol in different sports underscores the ongoing need for robust anti-doping measures, athlete education, and a cultural shift towards valuing clean, fair competition. As our understanding of the long-term health consequences of steroid use continues to grow, it becomes increasingly clear that the risks of using substances like Winstrol far outweigh any potential short-term gains in athletic performance. Frequently Asked Questions (FAQ) In this section, we'll address some of the most common questions surrounding Winstrol (stanozolol), providing clear and comprehensive answers to help demystify this controversial anabolic steroid. It's crucial to approach this information with the understanding that Winstrol use for performance enhancement is illegal and potentially dangerous. What exactly is Winstrol and how does it work? Winstrol, scientifically known as stanozolol, is a synthetic anabolic steroid derived from dihydrotestosterone (DHT). It works by binding to androgen receptors in the body, promoting protein synthesis and enhancing nitrogen retention in muscles. This leads to increased muscle growth and strength. Additionally, Winstrol has the unique ability to reduce sex hormone-binding globulin (SHBG) levels, which can increase the bioavailability of other hormones in the body. Is Winstrol legal? Winstrol is a controlled substance in many countries, including the United States, where it's classified as a Schedule III drug. Its use without a valid prescription is illegal. In the context of sports, Winstrol is banned by all major sporting bodies and is prohibited both in and out of competition by the World Anti-Doping Agency (WADA). What are the main benefits athletes seek from using Winstrol? Athletes often turn to Winstrol for its ability to promote lean muscle growth without significant water retention. It's valued for enhancing strength and speed without adding excessive bulk, making it popular in sports where power-to-weight ratio is crucial. Some users report improved muscle hardness and vascularity, which is particularly appealing in bodybuilding. What are the most common side effects of Winstrol? Winstrol can cause a range of side effects, including liver toxicity, especially with oral use, cardiovascular issues such as negative changes in cholesterol levels, joint pain, acne, hair loss, and mood changes. In men, it can lead to testicular atrophy and decreased natural testosterone production. Women face the risk of virilization effects, including deepening of the voice and increased body hair growth. How long does Winstrol stay in your system? The detection time for Winstrol can vary depending on factors such as dosage, duration of use, and individual metabolism. Generally, it can be detected in urine tests for up to 2 months after the last use. However, more advanced testing methods may detect metabolites for even longer periods. Can Winstrol be used safely? While Winstrol has legitimate medical uses under close physician supervision, its use for performance enhancement is not considered safe. The potential health risks, combined with its illegal status in sports, make it a dangerous choice for athletes. There is no completely safe way to use Winstrol for performance enhancement. How does Winstrol compare to other anabolic steroids? Winstrol is often considered milder than some other anabolic steroids in terms of muscle mass gains. However, it's particularly valued for its ability to increase strength and speed without significant weight gain. Unlike many steroids, Winstrol doesn't convert to estrogen in the body, which reduces the risk of estrogenic side effects like gynecomastia. What is the typical dosage and cycle length for Winstrol? While we don't endorse its use, typical cycles reported by users range from 6 to 8 weeks. Dosages vary widely, with oral doses for men often ranging from 40 to 80 mg per day, and for women, much lower at 5 to 10 mg daily. Injectable Winstrol is typically used at slightly lower doses. It's crucial to emphasize that there is no safe dosage for non-medical use. Is Post Cycle Therapy (PCT) necessary after using Winstrol? Yes, PCT is crucial after a Winstrol cycle to help restore natural hormone production. Typical PCT protocols involve the use of Selective Estrogen Receptor Modulators (SERMs) like Clomid or Nolvadex for 4-6 weeks following the cycle. Can Winstrol be detected in drug tests? Yes, Winstrol can be detected in standard drug tests used in sports. Its metabolites can be identified in urine samples, and more advanced testing methods can detect its use even after the standard detection window. Are there legal alternatives to Winstrol? There are numerous legal supplements marketed as alternatives to Winstrol, often containing natural ingredients purported to support lean muscle growth and performance. However, these cannot replicate the effects of anabolic steroids. The safest and most effective approach to enhancing athletic performance remains a combination of proper training, nutrition, and recovery. In conclusion, while Winstrol has been a topic of interest in the athletic community for its potential performance-enhancing effects, it's crucial to understand the significant legal and health risks associated with its use. Athletes and fitness enthusiasts should prioritize safe, legal methods for improving their performance and physique. Consulting with qualified healthcare professionals and certified trainers is always the best approach for achieving athletic goals safely and ethically. Conclusion As we conclude our comprehensive exploration of Winstrol (stanozolol), it's crucial to reflect on the multifaceted nature of this controversial anabolic steroid and its impact on the world of sports and athletics. Throughout this article, we've delved into the intricate details of Winstrol, from its chemical composition and mechanisms of action to its perceived benefits, risks, and legal status. This thorough examination serves not only to inform but also to underscore the complex ethical and health considerations surrounding its use. Winstrol, with its unique properties that promote lean muscle growth and enhance athletic performance without significant water retention, has undeniably left its mark on various sports disciplines. From bodybuilding to track and field, swimming to combat sports, the allure of Winstrol's potential benefits has tempted athletes across the spectrum. Its ability to increase strength and speed without adding excessive bulk has made it particularly appealing in sports where power-to-weight ratio is paramount. However, the potential performance gains associated with Winstrol come at a steep price. The health risks are significant and cannot be overstated. Liver toxicity, cardiovascular issues, hormonal imbalances, and a host of other side effects pose serious threats to an athlete's short-term and long-term well-being. The psychological impacts, including mood swings and potential dependency, add another layer of concern. For female athletes, the risk of irreversible virilization effects presents a particularly daunting challenge. Moreover, the legal ramifications of Winstrol use extend far beyond the realm of personal health. As a controlled substance in many countries and a banned substance in virtually all competitive sports, the use of Winstrol carries severe legal and professional consequences. Athletes caught using this steroid face not only disqualification and loss of achievements but also damage to their reputation and career prospects. The integrity of sports as a whole suffers when performance-enhancing drugs like Winstrol distort the playing field. The prevalence of Winstrol in doping scandals over the years has led to increased scrutiny and more sophisticated testing methods. Sports governing bodies and anti-doping agencies continue to evolve their approaches to detect and deter the use of Winstrol and other prohibited substances. This ongoing battle underscores the importance of education and prevention in combating doping in sports. It's essential to recognize that the allure of quick gains through substances like Winstrol often overshadows the value of hard work, dedication, and natural talent in athletic achievement. The most sustainable and rewarding path to athletic excellence lies in optimizing training techniques, nutrition, and recovery strategies. These methods not only enhance performance legally and safely but also contribute to an athlete's overall health and well-being. For those who have used Winstrol or are considering its use, it's crucial to understand the importance of proper medical guidance. The complexity of post-cycle therapy and the potential for long-term health effects necessitate professional medical oversight. However, the best approach remains abstaining from the use of performance-enhancing drugs altogether. As we move forward, the conversation around Winstrol and similar substances must continue to evolve. It's imperative that athletes, coaches, sports organizations, and the public at large engage in open and honest discussions about the pressures and temptations in competitive sports. Fostering a culture that values fair play, natural talent, and ethical competition is essential in creating a sporting environment where the use of substances like Winstrol becomes not just illegal, but unthinkable. In conclusion, while Winstrol has played a significant role in the history of performance enhancement in sports, its risks far outweigh any potential benefits. The future of athletics lies not in the pursuit of artificial enhancements, but in the celebration of human potential achieved through legitimate means. As we continue to push the boundaries of human performance, let it be through innovation in training, nutrition, and recovery, rather than through the use of dangerous and illegal substances. The story of Winstrol serves as a powerful reminder of the ongoing challenges in maintaining the integrity of sports and the importance of prioritizing athlete health and safety. It is our collective responsibility – as athletes, fans, and members of the sporting community – to champion clean competition and to support those who choose to pursue their athletic dreams through dedication, skill, and natural ability. Only then can we truly celebrate the remarkable achievements of human athleticism in its purest form. Referências Pahuja M, Chhabra P. Winstrol. [Updated 2021 Mar 1]. In: StatPearls [Internet]. Treasure Island (FL): StatPearls Publishing; 2021 Jan-. Available from: https://www.ncbi.nlm.nih.gov/books/NBK564501/ Caraci F, Pistarà V, Corsaro A, et al. Neurotoxicity of anabolic androgenic steroids: morphological and molecular imaging studies. Life Sci. 2011 May 23;89(21-22):770-7. doi: 10.1016/j.lfs.2011.08.018. Epub 2011 Aug 24. PMID: 21884759. Hartgens F, Kuipers H. Effects of androgenic-anabolic steroids in athletes. Sports Med. 2004;34(8):513-54. doi: 10.2165/00007256-200434080-00003. PMID: 15248788. Geyer H, Parr MK, Koehler K, Mareck U, Schänzer W, Thevis M. Nutritional supplements cross-contaminated and faked with doping substances. J Mass Spectrom. 2008 Jan;43(3):313-21. doi: 10.1002/jms.1341. PMID: 18205110. Dawson RT. Managing the side effects of anabolic steroids. Curr Sports Med Rep. 2007 Jan;6(1):16-22. doi: 10.1007/s11932-007-0005-5. PMID: 17215577. Anavar for Women Top 5 steroids for weight loss Top 6 Steroids for Women - A Comprehensive Guide Top 5 Steroids for Your First Cycle SARMS: COMPLETE AND ULTIMATE GUIDE FOR BEGINNERS Novaldex: Uses, Side Effects, Dosage, and Interactions Arimidex: Everything You Need to Know About Clomid: Everything You Need to Know About Testolone (RAD-140): A Comprehensive Guide Nandrolona: A Powerful Steroid Turinabol: Exploring the Benefits, Side Effects, and Alternatives HGH: The Potential Side Effects MK-2866 (Ostarine): Benefits, Side Effects, and Considerations Anavar: Discover 10 benefits of this anabolic steroid Winstrol Cycle: The Ultimate Guide Anastrozole: Benefits, Side Effects, and Uses Sustanon 250: Everything You Need to Know Trenbolone: The Ultimate Guide to This Powerful Steroid Testosterone Cypionate Cycle: Beginner's Guide Anavar Side Effects: The Ultimate Guide Deca-Durabolin: The Pros and Cons of This Powerful Steroid Proviron: Complete Guide Primobolan: Steroid for Lean Muscle Gains Dianabol: Ultimate Guide Anadrol: The Ultimate Guide to this Powerful Steroid Equipoise: Understanding Dosages and Side Effects for Safe Use Testosterone Undecanoate: What You Need to Know Testosterone Cypionate: Dosage and Cycle Length Recommendations Testosterone Enanthate: Cycles, Dosage and Benefits Testosterone Propionate: Complete Guide Wolf Tattoo: Unleashing the Wild and Free Nipple Tattoos: A Comprehensive Guide to Areola Reconstruction and Decorative Designs Polynesian Tattoo: A Comprehensive Guide Hip Tattoos: The Ultimate Guide to Choosing and Caring for Your Sexy Hip Ink Magic Tattoos: Enchanting Designs for Body Art Enthusiasts Divergent Tattoos: A Comprehensive Guide to Choosing, Placing, and Caring for Your Ink Fine Line Tattoos: Everything You Need to Know Head Tattoos: Bold Designs and Placement Ideas Rabbit Tattoos
- Dumbbell Squat: Proper Form, Benefits, Variations, and Mistakes
Welcome to a journey that's about to transform your leg day routine – the Squat with Dumbbells. In the realm of strength training and functional fitness, squats reign supreme, and when you introduce dumbbells into the equation, the game gets even more dynamic. The squat, a fundamental compound movement, is a cornerstone of lower body development. It engages multiple muscle groups simultaneously, fostering strength, stability, and flexibility. Now, imagine supercharging this foundational exercise by incorporating dumbbells. In this guide, we'll explore the nuances of the Squat with Dumbbells – a versatile and effective variation that offers a fresh perspective on traditional squatting. Whether you're a seasoned fitness enthusiast or just embarking on your journey, this variation holds the potential to elevate your leg day experience. Dumbbells introduce an extra layer of challenge and engagement. They require enhanced stability and control, activating stabilizing muscles and encouraging a more comprehensive recruitment of your lower body and core. The result? A well-rounded leg day that not only builds strength but also enhances balance and coordination. Get ready to delve into the specifics – from the right setup to perfecting your form, exploring variations, and understanding the benefits. The Squat with Dumbbells is more than an exercise; it's a gateway to unlocking the full potential of your lower body strength and functional fitness. Let's dive in and sculpt those legs while embracing the power of the Squat with Dumbbells. Your leg day will never be the same again! Table of Contents: What is the Dumbbell Squat Exercise Muscles Worked in Dumbbell Squat How to Do the Dumbbell Squat Benefits of the Dumbbell Squat Variations of Dumbbell Squats Frequently Asked Questions About This Exercise Conclusion What is the Dumbbell Squat Exercise The Dumbbell Squat is a fundamental compound exercise that combines the muscle-building power of traditional squats with the versatility and accessibility of dumbbell training. At its core, this exercise involves holding one or more dumbbells while performing a squatting movement, lowering your hips toward the ground and then returning to a standing position. What makes the dumbbell squat particularly brilliant is its incredible accessibility . Unlike barbell squats that require a squat rack, safety bars, and often a spotter, dumbbell squats can be performed virtually anywhere with minimal equipment. All you need is a set of adjustable dumbbells and enough space to move freely. The exercise primarily targets your quadriceps, glutes, and hamstrings while simultaneously engaging your core, calves, and upper body stabilizers. This makes it one of the most efficient exercises you can perform for total-body strength and muscle development. The beauty of dumbbell squats lies in their versatility of loading positions . You can hold dumbbells at your sides, at shoulder height (front-loaded), or even overhead, each variation creating different challenges and muscle emphasis. This adaptability makes dumbbell squats suitable for everyone from complete beginners to advanced athletes. Unlike barbell squats that place the load directly on your spine, dumbbell squats distribute the weight more evenly throughout your body, often making them more comfortable for people with back sensitivities or mobility limitations. The reduced spinal compression is a significant advantage for many lifters. The movement pattern of the dumbbell squat is fundamentally the same as any squat - you initiate by pushing your hips back, bend your knees to lower your body, and then drive through your heels to return to standing. However, the dumbbell loading creates unique stability challenges that can actually improve your overall movement quality and body awareness. For those serious about maximizing their dumbbell squat performance, proper nutrition becomes essential. Optimum Nutrition Gold Standard Whey Protein provides the high-quality protein necessary for muscle recovery and growth when combined with consistent training. To see perfect dumbbell squat technique in action, you can watch detailed demonstrations by searching "dumbbell squat proper form" on YouTube. Muscles Worked in Dumbbell Squat: The Dumbbell Squat is a powerhouse exercise that engages a multitude of muscle groups, making it a vital component of any comprehensive strength training routine. Here's an explanation of the primary muscle groups involved: Quadriceps (Front Thigh Muscles): The quadriceps are the prime movers in the Dumbbell Squat. They are responsible for extending the knee joint as you rise from the squatting position. Strong quadriceps play a pivotal role in lower body strength and overall athletic performance. Hamstrings (Rear Thigh Muscles): The hamstrings work in concert with the quadriceps during the Dumbbell Squat. They assist in knee extension and hip flexion, contributing to the overall power generated during the exercise. Glutes (Buttocks): The gluteal muscles, including the gluteus maximus, are heavily engaged during the Dumbbell Squat. They are responsible for hip extension and play a crucial role in maintaining an upright posture as you squat down and rise back up. Strong glutes contribute to hip stability, posture, and lower body power. Lower Back (Erector Spinae): The lower back, particularly the erector spinae muscles, plays a vital role in maintaining an erect and stable posture during the Dumbbell Squat. These muscles are responsible for spinal extension and support the entire back while providing core stability. Core Stability: The core muscles, including the rectus abdominis, obliques, and transverse abdominis, are engaged to stabilize your spine and pelvis during the Dumbbell Squat. A stable core not only ensures proper form but also reduces the risk of injury. The Dumbbell Squat's comprehensive engagement of the quadriceps, hamstrings, glutes, and lower back leads to a powerful lower body workout. Additionally, the exercise enhances core stability, making it a full-body movement that can significantly impact your overall strength and stability. Incorporating Dumbbell Squats into your fitness routine can help you develop well-rounded lower body strength while simultaneously contributing to your overall athletic performance and . How to Do the Dumbbell Squat: (credits: Testosterone Nation) Starting Position and Dumbbell Selection: Begin by selecting the appropriate dumbbell weight. For beginners, it's advisable to start with a lighter weight to perfect your form. Stand with your feet shoulder-width apart, with your toes pointed slightly outward. Hold a dumbbell in each hand, with your arms extended down by your sides, palms facing inward. This is your starting position. Initiating the Squat: Inhale deeply, engage your core, and maintain a neutral spine (a straight line from head to tailbone). Initiate the squat by bending at your hips and knees simultaneously. Imagine sitting back into an imaginary chair. Keep your chest up, shoulders back, and your gaze forward as you descend. This ensures a straight and stable upper body. Squatting Depth: Continue to lower your body until your thighs are parallel to the ground or reach a depth that is comfortable for your flexibility. Ideally, aim for a full range of motion. Ensure your knees are aligned with your toes and do not collapse inward. This helps prevent undue stress on the knee joints. Ascent and Exhalation: Exhale as you push through your heels to return to the starting position. Imagine driving your hips forward and upward. Keep your core engaged throughout the ascent to stabilize your spine. Repeat and Maintain Form: Perform the desired number of repetitions, ensuring that you maintain proper form throughout the exercise. Focus on a controlled movement pattern rather than speed. This emphasizes muscle engagement and minimizes the risk of injury. Tips for Proper Form: Choose dumbbell weights that challenge you but allow you to maintain proper form. As you become more comfortable, gradually increase the weight. Keep your heels flat on the ground throughout the squat. Maintain a natural arch in your lower back. Avoid excessive rounding or arching of the spine. Do not let your knees go past your toes during the descent. Ensure that your knees track in line with your feet, avoiding inward collapse. Proper form is crucial when performing the Dumbbell Squat to maximize its benefits and reduce the risk of injury. Start with a lighter weight and focus on mastering the technique before progressing to heavier weights. A neutral spine, proper squatting depth, and controlled movement are key to a safe and effective Dumbbell Squat. Benefits of the Dumbbell Squat: Incorporating dumbbell squats into your workout routine offers a wealth of advantages that extend beyond the gym. Here's a closer look at the numerous benefits: Leg and Core Strength: Dumbbell squats are an exceptional exercise for building leg strength, targeting the quadriceps, hamstrings, and gluteal muscles. These muscles are essential for everyday movements like walking, climbing stairs, and standing up from a seated position. Additionally, the squat engages the core muscles, promoting abdominal and lower back strength. A strong core enhances stability and supports good posture. Muscle Growth : If muscle growth is your goal, dumbbell squats are an excellent choice. The exercise places significant resistance on the lower body, leading to muscle hypertrophy (growth) over time. By progressively increasing the dumbbell weight and focusing on proper form, you can sculpt shapely and powerful legs. Improved Balance: Dumbbell squats require balance and coordination as you stabilize your body during the movement. This not only strengthens the muscles but also enhances your overall balance and proprioception (awareness of your body's position in space). Improved balance can reduce the risk of falls and injuries, especially as you age. Functional Fitness: Beyond the aesthetic benefits, dumbbell squats have practical applications in daily life. Think about how often you need to lift, carry, or support weight with your lower body. The strength and stability gained from dumbbell squats can make everyday activities easier, whether it's picking up groceries, moving furniture, or playing with your kids. Calorie Burn and Metabolism Boost: Dumbbell squats are a compound exercise that engages multiple muscle groups simultaneously. This increases your heart rate and burns calories effectively, making them a valuable addition to fat loss or conditioning workouts. Additionally, strength training, like dumbbell squats, can boost your metabolism, helping you burn more calories even at rest. Injury Prevention: A well-executed dumbbell squat encourages proper body mechanics, which can reduce the risk of lower back and knee injuries. Strengthening the muscles around these vulnerable areas can provide additional support and reduce the likelihood of strains and sprains. Incorporating dumbbell squats into your fitness routine is a holistic approach to building strength, enhancing muscle definition, and improving overall functional fitness. The benefits extend far beyond the gym, helping you lead a healthier and more active life while reducing the risk of injuries and improving your quality of life. Variations of Dumbbell Squats The dumbbell squat offers an incredible array of variations that can target different muscle groups, challenge your stability in unique ways, and accommodate various fitness levels and equipment limitations. Goblet Squat The Goblet Squat is arguably the most popular and beginner-friendly dumbbell squat variation. You hold a single dumbbell vertically against your chest, cupping one end with both hands. This front-loaded position naturally encourages an upright torso and helps you maintain proper squat mechanics. The goblet position is particularly effective for teaching proper squat depth and hip mobility. The counterbalance effect of the front-loaded weight makes it easier to achieve full depth while maintaining balance. For this variation, a CAP Barbell Rubber Hex Dumbbell Set provides excellent grip and durability. Dumbbell Front Squat The Dumbbell Front Squat involves holding two dumbbells at shoulder height, resting them on your deltoids with your elbows pointing forward. This variation closely mimics the barbell front squat and places significant emphasis on your quadriceps and core stability. This position demands excellent upper body strength and mobility to maintain proper posture throughout the movement. The front-loaded position also reduces the stress on your lower back compared to back-loaded variations. Dumbbell Sumo Squat The Dumbbell Sumo Squat is performed with a wider stance and toes pointed outward at approximately 45 degrees. You typically hold a single dumbbell with both hands, letting it hang between your legs. This wider stance places greater emphasis on your inner thighs (adductors) and glutes. The sumo variation is excellent for people with limited ankle mobility or those who want to target their glutes more specifically. Bowflex SelectTech Adjustable Dumbbells are perfect for this variation as you can easily adjust the weight as you progress. Single-Arm Dumbbell Squat This unilateral loading variation involves holding a single dumbbell in one hand while squatting. The uneven loading creates significant core stability challenges and helps identify and correct strength imbalances between sides of your body. You can hold the dumbbell at your side, at shoulder height, or even overhead for increased difficulty. This variation is excellent for athletes who need unilateral strength and stability for their sport. Dumbbell Overhead Squat The Dumbbell Overhead Squat is an advanced variation where you hold one or two dumbbells directly overhead with arms fully extended throughout the entire squatting movement. This exercise demands exceptional shoulder mobility, core stability, and overall body control. This variation serves as both a strength exercise and a mobility assessment, revealing limitations in ankle, hip, thoracic, and shoulder mobility. For overhead work, PowerBlock Elite Dumbbells offer excellent balance and control. Bulgarian Split Squat with Dumbbells While technically a single-leg squat variation, the Dumbbell Bulgarian Split Squat deserves mention for its incredible effectiveness. Your rear foot is elevated on a bench or platform while you hold dumbbells and perform a single-leg squatting movement. This variation is phenomenal for building unilateral leg strength, improving balance, and addressing muscle imbalances. A FLYBIRD Adjustable Weight Bench provides the perfect platform for this challenging exercise. Dumbbell Jump Squat For those seeking explosive power development, the Dumbbell Jump Squat adds a plyometric component to the traditional squat. You hold lighter dumbbells and explode upward into a jump at the top of each rep. This variation is excellent for athletes who need to develop power and explosiveness. Start with lighter weights like AmazonBasics Neoprene Dumbbells to master the movement before progressing to heavier loads. Programming Different Variations Beginners should start with goblet squats to master the movement pattern before progressing to more challenging variations. Intermediate lifters can incorporate multiple variations within the same workout or training week. Advanced athletes can use different variations to target specific weaknesses or training goals. For comprehensive demonstrations of all these variations, explore detailed tutorials by searching "dumbbell squat variations" on YouTube. Frequently Asked Questions About This Exercise Dumbbell squats generate numerous questions from both beginners and experienced lifters due to their versatility and the various ways they can be performed and programmed. How Much Weight Should I Use for Dumbbell Squats? Start conservatively with a weight that allows you to perform 10-12 perfect repetitions with 2-3 reps left in reserve. For beginners, this might be 10-20 pounds per dumbbell, while advanced lifters might use 50+ pounds per dumbbell. The key is prioritizing form over weight. Rubber Hex Dumbbells are excellent for beginners as they provide a secure grip and won't damage floors if accidentally dropped. Focus on progressive overload by gradually increasing weight by 2.5-5 pounds when you can complete all sets with perfect form. Adjustable Dumbbell Sets make this progression seamless and cost-effective. Are Dumbbell Squats as Effective as Barbell Squats? Both exercises are highly effective but offer different benefits. Dumbbell squats provide greater accessibility, reduced spinal loading, and improved unilateral stability. Barbell squats typically allow for heavier loading and may be more efficient for pure strength development. For most people, dumbbell squats provide excellent muscle-building stimulus and functional strength development. They're particularly valuable for home workouts, beginners, or those with back sensitivities. How Often Should I Do Dumbbell Squats? Frequency depends on your training experience and goals . Beginners can perform dumbbell squats 2-3 times per week as part of full-body workouts. Intermediate and advanced lifters might incorporate them 1-2 times per week alongside other leg exercises. The relatively lower loading compared to barbell squats often allows for higher frequency training, making them excellent for movement practice and technique refinement. Can I Build Big Legs with Just Dumbbell Squats? Absolutely! Dumbbell squats can provide significant muscle-building stimulus when performed with adequate volume, intensity, and progressive overload. The key is consistently challenging your muscles and supporting your training with proper nutrition. Optimum Nutrition Serious Mass Weight Gainer can help support muscle growth for those struggling to consume enough calories through whole foods alone. What's the Difference Between Goblet Squats and Regular Dumbbell Squats? Goblet squats use a single dumbbell held vertically against your chest, while regular dumbbell squats typically refer to holding dumbbells at your sides or shoulders. The goblet position provides better balance and is more beginner-friendly, while side-loaded squats allow for heavier loading. Both variations are valuable and can be used based on your experience level, goals, and available equipment. Do Dumbbell Squats Work Your Core? Yes, significantly! Holding dumbbells, especially in front-loaded positions like goblet squats, requires substantial core activation to maintain proper posture and stability. This makes dumbbell squats excellent for developing functional core strength. The uneven loading in single-arm variations creates even greater core stability demands, making them excellent for developing anti-rotation strength. Can I Do Dumbbell Squats Every Day? While technically possible , daily dumbbell squats aren't necessary for most people. Your muscles need recovery time to adapt and grow stronger. However, light dumbbell squats can be performed daily as part of a movement practice or warm-up routine. For recovery support, Optimum Nutrition Gold Standard BCAA can help reduce muscle soreness and support faster recovery between training sessions. What Are Common Mistakes in Dumbbell Squats? Common mistakes include knee valgus (knees caving inward), forward lean, partial range of motion, and using momentum instead of controlled movement. Resistance Bands for Legs can help teach proper knee tracking and glute activation. Rushing through reps is another frequent error. Focus on controlled movement with emphasis on the eccentric (lowering) portion of each rep. How Deep Should I Squat with Dumbbells? Squat as deep as your mobility allows while maintaining proper form. Ideally, your hip crease should drop just below your knee level, but don't force depth at the expense of form or comfort. Foam Rollers and Stretching Straps can help improve the mobility needed for deeper squats over time. For visual guidance on proper depth and form, search "dumbbell squat depth tutorial" on YouTube. Can Dumbbell Squats Replace Barbell Squats? For many people, yes! Dumbbell squats can provide excellent muscle development, strength gains, and functional benefits. They're particularly suitable for home workouts, beginners, or those with equipment limitations. However, if your goal is maximum strength development or powerlifting competition, barbell squats remain the gold standard due to their higher loading potential. To maximize your dumbbell squat results, consider adding Creatine Monohydrate Powder to support power output and Pre-Workout Supplements for enhanced training intensity. Conclusion and Final Thoughts As we wrap up our journey through the realm of fitness, one exercise stands tall as a formidable ally: the dumbbell squat. Let's distill the wisdom we've uncovered and reinforce the significance of this dynamic movement. The dumbbell squat is a versatile and potent exercise that strengthens the legs, core, and overall stability. It offers an array of benefits, including enhanced leg and core strength, muscle growth, improved balance, functional fitness, and calorie burn. Dumbbell squats cater to various fitness levels, making them accessible to beginners while challenging even the most seasoned athletes. Incorporating Dumbbell Squats: It's time to embrace the potential of the dumbbell squat in your fitness journey. Whether you seek strength, muscle definition, or functional fitness, this exercise can be your steadfast companion. Seeking Professional Guidance: Yet, as you embark on this path to greater fitness, remember the importance of safety and guidance. Seeking counsel from a fitness professional or a physical therapist can be instrumental in ensuring you perform the dumbbell squat with precision and avoid potential pitfalls. So, as you step into the gym or your home workout space, dumbbells in hand, let the dumbbell squat empower you. Let it sculpt your physique, fortify your core, and boost your overall well-being. Each squat is a step towards a stronger, healthier you. Embrace the journey, and may the dumbbell squat be your steadfast companion on the road to fitness excellence. See More: ⤵ Leg Press: Unleashing Leg Power Leg Extensions: The Ultimate Guide to Mastering Unveiling the Magic of Seated Leg Curl: Your Ticket to Sculpted Legs Bulgarian Split Squats: Mastering Leg Gains Unleash Your Leg Strength with the Russian Squat Program Dumbbell Thruster: Unleashing Full-Body Power Best Leg Workout Arnold Leg Workout How To Do The Leg Curl Hack Squat: Complete Guid Dumbbell Squat: Your Comprehensive Guide Goblet Squat: A Comprehensive Guide Calf Raises: Elevate Your Leg Day Romanian Deadlifts: Proper Form and Technique Barbell Squats: Strength and Stability
- How Much Does Wall Pilates Cost?
In recent years, Wall Pilates has emerged as a popular and effective fitness trend, captivating enthusiasts with its unique approach to core strengthening and overall body conditioning. As more people discover the benefits of this innovative exercise method, a common question arises: "How much does Wall Pilates cost?" This comprehensive guide aims to demystify the pricing landscape of Wall Pilates, providing you with valuable insights to make informed decisions about your fitness investment. Wall Pilates, a variation of the traditional Pilates method, utilizes a wall or vertical surface as a prop for resistance and support. This approach offers a range of benefits, including improved posture, enhanced core strength, and increased flexibility. However, the cost of engaging in Wall Pilates can vary significantly based on several factors, from the type of classes you choose to the equipment you might need for home practice. Table of Contents: Introduction to Wall Pilates Factors Affecting Wall Pilates Costs Average Cost of Wall Pilates Classes Equipment Costs for Home Wall Pilates Practice Conclusion: Making an Informed Decision About Wall Pilates Costs In this article, we'll explore the various aspects of Wall Pilates costs, from average class prices to equipment expenses for home practice. We'll also delve into ways to save money, financing options, and how Wall Pilates compares financially to other fitness alternatives. Whether you're a fitness enthusiast on a budget or someone looking to invest in a premium Wall Pilates experience, this guide will help you navigate the financial aspects of incorporating Wall Pilates into your fitness routine. As we journey through these topics, you'll gain a comprehensive understanding of the financial landscape of Wall Pilates. From understanding the basic costs to evaluating the long-term value, this guide will equip you with the knowledge to make a decision that aligns with both your fitness goals and your budget. Let's dive in and unravel the question: How much does Wall Pilates really cost? Introduction to Wall Pilates Wall Pilates, an innovative evolution of the classical Pilates method, has been gaining significant traction in the fitness world. As more people ask, "How much does Wall Pilates cost?", it's essential to first understand what this exercise modality entails. Wall Pilates ingeniously incorporates a vertical surface – typically a wall or specialized equipment – into traditional Pilates movements, offering a unique blend of resistance training and body alignment work. The origins of Wall Pilates can be traced back to the fundamental principles established by Joseph Pilates in the early 20th century. However, it wasn't until recent years that fitness professionals began to extensively explore and develop wall-based Pilates exercises. This adaptation has led to a surge in popularity, particularly among those seeking low-impact yet highly effective workouts. The rise in popularity of Wall Pilates is largely attributed to its accessibility and effectiveness. Unlike traditional Pilates that often requires specialized equipment like reformers, Wall Pilates can be practiced with minimal gear, making it an attractive option for both studios and home practitioners. This accessibility factor plays a significant role when considering the cost of Wall Pilates, as it often requires less initial investment compared to other Pilates variations. The potential benefits of Wall Pilates are numerous and contribute to its growing appeal. Practitioners often report improved posture, enhanced core strength, increased flexibility, and better body awareness. The wall serves as a constant reference point, helping individuals maintain proper alignment throughout their workout. This aspect is particularly beneficial for those recovering from injuries or dealing with chronic pain, potentially influencing the perceived value when evaluating the cost of Wall Pilates. Moreover, Wall Pilates offers a unique challenge to the body's proprioception – the sense of body position and movement. By working against the wall, practitioners engage in exercises that challenge balance and coordination in ways that differ from mat-based Pilates. This added dimension can lead to improved overall body control and functional fitness, factors that many consider when weighing the cost of Wall Pilates against its benefits. As we delve deeper into the question of "How much does Wall Pilates cost?", it's crucial to keep in mind the multifaceted nature of this exercise method. The cost considerations extend beyond mere class fees or equipment prices; they encompass the potential long-term health benefits, the versatility of the practice, and its adaptability to various fitness levels and goals. In the following sections, we'll explore the various factors that influence the cost of Wall Pilates, from class prices to equipment expenses. We'll also examine how these costs compare to other fitness options and discuss ways to make Wall Pilates more affordable. By understanding both the financial and health aspects of Wall Pilates, you'll be better equipped to determine if this innovative fitness approach aligns with your budget and wellness objectives. Factors Affecting Wall Pilates Costs When exploring the question, "How much does Wall Pilates cost?", it's crucial to understand that several factors can significantly influence the price. These variables can cause the cost of Wall Pilates to vary widely, making it essential for potential practitioners to consider each aspect carefully. Instructor experience and certification play a pivotal role in determining the cost of Wall Pilates sessions. Highly experienced instructors with advanced certifications often command higher rates due to their expertise and the quality of instruction they provide. For instance, an instructor with years of experience and specialized Wall Pilates training may charge $80-$150 per hour for private sessions, while a newer instructor might charge $50-$80. When considering group classes, the instructor's qualifications can influence the per-class cost, typically ranging from $15 to $40. Location is another critical factor affecting Wall Pilates costs. Urban areas, particularly in major cities, tend to have higher prices due to increased overhead costs and higher demand. For example, a Wall Pilates class in New York City might cost $25-$45, while a similar class in a smaller town could be priced at $15-$30. This geographical price variation is essential to consider when budgeting for Wall Pilates, especially if you're comparing costs across different areas. The choice between studio practice and home practice can significantly impact the overall cost of Wall Pilates. Studio classes often require membership fees or per-class payments, which can add up over time. However, practicing at home requires an initial investment in equipment, which can range from minimal (a simple wall space and a mat) to substantial (specialized Wall Pilates equipment). While home practice may seem more cost-effective in the long run, it's important to factor in the value of professional instruction and the motivation that comes from group classes. Group classes versus private sessions is another factor that greatly influences the cost of Wall Pilates. Group classes are generally more affordable, with prices ranging from $15 to $40 per session, depending on the factors mentioned earlier. Private sessions, while more expensive (typically $60-$150 per hour), offer personalized attention and customized instruction, which can be particularly beneficial for beginners or those with specific fitness goals or physical limitations. The duration and frequency of sessions also play a role in determining the overall cost of Wall Pilates. Most classes range from 45 to 60 minutes, with longer sessions typically costing more. Frequency of practice impacts the total monthly cost – practicing once a week will naturally be less expensive than attending classes three times a week. Many studios offer package deals or memberships that can reduce the per-class cost for frequent attendees. When considering "How much does Wall Pilates cost?", it's also important to factor in any additional fees. Some studios may require registration fees, equipment rental charges, or cancellation fees. Online Wall Pilates classes have become increasingly popular, often offering a more affordable option with prices ranging from $10-$25 per class or $20-$100 for monthly subscriptions. Understanding these factors is crucial for anyone looking to incorporate Wall Pilates into their fitness routine. By considering each aspect – from instructor qualifications to class format and location – individuals can make informed decisions about their Wall Pilates investment. In the next sections, we'll delve deeper into specific cost breakdowns and explore ways to maximize the value of your Wall Pilates experience while managing expenses effectively. Average Cost of Wall Pilates Classes To answer the question "How much does Wall Pilates cost?" comprehensively, it's essential to break down the average costs of different class types and formats. This section will provide a detailed overview of typical pricing structures for Wall Pilates classes, helping you understand what to expect when budgeting for this fitness activity. Group class prices for Wall Pilates can vary significantly based on factors discussed earlier, such as location and instructor experience. On average, group classes range from $15 to $40 per session. In metropolitan areas, you might find prices on the higher end, typically $25 to $40 per class. Smaller cities or suburban areas often offer more affordable options, with classes priced between $15 and $30. Some studios offer introductory rates for new clients, which can be as low as $10 to $15 per class, providing an excellent opportunity to try Wall Pilates without a significant financial commitment. Private session rates for Wall Pilates tend to be higher due to the personalized attention and customized instruction. On average, private sessions can cost anywhere from $60 to $150 per hour. Highly experienced instructors in upscale urban studios may charge up to $200 per session. While these rates might seem steep, many practitioners find the individualized approach invaluable, especially when starting out or addressing specific fitness goals or physical limitations. Package deals and memberships often provide a more cost-effective way to engage in regular Wall Pilates practice. Many studios offer packages of 5, 10, or 20 classes at discounted rates. For instance, a 10-class package might offer a 10-20% discount compared to the drop-in rate, potentially reducing the per-class cost to $20-$35 in areas where single classes are priced at $30-$40. Monthly unlimited memberships are another popular option, typically ranging from $100 to $300 per month, depending on the studio's location and offerings. These memberships can significantly reduce the per-class cost for frequent attendees. Online Wall Pilates class costs have become an important consideration, especially in recent years. Virtual classes often come at a lower price point, with single classes ranging from $10 to $25. Many online platforms offer monthly subscription services, typically priced between $20 and $100 per month, providing access to a variety of Wall Pilates classes and often including other fitness content. These online options can be particularly cost-effective for those looking to practice frequently or who don't have easy access to physical Wall Pilates studios. When evaluating "How much does Wall Pilates cost?", it's important to consider the value proposition of different pricing models. While drop-in classes offer flexibility, they are often the most expensive per-session option. Packages and memberships, while requiring a larger upfront investment, can significantly reduce the per-class cost for regular practitioners. Online classes, though lacking the hands-on adjustments of in-person sessions, offer a budget-friendly and convenient alternative. It's also worth noting that many studios offer hybrid models, combining in-person and online classes in their membership or package options. These hybrid models, often priced between traditional in-person and online-only offerings, provide flexibility and value for practitioners who appreciate both formats. Some studios also offer specialized Wall Pilates workshops or intensive courses, which can range from $50 to $200 for a single workshop, or $300 to $1000 for multi-week courses. While more expensive upfront, these specialized offerings can provide in-depth knowledge and skills that enhance the overall value of your Wall Pilates practice. Understanding these average costs is crucial for budgeting and choosing the right Wall Pilates option for your needs and financial situation. As you consider integrating Wall Pilates into your fitness routine, weigh these costs against the potential benefits and your personal fitness goals. In the following sections, we'll explore equipment costs for home practice and compare Wall Pilates expenses to other fitness options, providing a comprehensive picture of the financial investment required for this innovative exercise method. Equipment Costs for Home Wall Pilates Practice For those wondering "How much does Wall Pilates cost?" in the context of home practice, understanding equipment costs is crucial. Home Wall Pilates can be a cost-effective alternative to studio classes, but it requires an initial investment in equipment. The range of equipment costs can vary widely, from minimal expenses for basic setups to more substantial investments for comprehensive home studios. The essential equipment for Wall Pilates at home starts with a clear wall space and a non-slip mat. A high-quality Pilates mat typically costs between $20 and $100, depending on the brand and material. While any clear wall can suffice, some practitioners choose to install a smooth, wipeable surface or a large mirror to enhance their practice, which can add $100 to $500 to the setup cost. For a basic Wall Pilates setup, additional equipment might include resistance bands, a Pilates ball, and a foam roller. Resistance bands, crucial for many Wall Pilates exercises, range from $10 to $50 for a set. A Pilates ball, useful for core exercises and balance work, typically costs $15 to $40. A foam roller, beneficial for muscle release and some exercises, is usually priced between $20 and $50. This basic setup, including the mat, could total anywhere from $65 to $240. More advanced practitioners might consider investing in specialized Wall Pilates equipment. Wall-mounted bars or towers, which provide support and resistance for a variety of exercises, can range from $200 to $1000, depending on the complexity and quality of the system. Portable wall units, which can be attached to doors or walls temporarily, offer a middle ground and typically cost between $100 and $500. For those seeking a comprehensive home Wall Pilates studio, additional equipment might include a Pilates chair (ranging from $500 to $2000), a spine corrector ($200 to $500), and various small props like magic circles ($20 to $50) and wedges ($20 to $40). A full home studio setup could range from $1000 for a basic configuration to $5000 or more for a professional-grade setup. It's important to note that while these costs may seem significant, they should be considered in the context of long-term savings on studio fees. For instance, if studio classes cost $30 per session and you practice three times a week, the annual cost would be around $4680. In comparison, a $1000 investment in home equipment could pay for itself in less than three months of regular practice. For budget-conscious practitioners asking "How much does Wall Pilates cost?", there are DIY options available. Many Wall Pilates exercises can be performed with household items. For example, towels can substitute for sliders, water bottles for light weights, and a sturdy chair for some bar exercises. While these alternatives may not provide the same experience as specialized equipment, they offer a low-cost entry point for beginners or those testing the waters of Wall Pilates. When considering equipment purchases, it's also worth exploring second-hand options. Used Pilates equipment can often be found at significantly reduced prices through online marketplaces or specialized fitness equipment resellers. However, it's crucial to ensure that any second-hand equipment is in good condition to avoid safety issues. Additionally, some companies offer equipment rental programs, which can be a cost-effective solution for those unsure about committing to a full equipment purchase. Rental fees typically range from $50 to $200 per month, depending on the type and amount of equipment. In evaluating "How much does Wall Pilates cost?" for home practice, it's essential to consider your long-term goals and commitment level. While the initial investment in equipment can be substantial, it often proves economical over time for regular practitioners. Moreover, the convenience of having equipment at home can lead to more consistent practice, potentially enhancing the overall value of your Wall Pilates experience. As you contemplate setting up a home Wall Pilates practice, consider starting with basic equipment and gradually building your collection as your skills and commitment grow. This approach allows you to spread the cost over time while ensuring that you're investing in equipment that truly enhances your practice. In the next section, we'll compare the costs of Wall Pilates to other fitness options, providing further context for your fitness investment decisions. Cost-Benefit Analysis of Wall Pilates When assessing "How much does Wall Pilates cost?", it's crucial to conduct a thorough cost-benefit analysis. This approach allows potential practitioners to evaluate not just the immediate financial outlay, but also the long-term value and potential savings associated with regular Wall Pilates practice. The long-term health benefits of Wall Pilates are a significant factor in this analysis. Regular practice has been shown to improve core strength, enhance flexibility, and promote better posture. These physical improvements can lead to reduced risk of back pain, improved balance, and increased overall functional fitness. While it's challenging to assign a direct monetary value to these benefits, they can significantly impact quality of life and potentially reduce future healthcare costs. For instance, consider the potential savings on medical expenses. Chronic back pain, a common issue that Wall Pilates can help address, is estimated to cost individuals thousands of dollars annually in medical treatments, lost work time, and reduced productivity. A study published in the Journal of Physical Therapy Science found that Pilates-based exercises were effective in reducing chronic low back pain and disability. If regular Wall Pilates practice can help prevent or alleviate such issues, the long-term savings could far outweigh the initial costs of classes or equipment. Comparing Wall Pilates to physical therapy costs provides another perspective on its value. Physical therapy sessions typically range from $50 to $150 per session, with many conditions requiring multiple sessions per week for several weeks or months. If Wall Pilates can serve as a preventive measure or as a maintenance program following physical therapy, it could result in significant cost savings. For example, if Wall Pilates classes cost $30 per session and prevent the need for a 12-session physical therapy program priced at $100 per session, the net savings would be $840. The mental health benefits of Wall Pilates should also be factored into the cost-benefit analysis. Regular exercise, including Pilates, has been linked to reduced stress, anxiety, and symptoms of depression. While it's difficult to quantify the monetary value of improved mental health, the impact on overall well-being and potentially reduced need for mental health services should be considered. Another aspect to consider is the potential for improved work performance and reduced absenteeism due to better physical health. Improved core strength and posture from Wall Pilates can lead to better endurance for desk work, potentially increasing productivity. Additionally, the stress-reduction benefits can contribute to better focus and job satisfaction. While these benefits are indirect, they can have a significant impact on earning potential and career advancement over time. When evaluating "How much does Wall Pilates cost?", it's also worth considering the social and lifestyle benefits. Wall Pilates classes can provide a sense of community and social interaction, which is valuable for mental health and overall life satisfaction. For some, the commitment to regular classes can also serve as a motivator for maintaining a healthier lifestyle overall, potentially leading to better dietary choices and other positive health behaviors. The versatility of Wall Pilates is another factor that adds to its value proposition. Unlike some fitness equipment that targets specific muscle groups or types of exercise, Wall Pilates equipment and techniques can be adapted for a full-body workout, making it a comprehensive fitness solution. This versatility means that practitioners may not need to invest in multiple types of fitness equipment or class subscriptions, potentially leading to overall savings in their fitness budget. For those practicing at home, the initial investment in Wall Pilates equipment can be spread over many years of use. High-quality equipment, while more expensive upfront, can last for a decade or more with proper care. When this longevity is factored into the cost per use, home Wall Pilates practice can become very economical over time. It's also important to consider the opportunity cost of not engaging in regular exercise. The long-term health risks associated with a sedentary lifestyle, including increased risk of cardiovascular disease, obesity, and certain cancers, can lead to substantial medical costs and reduced quality of life in the future. Regular Wall Pilates practice, as part of an active lifestyle, can be seen as an investment in future health and well-being. In conclusion, while the immediate costs of Wall Pilates – whether in class fees or equipment purchases – may seem significant, the potential long-term benefits and savings can make it a worthwhile investment. Improved physical health, reduced risk of chronic pain, enhanced mental well-being, and potential savings on future medical expenses all contribute to the value proposition of Wall Pilates. When asking "How much does Wall Pilates cost?", it's essential to look beyond the immediate price tag and consider the comprehensive benefits that this form of exercise can bring to your life. For many practitioners, the holistic improvements in health and quality of life make Wall Pilates a cost-effective choice in their fitness journey. Wall Pilates for Different Budgets When addressing the question "How much does Wall Pilates cost?", it's important to recognize that there are options available for various budget levels. Wall Pilates can be adapted to fit different financial situations, from low-cost options for tight budgets to luxury Wall Pilates experiences for those seeking premium services. Low-cost options for tight budgets are increasingly available, making Wall Pilates more accessible to a wider audience. For those on a limited budget, online resources and DIY approaches can significantly reduce costs. Many free Wall Pilates tutorials and workout videos are available on platforms like YouTube, offering guided sessions that require minimal or no equipment. Basic equipment like resistance bands and a yoga mat can be purchased for under $50, providing a foundation for a home Wall Pilates practice. Community centers and local recreation departments sometimes offer affordable Wall Pilates classes, often priced between $5 and $15 per session. These classes may not have the amenities of boutique studios but can provide quality instruction at a fraction of the cost. Some yoga studios also incorporate Wall Pilates elements into their classes, offering an affordable way to experience aspects of the practice. For those able to invest a bit more, mid-range Wall Pilates experiences offer a balance between cost and quality. This category might include small group classes at dedicated Pilates studios, typically ranging from $15 to $30 per class. Many studios offer package deals or monthly memberships that can bring the per-class cost down to $10-$20 for regular attendees. Mid-range options also include more comprehensive home setups. A basic Wall Pilates home kit, including a mat, resistance bands, a Pilates ball, and a foam roller, can be assembled for around $100-$200. This investment allows for a varied home practice without the need for expensive equipment or ongoing class fees. Online subscription services fall into the mid-range category as well. Platforms dedicated to Pilates and body-weight exercises often offer extensive libraries of Wall Pilates workouts for monthly fees ranging from $15 to $30. These services provide the flexibility of home practice with the guidance of professional instructors, often at a lower cost than regular in-person classes. For those with more flexible budgets, luxury Wall Pilates programs offer premium experiences and equipment. High-end studios in urban areas may charge $40-$80 per group class, offering state-of-the-art facilities, small class sizes, and highly experienced instructors. Private sessions in these settings can range from $80 to $150 or more, providing personalized attention and customized workout plans. Luxury home Wall Pilates setups can include professional-grade equipment like wall-mounted Pilates towers or comprehensive multi-function units. These setups can cost anywhere from $1,000 to $5,000 or more but offer a studio-quality experience in the comfort of one's home. While expensive, these systems can be cost-effective in the long run for dedicated practitioners who would otherwise attend frequent studio sessions. High-end Wall Pilates retreats and intensive workshops represent the upper tier of Wall Pilates experiences. These can range from weekend workshops priced at $300-$500 to weeklong retreats costing several thousand dollars. While expensive, these immersive experiences offer in-depth training, luxury accommodations, and often combine Wall Pilates with other wellness activities. When considering "How much does Wall Pilates cost?" across different budget levels, it's important to factor in the frequency of practice and long-term goals. For some, investing in a quality home setup may be more cost-effective than ongoing studio memberships. Others may find value in combining affordable online resources with occasional in-person classes or workshops. It's also worth noting that many studios and instructors offer tiered pricing options. These might include discounted rates for off-peak hours, student or senior discounts, or sliding scale fees based on income. Don't hesitate to inquire about these options if you're interested in studio classes but concerned about costs. For those on tight budgets, creative approaches can make Wall Pilates more accessible. Forming a practice group with friends to share the cost of equipment or private instruction can significantly reduce individual expenses. Some practitioners barter services or skills in exchange for classes or equipment, especially in community-oriented settings. Regardless of budget level, consistency in practice is key to reaping the benefits of Wall Pilates. A regular practice using basic equipment or online resources can be more beneficial than sporadic high-end sessions. The most important factor is finding an approach that fits both your financial situation and your commitment to regular practice. In conclusion, Wall Pilates can be adapted to fit a wide range of budgets, from low-cost DIY approaches to luxury studio experiences. When evaluating "How much does Wall Pilates cost?", consider not just the immediate price tag but also the long-term value and sustainability for your lifestyle. By exploring various options and potentially combining different approaches, you can find a Wall Pilates practice that aligns with both your fitness goals and your financial means. Remember, the most effective Wall Pilates practice is one that you can maintain consistently, regardless of the price point. Conclusion: Making an Informed Decision About Wall Pilates Costs As we conclude our comprehensive exploration of "How much does Wall Pilates cost?", it's clear that the answer is multifaceted and depends on various factors. From class fees and equipment expenses to regional variations and long-term health benefits, the cost of Wall Pilates encompasses more than just a simple price tag. Making an informed decision about investing in Wall Pilates requires careful consideration of these diverse aspects. Recapping the key cost factors, we've seen that Wall Pilates expenses can range from minimal investments for home practice with basic equipment to significant outlays for high-end studio memberships or comprehensive home setups. Class prices can vary widely, typically ranging from $15 to $50 per session, depending on location, instructor experience, and class format. Equipment costs for home practice can range from under $100 for basic setups to several thousand dollars for professional-grade wall units. The variability in pricing across different regions highlights the importance of researching local options. Urban areas generally have higher costs but may offer more variety and specialized instruction, while rural or suburban areas might provide more affordable options, albeit with potentially fewer choices. When budgeting for Wall Pilates, consider your long-term commitment and goals. For dedicated practitioners, investing in quality home equipment or a studio membership may be more cost-effective over time than sporadic drop-in classes. Look for package deals, off-peak pricing, or introductory offers to maximize value. Don't overlook online resources and virtual classes, which can provide affordable alternatives or supplements to in-person sessions. It's crucial to weigh the costs against the potential benefits. The physical health improvements, such as enhanced core strength, better posture, and increased flexibility, can contribute to long-term health and potentially reduce future medical expenses. The mental health benefits, including stress reduction and improved body awareness, add significant value that extends beyond mere physical fitness. For those on tight budgets, remember that effective Wall Pilates practice is possible with minimal equipment and by utilizing free or low-cost resources. Consistency in practice is more important than having the most expensive setup or attending the most exclusive studio. Consider the versatility of Wall Pilates when evaluating its cost. Its adaptability for home or studio practice, suitability for various fitness levels, and potential to complement other forms of exercise make it a versatile investment in your overall health and fitness regimen. When making your decision, factor in hidden costs such as transportation to studios, appropriate workout attire, and any necessary modifications to your home space for equipment. Also, consider potential savings, such as reduced need for other fitness memberships or decreased healthcare costs over time. It's advisable to start small and gradually increase your investment as you become more committed to the practice. Many practitioners find that beginning with basic classes or home routines allows them to gauge their interest and commitment before making larger financial investments. Don't hesitate to communicate with instructors or studio owners about your budget constraints. Many offer flexible pricing options or can provide advice on cost-effective ways to incorporate Wall Pilates into your routine. Remember that the true value of Wall Pilates lies not just in the monetary investment but in the consistent practice and the benefits it brings to your life. The most expensive option is not always the best, and the most affordable may not always meet your needs. The key is finding a balance that allows you to maintain a regular practice within your means. In conclusion, when answering the question "How much does Wall Pilates cost?", the response must be: it varies, and it depends on your individual circumstances and goals. By carefully considering the factors discussed in this guide – from class and equipment costs to regional variations and long-term health benefits – you can make an informed decision about investing in Wall Pilates. Whether you choose a high-end studio experience, a modest home practice, or something in between, the most important factor is finding an approach that you can sustain and that contributes positively to your health and well-being. Ultimately, the cost of Wall Pilates should be viewed as an investment in your health, fitness, and overall quality of life. By approaching this decision with careful consideration and a clear understanding of your options, you can find a Wall Pilates practice that fits both your budget and your wellness goals, potentially leading to lasting benefits that far outweigh the initial costs. See More Exercises: ⤵ Pilates for Beginners: Your Path to Core Strength and Flexibility 28 Day Wall Pilates Challenge: Strengthen, Tone, Transform! What is the Difference Between Regular Pilates and Wall Pilates? Will 20 Minutes of Pilates Make a Difference? What Happens When You Do Wall Pilates Every Day? Can You Really Lose Weight with Wall Pilates? How Much Does Wall Pilates Cost? The Benefits of Wall Pilates: A Beginner-Friendly Workout Guide Does the wall pilates really work? Best Workout Plans for Women: A Comprehensive Guide Leg Press for Quads: A Comprehensive Guide Bodyweight Lunge exercise Barbell Sumo Squat exercise Dumbbell Good Morning exercise Dumbbell Walking Lunge Dumbbell Squat: Your Comprehensive Guide How To Do Reverse Lunges How To Do Good Morning Exercise Mastering Lateral Lunges for Stronger, More Agile Legs Single Leg Hip Thrust: Your Step-by-Step Guide Leg Press: Unleashing Leg Power Leg Extensions: The Ultimate Guide to Mastering Seated Leg Curl: Your Ticket to Sculpted Legs Bulgarian Split Squats: Mastering Leg Gains Russian Squat Program Dumbbell Thruster: Unleashing Full-Body Power Best Leg Workout Arnold Leg Workout How To Do The Leg Curl
- Anastrozole: The Ultimate Guide for Bodybuilders and Athletes in 2025
Are you looking to optimize your performance and physique while managing the risks associated with anabolic steroid use? Welcome to the definitive guide on Anastrozole, the powerful aromatase inhibitor that's revolutionizing estrogen control in bodybuilding and athletics in 2025. Whether you're a seasoned bodybuilder, a competitive athlete, or someone just starting their fitness journey, understanding Anastrozole is crucial for anyone serious about performance enhancement and hormone management. In this comprehensive guide to Anastrozole, we'll dive deep into everything you need to know about this potent estrogen blocker. From its mechanisms of action to dosage strategies and potential side effects, we've got you covered. Our goal? To provide you with the most up-to-date, science-backed information on Anastrozole use in the fitness and sports world. What You'll Learn in This Guide: What is Anastrozole? How Anastrozole Works Benefits of Anastrozole for Bodybuilders and Athletes Potential Side Effects of Anastrozole Proper Dosage and Administration Anastrozole vs. Other Estrogen Control Methods How to Safely Use Anastrozole Combining Anastrozole with Anabolic Steroids Anastrozole for Female Athletes Long-Term Effects of Anastrozole Use Alternatives to Anastrozole Anastrozole has gained significant popularity in the bodybuilding and athletic communities due to its potent estrogen-blocking capabilities. Its ability to prevent the conversion of testosterone to estrogen makes it a valuable tool for those looking to maximize the benefits of their steroid cycles while minimizing estrogenic side effects like gynecomastia and water retention. In this 2025 guide, we'll explore the latest research, cutting-edge protocols, and expert insights to help you harness the full potential of Anastrozole while minimizing risks. Whether you're considering incorporating Anastrozole into your regimen for the first time or looking to optimize your current protocol, this article is your roadmap to success. Ready to master the art of estrogen control and take your physique to the next level? Let's dive into the world of Anastrozole and discover why it's become an indispensable tool for modern bodybuilders and athletes. Buckle up – you're about to become an Anastrozole expert! Are you looking to optimize your performance and physique while managing the risks associated with anabolic steroid use? Welcome to the definitive guide on Anastrozole , the powerful aromatase inhibitor that's revolutionizing estrogen control in bodybuilding and athletics in 2025. Whether you're a seasoned bodybuilder, a competitive athlete, or someone just starting their fitness journey, understanding Anastrozole is crucial for anyone serious about performance enhancement and hormone management. In this comprehensive guide to Anastrozole , we'll dive deep into everything you need to know about this potent estrogen blocker. From its mechanisms of action to dosage strategies and potential side effects, we've got you covered. Our goal? To provide you with the most up-to-date, science-backed information on Anastrozole use in the fitness and sports world. What is Anastrozole? Anastrozole, often known by its brand name Arimidex, is a potent aromatase inhibitor that has become a cornerstone in the world of bodybuilding and performance enhancement. Originally developed for medical purposes, particularly in the treatment of breast cancer in postmenopausal women, Anastrozole has found a significant place in the arsenal of bodybuilders and athletes looking to manage their estrogen levels effectively. At its core, Anastrozole is a selective, non-steroidal aromatase inhibitor. This means it specifically targets and inhibits the enzyme aromatase, which is responsible for converting androgens (like testosterone) into estrogen in the body. By blocking this conversion process, Anastrozole helps maintain higher levels of testosterone while simultaneously reducing estrogen levels. The chemical structure of Anastrozole allows it to bind strongly to the aromatase enzyme, effectively "shutting it down." This high binding affinity is what makes Anastrozole one of the most potent and efficient aromatase inhibitors available. Its ability to reduce estrogen levels by up to 80% in some cases has made it a go-to choice for many in the bodybuilding community. Compared to other aromatase inhibitors like Letrozole or Exemestane, Anastrozole is often considered to have a more balanced profile in terms of efficacy and side effects. It's generally well-tolerated and doesn't tend to crash estrogen levels as dramatically as some other options, making it a popular choice for those looking for effective but manageable estrogen control. In the context of bodybuilding and athletics, Anastrozole's role extends beyond just estrogen control. By maintaining higher testosterone levels and reducing estrogen, it can contribute to a more favorable anabolic environment in the body. This can potentially lead to increased muscle mass, reduced fat storage, and improved overall body composition – all crucial factors for competitive bodybuilders and athletes. How Anastrozole Works Understanding the mechanism of action of Anastrozole is crucial for appreciating its effects and using it effectively in a bodybuilding or athletic context. At its core, Anastrozole works by inhibiting the aromatase enzyme, but the cascading effects of this inhibition are what make it so valuable in performance enhancement. When Anastrozole enters the body, it specifically targets the aromatase enzyme. This enzyme is responsible for the final step in estrogen biosynthesis, where it converts androgens like testosterone into estrogen. By binding to the aromatase enzyme, Anastrozole effectively "locks" it, preventing it from carrying out this conversion. This results in two primary effects: a reduction in estrogen levels and an indirect increase in testosterone levels. The reduction in estrogen levels is the most direct and noticeable effect of Anastrozole. By blocking the conversion of testosterone to estrogen, it can significantly lower the amount of estrogen circulating in the body. This is particularly important for bodybuilders and athletes using anabolic steroids, as many steroids can dramatically increase estrogen levels through aromatization. The indirect increase in testosterone levels occurs through a feedback mechanism. As estrogen levels decrease, the body's natural testosterone production may increase. This is because estrogen plays a role in regulating testosterone production through the hypothalamic-pituitary-gonadal (HPG) axis. When estrogen levels are lower, the body may produce more testosterone to try to restore balance. It's important to note that Anastrozole doesn't directly stimulate testosterone production. Instead, it creates an environment where natural testosterone production can potentially increase. This effect is particularly valuable during post-cycle therapy (PCT) when bodybuilders are trying to restore natural hormone balance after a steroid cycle. Another crucial aspect of Anastrozole's action is its selectivity. Unlike some other estrogen-controlling drugs that block estrogen receptors throughout the body, Anastrozole specifically targets the aromatase enzyme. This selectivity can potentially result in fewer side effects compared to broader-acting drugs. The speed and efficacy of Anastrozole are also noteworthy. It can begin reducing estrogen levels within hours of administration, with maximum suppression typically occurring within a few days of consistent use. This rapid action makes it valuable for quickly addressing estrogen-related side effects that may occur during a steroid cycle. For more information on how Anastrozole compares to other estrogen control methods, check out this comprehensive guide on aromatase inhibitors . Benefits of Anastrozole for Bodybuilders and Athletes Anastrozole offers a range of benefits that make it highly valued in the bodybuilding and athletic communities. Understanding these benefits is crucial for anyone considering incorporating Anastrozole into their performance enhancement regimen. One of the primary benefits of Anastrozole for bodybuilders is its ability to prevent gynecomastia. Gynecomastia, the development of breast tissue in males, is a common and feared side effect of anabolic steroid use. By reducing estrogen levels, Anastrozole can significantly decrease the risk of developing gynecomastia, allowing bodybuilders to pursue their muscle-building goals without this aesthetic and potentially painful concern. Water retention is another issue that Anastrozole helps combat. Excess estrogen can lead to increased water retention, which can obscure muscle definition and give a "puffy" appearance. By keeping estrogen levels in check, Anastrozole helps maintain a leaner, more defined physique. This is particularly valuable for bodybuilders preparing for competition, where muscle definition is crucial. The potential for increased muscle mass and strength is another significant benefit of Anastrozole. By maintaining higher testosterone levels (through reduced conversion to estrogen) and creating a more favorable anabolic environment, Anastrozole can contribute to greater muscle gains. This effect is particularly noticeable when Anastrozole is used in conjunction with anabolic steroids. For athletes in weight-class sports, Anastrozole's ability to reduce water retention can be a game-changer. It allows them to maintain their strength and muscle mass while staying within their weight class, potentially giving them a competitive edge. Anastrozole can also play a crucial role in post-cycle therapy (PCT). After a cycle of anabolic steroids, natural testosterone production is often suppressed. By reducing estrogen levels, Anastrozole can help stimulate the body's natural testosterone production, aiding in a faster recovery of hormone balance. Some users report improved mood and mental clarity when using Anastrozole. This could be due to the optimization of the testosterone-to-estrogen ratio, as both very high and very low estrogen levels can negatively impact mood and cognitive function. For more insights on how Anastrozole compares to other performance-enhancing substances, check out this article on top 5 steroids for your first cycle . It's important to note that while these benefits are significant, they come with the responsibility of proper use and monitoring. Anastrozole is a powerful drug, and its benefits are best realized when it's used correctly and responsibly. Potential Side Effects of Anastrozole While Anastrozole offers numerous benefits for bodybuilders and athletes, it's crucial to be aware of its potential side effects. Understanding these risks is essential for anyone considering using Anastrozole as part of their performance enhancement regimen. One of the most significant potential side effects of Anastrozole is its impact on bone health. Estrogen plays a crucial role in maintaining bone density, and by reducing estrogen levels, Anastrozole can potentially lead to decreased bone mineral density over time. This can increase the risk of osteoporosis and fractures, particularly with long-term use. Athletes and bodybuilders using Anastrozole should consider regular bone density scans and may need to incorporate strategies to support bone health. Joint pain and stiffness are other common complaints among Anastrozole users. This is likely related to the drug's effect on estrogen, as estrogen helps maintain joint health and lubrication. Some users report increased difficulty in recovery from intense workouts due to joint discomfort. This side effect can be particularly problematic for athletes in high-impact sports or bodybuilders engaging in heavy lifting. Cardiovascular health is another area of concern with Anastrozole use. While the drug can have positive effects on body composition, it may negatively impact cholesterol levels. Specifically, it can lower HDL (good) cholesterol and increase LDL (bad) cholesterol. This shift in lipid profile can potentially increase the risk of cardiovascular issues, especially with long-term use. Regular blood work to monitor cholesterol levels is crucial for those using Anastrozole. Some users report mood changes and cognitive effects while on Anastrozole. These can include mood swings, anxiety, and in some cases, depression. It's thought that these effects are related to the significant changes in hormone levels caused by the drug. While not everyone experiences these side effects, they're important to be aware of and monitor. Fatigue and weakness are sometimes reported, particularly in the early stages of Anastrozole use. This could be due to the body adjusting to lower estrogen levels. In most cases, these symptoms tend to improve as the body adapts, but they can be challenging for athletes trying to maintain peak performance. In rare cases, Anastrozole can cause liver stress. While it's generally considered less hepatotoxic than many anabolic steroids, it's still processed by the liver and can potentially cause elevated liver enzymes. Regular liver function tests are advisable for those using Anastrozole, especially if it's being used in conjunction with other potentially liver-stressing compounds. For a deeper dive into managing side effects of performance-enhancing substances, check out this article on Oxandrolone side effects . It's important to note that the severity and occurrence of these side effects can vary greatly between individuals. Factors such as dosage, duration of use, individual genetics, and overall health all play a role in how one responds to Anastrozole. Proper Dosage and Administration Determining the right dosage and administration protocol for Anastrozole is crucial for maximizing its benefits while minimizing potential side effects. It's important to remember that Anastrozole is a powerful drug, and its dosage needs to be carefully calibrated to individual needs and responses. For bodybuilders and athletes using Anastrozole as part of a steroid cycle or for general estrogen control, the typical dosage range is between 0.5mg to 1mg every other day or every day, depending on individual needs and the specific cycle being run. It's generally recommended to start at the lower end of this range and adjust as necessary based on symptoms and blood work results. When using Anastrozole during a steroid cycle, the dosage often depends on the aromatizing potential of the steroids being used. For example, a cycle involving high doses of testosterone might require a higher dose of Anastrozole compared to a cycle with less aromatizing compounds. Some users find that 0.5mg every other day is sufficient for moderate cycles, while more aggressive cycles might require 1mg daily. For those using Anastrozole as part of post-cycle therapy (PCT), the dosage is typically lower. A common protocol might involve 0.5mg every other day for the duration of PCT, which usually lasts 4-6 weeks. The goal during PCT is to help restore natural hormone balance without crashing estrogen levels completely. It's crucial to note that more is not always better when it comes to Anastrozole dosing. Excessive suppression of estrogen can lead to a range of negative side effects, including joint pain, mood issues, and decreased libido. The aim should be to maintain estrogen within a healthy range, not to eliminate it entirely. Timing of Anastrozole administration can also play a role in its effectiveness. Many users prefer to take it in the morning, as it may help mitigate any potential sleep disturbances. Consistency in timing can help maintain stable blood levels of the drug. For those new to Anastrozole, it's often recommended to start with a lower dose, such as 0.5mg twice a week, and gradually increase if needed. This approach allows you to gauge your body's response and minimize the risk of over-suppressing estrogen. Regular blood work is essential when using Anastrozole. Monitoring estradiol (estrogen) levels, as well as other key health markers, can help you and your healthcare provider determine if your dosage is appropriate or needs adjustment. For more information on how Anastrozole fits into a broader steroid cycle strategy, check out this guide on building the perfect steroid stack . It's important to remember that while these are general guidelines, individual responses to Anastrozole can vary significantly. Factors such as body composition, age, overall health, and concurrent supplement or medication use can all influence how you respond to Anastrozole. Always consult with a knowledgeable healthcare provider before starting or adjusting your Anastrozole protocol. Anastrozole vs. Other Estrogen Control Methods When it comes to managing estrogen levels in the context of bodybuilding and performance enhancement, Anastrozole is just one of several options available. Understanding how Anastrozole compares to other estrogen control methods is crucial for making informed decisions about your hormone management strategy. One of the primary alternatives to Anastrozole is Tamoxifen, also known as Nolvadex. Unlike Anastrozole, which is an aromatase inhibitor, Tamoxifen is a Selective Estrogen Receptor Modulator (SERM). While Anastrozole works by reducing overall estrogen levels, Tamoxifen blocks estrogen's effects in certain tissues while allowing its benefits in others. This can be advantageous in some situations, particularly for maintaining bone density and cardiovascular health. However, Tamoxifen may not be as effective at preventing water retention or gynecomastia in some users. Another aromatase inhibitor often compared to Anastrozole is Letrozole. Letrozole is generally considered more potent than Anastrozole, capable of suppressing estrogen levels to a greater degree. While this can be beneficial in cases of severe estrogen-related side effects, it also comes with a higher risk of crashing estrogen levels, which can lead to joint pain, mood issues, and decreased libido. Many users find Anastrozole to offer a more balanced approach, providing effective estrogen control with a lower risk of over-suppression. Exemestane, marketed as Aromasin, is another aromatase inhibitor worth comparing to Anastrozole. Exemestane is a "suicidal" aromatase inhibitor, meaning it permanently deactivates the aromatase enzyme. This can lead to more consistent estrogen suppression compared to Anastrozole, which temporarily binds to the enzyme. However, Exemestane can be harsher on lipid profiles and may require a longer recovery period for estrogen levels to normalize after discontinuation. For those seeking a more natural approach to estrogen control, supplements like Diindolylmethane (DIM) or Calcium D-Glucarate are sometimes used. These natural compounds can help promote healthy estrogen metabolism but are generally much milder in their effects compared to pharmaceutical options like Anastrozole. While they may be sufficient for general health or mild estrogen management, they're typically not potent enough for those using high doses of aromatizing steroids. When comparing these options, it's important to consider not just their effectiveness at controlling estrogen, but also their side effect profiles, ease of use, and how they align with your specific goals. For example, if maintaining bone density is a primary concern, a SERM like Tamoxifen might be preferable to an aromatase inhibitor. On the other hand, if water retention is your main issue, Anastrozole or another AI might be more effective. For a more in-depth look at how different compounds can affect your hormone balance, check out this article on testosterone for muscle growth . It's also worth noting that some users opt for a combination approach, using different estrogen control methods at various points in their cycle or based on specific needs. For instance, some might use Anastrozole during a steroid cycle for day-to-day estrogen management, then switch to Tamoxifen for post-cycle therapy to help restore natural testosterone production. Ultimately, the choice between Anastrozole and other estrogen control methods should be based on individual needs, goals, and responses. What works best for one person may not be ideal for another. Regular blood work and close monitoring of symptoms are crucial for determining the most effective approach for your specific situation. How to Safely Use Anastrozole Using Anastrozole safely requires a thoughtful and informed approach. While it can be a powerful tool for managing estrogen levels, improper use can lead to a range of health issues. Here are key considerations for using Anastrozole safely and effectively. First and foremost, start with thorough research and education. Understanding how Anastrozole works, its potential benefits, and risks is crucial before beginning use. This guide is a good starting point, but continue to educate yourself from reliable sources and, if possible, consult with a healthcare professional knowledgeable about performance-enhancing drugs. Before starting Anastrozole, it's highly recommended to get comprehensive blood work done. This should include a hormone panel to assess your baseline estrogen and testosterone levels, as well as other key health markers like lipid profiles and liver function tests. These baseline readings will help you and your healthcare provider monitor your health throughout your use of Anastrozole. Start with a low dose and gradually increase if needed. As mentioned in the dosage section, beginning with 0.5mg twice a week is a good starting point for most users. This allows you to assess your body's response and tolerance to the compound. If you decide to increase the dose, do so gradually and monitor for any adverse effects. Regular blood work is crucial when using Anastrozole. Aim to get tested every 4-6 weeks, or more frequently if you're adjusting your dosage. Pay particular attention to your estradiol (estrogen) levels, as well as your lipid profile and bone density markers if using Anastrozole long-term. Be vigilant for signs of estrogen crash, which can occur if Anastrozole suppresses estrogen levels too much. Symptoms can include joint pain, mood swings, fatigue, and decreased libido. If you experience these symptoms, consider reducing your dosage or frequency of use. For more insights on managing hormone levels safely, check out this guide on hormone replacement therapy for athletes . Incorporate supportive measures to counteract potential side effects. This might include supplementing with vitamins D and K2 for bone health, omega-3 fatty acids for cardiovascular support, and glucosamine for joint health. Regular weight-bearing exercise is also crucial for maintaining bone density. If you're using Anastrozole as part of a steroid cycle, plan your entire cycle, including post-cycle therapy, before you begin. Know exactly when you'll start and stop Anastrozole, and have all necessary supplements and medications on hand. Be prepared to adjust your protocol based on your body's response. What works for others may not work for you, and your needs may change over time. Stay flexible and willing to make changes based on your symptoms and blood work results. Never extend Anastrozole use indefinitely without breaks. Even if you're on long-term testosterone replacement therapy, it's generally advisable to take periodic breaks from Anastrozole to allow your body to reset and to assess your continued need for estrogen management. If you experience severe side effects or health issues while using Anastrozole, don't hesitate to stop use and seek medical attention. Your health should always be the top priority. Lastly, be honest with your healthcare providers about your use of Anastrozole and any other performance-enhancing substances. This honesty is crucial for receiving appropriate medical care and advice. Remember, while Anastrozole can be a valuable tool for managing estrogen levels, it's not a magic solution. It works best when combined with a proper diet, consistent training regimen, and overall healthy lifestyle. Safe and effective use of Anastrozole requires ongoing education, vigilance, and a commitment to your overall health and well-being. Combining Anastrozole with Anabolic Steroids The use of Anastrozole in conjunction with anabolic steroids is a common practice in the world of bodybuilding and performance enhancement. Understanding how to effectively combine these compounds is crucial for maximizing benefits while minimizing potential risks. Anastrozole is primarily used alongside aromatizing steroids – those that can convert to estrogen in the body. The most common of these is testosterone, but others include Dianabol, Deca Durabolin, and certain forms of Equipoise. When using these steroids, Anastrozole helps prevent the excessive buildup of estrogen that can lead to side effects like gynecomastia, water retention, and mood swings. The dosage of Anastrozole when used with steroids can vary depending on the types and amounts of steroids being used. As a general guideline, for a moderate testosterone cycle (500mg per week), a typical Anastrozole dose might be 0.5mg every other day or twice a week. For higher doses or when using multiple aromatizing compounds, this might increase to 0.5mg daily or even 1mg daily in some cases. It's important to note that Anastrozole should be used judiciously. The goal is to control estrogen, not eliminate it entirely. Estrogen plays important roles in the body, including supporting muscle growth, bone health, and cognitive function. Over-suppressing estrogen can lead to joint pain, mood issues, and decreased libido. When starting a new steroid cycle that includes Anastrozole, it's often recommended to begin the Anastrozole a week or two after starting the steroids. This allows you to gauge your body's initial response to the steroids before introducing estrogen control. Some users prefer to have Anastrozole on hand but only start using it if they notice signs of high estrogen. For more information on how different steroids can affect your body and performance, check out this article on top 5 steroids for weight loss . It's crucial to adjust your Anastrozole dosage based on your symptoms and blood work results. Signs of high estrogen (like water retention or sensitive nipples) might indicate a need to increase the dose, while symptoms of low estrogen (like joint pain or mood issues) suggest the dose should be reduced. Some steroid users incorporate Anastrozole into their post-cycle therapy (PCT) protocol. In this context, Anastrozole can help manage the estrogen rebound that can occur when coming off steroids. However, it's often used in conjunction with other PCT drugs like Clomid or Nolvadex for a more comprehensive approach to restoring natural hormone balance. When combining Anastrozole with steroids, it's especially important to monitor your health markers regularly. This should include comprehensive blood work to check hormone levels, lipid profiles, and liver function. The frequency of these tests may need to increase compared to using either compound alone. It's worth noting that not all steroids require the use of an aromatase inhibitor like Anastrozole. Non-aromatizing steroids such as Trenbolone, Winstrol, or Anavar typically don't cause estrogen-related side effects and therefore don't necessitate Anastrozole use. In fact, using Anastrozole with these steroids could potentially lead to excessively low estrogen levels. Lastly, always consider the cumulative stress on your body when combining multiple compounds. While Anastrozole can help manage certain side effects of steroid use, it doesn't negate all risks. The more compounds you introduce, the more variables you're adding to your hormone balance and overall health. Always prioritize safety and be willing to adjust or terminate your cycle if health concerns arise. Anastrozole for Female Athletes The use of Anastrozole among female athletes and bodybuilders is a topic that requires special consideration. While Anastrozole is primarily used by male athletes to combat estrogen-related side effects of anabolic steroid use, its application for women in sports and bodybuilding contexts is more nuanced and potentially controversial. First, it's crucial to understand that women naturally have higher levels of estrogen than men, and this hormone plays vital roles in female health, including maintaining bone density, supporting cardiovascular health, and regulating menstrual cycles. Therefore, the use of an aromatase inhibitor like Anastrozole in women can have more dramatic and potentially harmful effects compared to its use in men. In the context of female bodybuilding and athletics, Anastrozole is sometimes used by women who are taking anabolic steroids or other performance-enhancing drugs that can increase testosterone or cause virilization effects. In these cases, Anastrozole might be employed to help manage estrogen levels and potentially reduce the risk of certain side effects. However, the dosages used by women are typically much lower than those used by men. While a male bodybuilder might use 0.5-1mg of Anastrozole daily or every other day, a female athlete might use as little as 0.25mg once or twice a week. The exact dosage can vary widely based on individual response and the specific compounds being used alongside Anastrozole. It's important to note that the use of Anastrozole by female athletes is not without risks. Excessive suppression of estrogen in women can lead to a range of health issues, including osteoporosis, cardiovascular problems, and menstrual irregularities. It can also cause symptoms like joint pain, mood swings, and vaginal dryness. For women considering the use of Anastrozole, extremely careful monitoring is essential. This should include regular blood work to check hormone levels, as well as bone density scans to monitor for potential bone loss. Any signs of excessive estrogen suppression should be taken seriously, and use should be discontinued if concerning symptoms arise. For more information on performance enhancement options for women, you might find this article on Anavar for women helpful. It's worth noting that there are often safer alternatives for female athletes looking to enhance their performance or physique. Compounds like Anavar or certain selective androgen receptor modulators (SARMs) are sometimes considered less risky options, although they too come with their own set of potential side effects and risks. For many female athletes, natural methods of optimizing hormone balance and performance may be preferable to the use of drugs like Anastrozole. This can include strategies like optimizing nutrition, fine-tuning training protocols, and using legal, natural supplements to support performance and recovery. Ultimately, the decision to use Anastrozole or any performance-enhancing substance is a personal one that should be made with full awareness of the potential risks and benefits. For female athletes considering this path, it's absolutely crucial to work closely with a knowledgeable healthcare provider who understands the unique considerations of women's health in the context of sports and bodybuilding. Remember, while the allure of enhanced performance can be strong, long-term health should always be the primary concern. The potential short-term gains from using compounds like Anastrozole must be carefully weighed against the possible long-term health consequences, especially for female athletes. Long-Term Effects of Anastrozole Use Understanding the long-term effects of Anastrozole use is crucial for anyone considering its incorporation into their performance enhancement or bodybuilding regimen. While Anastrozole can offer significant benefits in terms of estrogen management, prolonged use can potentially lead to various health concerns that need to be carefully considered. One of the most significant long-term concerns with Anastrozole use is its impact on bone health. Estrogen plays a crucial role in maintaining bone density, and by suppressing estrogen levels, Anastrozole can potentially lead to decreased bone mineral density over time. This increases the risk of osteoporosis and fractures, particularly in older users or those with pre-existing bone health issues. Regular bone density scans and supplementation with calcium and vitamin D are often recommended for long-term Anastrozole users. Cardiovascular health is another area of concern with prolonged Anastrozole use. While the drug can have positive effects on body composition, long-term use may negatively impact cholesterol levels. Specifically, it can lower HDL (good) cholesterol and increase LDL (bad) cholesterol. This shift in lipid profile can potentially increase the risk of cardiovascular issues over time. Regular monitoring of cholesterol levels and incorporating heart-healthy lifestyle practices become especially important for long-term users. The impact on joint health is another consideration for those using Anastrozole over extended periods. Many users report increased joint pain and stiffness with prolonged use, likely due to the reduction in estrogen, which plays a role in joint lubrication and health. This can be particularly problematic for athletes and bodybuilders engaged in high-impact activities or heavy lifting. For more insights on managing long-term health while pursuing performance enhancement, you might find this article on natural alternatives to steroids helpful. Cognitive function and mood stability are areas that may be affected by long-term Anastrozole use. Some studies have suggested that estrogen plays a role in cognitive health, particularly in older adults. While more research is needed, there's concern that long-term estrogen suppression could potentially impact cognitive function or mood over time. The endocrine system as a whole can be affected by prolonged Anastrozole use. The body's hormonal balance is delicate, and long-term manipulation of estrogen levels can potentially lead to adaptations in other hormonal pathways. This could affect everything from thyroid function to cortisol levels, potentially impacting metabolism, stress response, and overall well-being. Liver health is another factor to consider with long-term Anastrozole use. While it's generally considered less hepatotoxic than many anabolic steroids, Anastrozole is still processed by the liver. Prolonged use could potentially stress the liver over time, making regular liver function tests important for long-term users. It's also worth considering the potential for developing a reliance on Anastrozole. While not physically addictive, some users may find it challenging to discontinue use due to fears of estrogen rebound or loss of the physique benefits associated with lower estrogen levels. This psychological dependence can be a barrier to eventually cycling off the drug. For those using Anastrozole as part of a broader performance enhancement regimen, it's crucial to consider the cumulative effects of all compounds being used. The long-term impacts of Anastrozole use may be compounded by concurrent use of other substances, potentially increasing overall health risks. It's important to note that many of these long-term effects are dose-dependent and can vary significantly between individuals. Using the lowest effective dose and incorporating regular breaks from Anastrozole use can help mitigate some of these long-term risks. Ultimately, the decision to use Anastrozole long-term should be made carefully, with full awareness of the potential risks Ultimately, the decision to use Anastrozole long-term should be made carefully, with full awareness of the potential risks and benefits. Regular health check-ups, including comprehensive blood work, bone density scans, and cardiovascular assessments, are crucial for monitoring long-term health impacts. For those considering long-term Anastrozole use, it's worth exploring cycling strategies or alternative approaches to managing estrogen levels that may reduce the risks associated with prolonged use. This might include periodic breaks from the drug, using lower doses, or incorporating natural estrogen management techniques. Alternatives to Anastrozole While Anastrozole is a popular choice for estrogen management in bodybuilding and athletic circles, it's not the only option available. Understanding the alternatives can help you make a more informed decision about your hormone management strategy. One of the primary alternatives to Anastrozole is Exemestane, also known as Aromasin. Like Anastrozole, Exemestane is an aromatase inhibitor, but it works slightly differently. Exemestane is a "suicidal" inhibitor, meaning it permanently deactivates the aromatase enzyme. This can lead to more consistent estrogen suppression compared to Anastrozole. Some users report fewer side effects with Exemestane, particularly in terms of joint pain and lipid profiles. Another alternative is Letrozole, which is generally considered the most potent of the aromatase inhibitors. Letrozole can suppress estrogen levels more dramatically than Anastrozole, which can be beneficial in cases of severe estrogen-related side effects. However, this potency also comes with a higher risk of over-suppressing estrogen, potentially leading to more severe side effects. For those looking for a different approach to estrogen management, Selective Estrogen Receptor Modulators (SERMs) like Tamoxifen (Nolvadex) or Raloxifene are worth considering. Unlike aromatase inhibitors, which reduce overall estrogen levels, SERMs block estrogen's effects in certain tissues while allowing its benefits in others. This can be advantageous for maintaining bone density and cardiovascular health. For more information on how different compounds can affect your hormone balance, check out this comprehensive guide on testosterone replacement therapy . Natural alternatives for estrogen management are also available, although they're generally less potent than pharmaceutical options. Compounds like Diindolylmethane (DIM), Indole-3-Carbinol (I3C), and Calcium D-Glucarate can help promote healthy estrogen metabolism. These natural options are often used by those looking for milder estrogen control or as a supplement to pharmaceutical approaches. Some athletes and bodybuilders opt for a more holistic approach to managing estrogen levels. This can include dietary changes, such as increasing fiber intake and consuming cruciferous vegetables, which naturally support healthy estrogen metabolism. Regular exercise, particularly resistance training, can also help maintain a healthy hormone balance. For those using anabolic steroids, another approach to reducing the need for estrogen management is to choose compounds that are less likely to aromatize. Steroids like Primobolan, Anavar, or certain SARMs have a lower tendency to convert to estrogen, potentially reducing the need for aromatase inhibitors like Anastrozole. It's worth noting that the best alternative to Anastrozole will depend on your individual needs, goals, and how your body responds. What works well for one person may not be ideal for another. It's always recommended to work with a knowledgeable healthcare provider to determine the most appropriate approach for your specific situation. Remember, while these alternatives can offer different approaches to estrogen management, they all come with their own set of potential benefits and risks. The safest approach is always to prioritize your overall health, use any performance-enhancing substances responsibly, and regularly monitor your health markers. Conclusion As we conclude this comprehensive guide on Anastrozole, it's clear why this compound has garnered significant attention in the world of bodybuilding and athletics. Its potent ability to control estrogen levels offers a range of benefits, from preventing gynecomastia to helping maintain a lean, defined physique. However, these benefits come with potential risks and side effects that must be carefully considered. For those considering Anastrozole use, education is key. Understanding how the compound works, proper dosing protocols, and the importance of regular health monitoring can help maximize benefits while minimizing risks. It's crucial to approach Anastrozole use with a balanced perspective, recognizing both its potential advantages and its limitations. Remember that Anastrozole, like any performance-enhancing substance, is not a magic solution. It works best when combined with a solid foundation of proper nutrition, consistent training, and adequate rest. Anastrozole should be viewed as a tool to complement your efforts, not replace the fundamental principles of fitness and health. For competitive athletes, the legal and ethical considerations of using Anastrozole cannot be overlooked. Its status as a prohibited substance in most sports means that use could jeopardize your athletic career. Always be aware of the regulations in your sport and make informed decisions. As research continues, our understanding of Anastrozole and its long-term effects will likely evolve. Staying informed about the latest studies and findings is crucial for anyone interested in using this compound. Ultimately, the decision to use Anastrozole is a personal one that should be made after careful consideration of the potential benefits and risks. For some, it may offer a powerful tool for enhancing their physique and performance. For others, the risks may outweigh the potential rewards, and alternative strategies may be more appropriate. Remember, your long-term health should always be the priority. No short-term gain is worth compromising your overall well-being. Whether you choose to use Anastrozole or explore other options, approach your fitness journey with patience, consistency, and a commitment to overall health. For more insights on optimizing your performance and health naturally, check out this guide on building muscle without steroids . As we look to the future of performance enhancement in 2025 and beyond, compounds like Anastrozole will likely continue to play a role in the world of bodybuilding and athletics. However, the most successful athletes will be those who combine cutting-edge tools with time-tested principles of hard work, smart training, and proper recovery. Thank you for joining us on this deep dive into Anastrozole. We hope this guide has provided you with valuable insights to help you make informed decisions about your fitness journey. Remember, knowledge is power, especially when it comes to optimizing your health and performance. See More:⤵ Anavar for Women Top 5 steroids for weight loss Top 6 Steroids for Women - A Comprehensive Guide Top 5 Steroids for Your First Cycle Clenbuterol: The Powerhouse Performance Enhancer What is Deca? Nandrolona: A Powerful Steroid Oxandrolone Side Effects: What You Need to Know Winstrol Cycle: The Ultimate Guide Anastrozole: Benefits, Side Effects, and Uses Sustanon 250: Everything You Need to Know Trenbolone: The Ultimate Guide to This Powerful Steroid Testosterone Cypionate Cycle: Beginner's Guide Deca-Durabolin: The Pros and Cons of This Powerful Steroid Proviron: Complete Guide Primobolan: Steroid for Lean Muscle Gains Dianabol: Ultimate Guide Anadrol: The Ultimate Guide to this Powerful Steroid Equipoise: Understanding Dosages and Side Effects for Safe Use
- Upper Body Training for Beginners: The Complete Guide to Building Strength and Muscle
Are you new to fitness and looking to develop a stronger, more defined upper body? You're in the right place. This comprehensive guide to upper body training for beginners will walk you through everything you need to know to start building strength, improving posture, and developing muscle in your chest, back, shoulders, and arms—even if you've never lifted weights before. Whether you're training at home or in a gym, this evidence-based approach to beginner upper body workouts will help you establish proper form, understand effective exercise selection, and create sustainable training habits that deliver real results. What You'll Learn in This Guide Upper Body Anatomy Essential Equipment for Beginners 10 Fundamental Upper Body Exercises Creating Your Beginner Workout Plan Progressive Overload Principles Nutrition for Upper Body Development Supplements for Upper Body Training Common Beginner Mistakes Tracking Progress Advanced Techniques Conclusion Why Upper Body Training Matters for Beginners Developing upper body strength isn't just about aesthetics—though a well-defined chest, broad shoulders, and toned arms are certainly motivating goals. A strong upper body improves your functional capacity for daily activities, from carrying groceries to lifting objects overhead. It also plays a crucial role in maintaining proper posture, reducing the risk of injury, and building overall confidence in your physical abilities. For beginners, starting with the right shoulder exercises, chest workouts, back training routines, and arm workouts creates a foundation that will support your fitness journey for years to come. Unlike advanced trainees who might need specialized approaches, beginners can make remarkable progress with relatively simple, compound movements that target multiple muscle groups simultaneously. In this guide, we'll focus on practical, science-backed methods for developing your upper body, regardless of your current fitness level. Whether you're looking to build muscle, increase strength, or simply improve your overall health, these principles will help you achieve your goals efficiently and safely. Ready to transform your upper body and build lasting strength? Let's dive into the fundamentals of upper body training for beginners and set you on the path to success. Upper Body Anatomy Understanding the anatomy of your upper body is essential for effective training. When you comprehend which muscles you're targeting with specific exercises, you can create more balanced workouts and establish stronger mind-muscle connections, ultimately leading to better results. The upper body consists of several major muscle groups, each with unique functions and movement patterns that contribute to overall strength and aesthetics. The chest muscles, or pectorals, are among the most prominent upper body muscles and are responsible for movements like pushing and bringing your arms toward the midline of your body. The pectoralis major is the larger, more visible chest muscle, while the pectoralis minor lies underneath and assists with shoulder movements. Many beginners are eager to develop their chest muscles through exercises like push-ups and bench presses, as a well-developed chest contributes significantly to the coveted V-shaped upper body. Your back consists of multiple muscle groups working together to support posture and enable pulling movements. The latissimus dorsi (or "lats") are the large, wing-like muscles that span the width of your mid and lower back, creating that desirable V-taper when developed. The rhomboids sit between your shoulder blades and help with posture and shoulder blade retraction, while the trapezius (or "traps") extend from your neck to mid-back and assist with shoulder and neck movements. Many beginners neglect back training in favor of more visible "mirror muscles," but a strong back is crucial for balanced development and injury prevention. The shoulder muscles, or deltoids, consist of three distinct heads: anterior (front), lateral (side), and posterior (rear). These muscles work together to enable the wide range of motion in your shoulder joint and contribute significantly to the appearance of upper body width and definition. Balanced development across all three deltoid heads is essential for both aesthetic purposes and functional shoulder health, which is why a well-designed beginner shoulder workout should include exercises that target each head specifically. Your arms consist primarily of the biceps on the front of your upper arms and the triceps on the back. The biceps brachii is a two-headed muscle responsible for elbow flexion and forearm supination, while the triceps brachii is a three-headed muscle that extends the elbow. Despite the popularity of bicep training, the triceps actually make up about two-thirds of your upper arm mass, making them crucial for developing impressive arms. A balanced arm workout for beginners should therefore include both bicep and tricep exercises in appropriate proportions. The forearms, while often overlooked, play a crucial role in grip strength and overall arm development. They consist of multiple smaller muscles that control wrist and finger movements and contribute to the appearance of well-developed arms. Strong forearms also support heavier lifting in virtually all upper body exercises, making them an important component of comprehensive upper body training. As you progress in your fitness journey, you'll find that forearm strength often becomes a limiting factor in exercises like pull-ups and rows, highlighting their importance in a balanced training program. Essential Equipment for Beginners Starting your upper body training journey doesn't require an elaborate home gym setup or expensive equipment. In fact, one of the beauties of upper body training for beginners is that you can achieve significant results with minimal investment. The key is to focus on versatile equipment that allows for progressive overload—the gradual increase in stress placed on the body during exercise that stimulates muscle adaptation and growth. Dumbbells are perhaps the most versatile and beginner-friendly piece of equipment for upper body training. Unlike barbells, which require both sides of your body to work in perfect unison, dumbbells allow each arm to move independently, helping to correct strength imbalances while also engaging more stabilizing muscles. For beginners, a set of adjustable dumbbells is ideal, as they allow you to start with lighter weights and gradually increase as you build strength. If budget is a concern, even a single pair of moderate-weight dumbbells can enable dozens of effective exercises targeting every upper body muscle group. Resistance bands have gained tremendous popularity in recent years, and for good reason. These inexpensive, portable training tools provide variable resistance throughout a movement (typically increasing tension at the end range of motion), which can be particularly beneficial for muscle development. For home upper body workouts, resistance bands can replicate many gym machine exercises and even provide unique benefits that free weights cannot. A set of bands with different resistance levels will allow you to progress from beginner to intermediate exercises without needing to purchase additional equipment. A pull-up bar is another valuable investment for comprehensive upper body development. While strict pull-ups may be challenging for most beginners, a doorway pull-up bar allows you to perform modified versions like negative pull-ups or band-assisted pull-ups, which are excellent for building the strength necessary for the full movement. Additionally, a pull-up bar can be used for hanging exercises that decompress the spine and improve grip strength, making it a versatile tool for overall upper body health and development. For those with a bit more space and budget, a simple weight bench dramatically expands your exercise options. An adjustable bench allows you to perform exercises at various angles, targeting different portions of muscle groups for more complete development. Incline bench presses, for example, shift emphasis to the upper chest, while decline positions target the lower chest fibers. Even without weights, a bench can be used for bodyweight exercises like elevated push-ups, tricep dips, and step-ups, making it a worthwhile investment for those serious about their fitness journey. Remember that your own body weight is perhaps the most accessible and effective "equipment" for beginners. Push-up variations, plank holds, dips using household furniture, and inverted rows under a sturdy table can all provide significant challenges for novice trainees. As your fitness improves, you can make bodyweight exercises more challenging by altering leverage, changing hand positions, or increasing time under tension, allowing for continued progress without additional equipment. The most important factor is consistency in training, not the fanciness of your equipment. 10 Fundamental Upper Body Exercises The foundation of effective upper body training for beginners lies in mastering a core set of fundamental exercises that target all major muscle groups. These movements establish proper movement patterns, build baseline strength, and create the neuromuscular connections necessary for more advanced training in the future. While there are countless exercises to choose from, these ten movements provide the most bang for your buck when starting your fitness journey. The push-up stands as perhaps the most fundamental upper body exercise, and for good reason. This compound movement primarily targets the chest muscles while also engaging the shoulders, triceps, and core stabilizers. The beauty of push-ups for beginners lies in their scalability—you can start with wall push-ups or elevated push-ups if standard floor push-ups are too challenging, then gradually progress to more difficult variations as strength improves. Focus on maintaining a rigid plank position throughout the movement, with your body forming a straight line from head to heels. Lower your chest to within a few inches of the floor, then press back up to the starting position while keeping your elbows at roughly a 45-degree angle from your torso. Aim for 3 sets of 8-12 repetitions, increasing the difficulty when you can comfortably perform all reps with perfect form. The dumbbell bench press serves as an excellent introduction to weighted chest training and a cornerstone of any beginner chest workout. Unlike the barbell version, dumbbell presses allow for a more natural range of motion and help identify and correct strength imbalances between sides. Lie on a flat bench holding dumbbells at chest level with palms facing forward. Press the weights upward until your arms are extended (but not locked), then slowly lower them back to the starting position, feeling a stretch across your chest muscles. The key for beginners is to start with lighter weights that allow for perfect form and full range of motion. As with most strength exercises, aim for 3 sets of 8-12 repetitions, focusing on controlled movement rather than momentum. Bent-over dumbbell rows are essential for developing the back muscles, particularly the latissimus dorsi and rhomboids, which are crucial for posture and pulling strength. This exercise forms the foundation of any effective back training for beginners program. Stand with feet shoulder-width apart, knees slightly bent, and hinge at your hips until your torso is nearly parallel to the floor. Hold dumbbells with arms extended toward the floor, then pull the weights toward your lower ribs, keeping your elbows close to your body. Focus on squeezing your shoulder blades together at the top of the movement before lowering the weights with control. Many beginners make the mistake of using momentum or excessive weight, which reduces the effectiveness of the exercise and increases injury risk. Start with lighter weights and perfect your form before progressing. Lateral raises target the middle deltoid head, contributing significantly to shoulder width and that coveted V-shaped upper body. This isolation exercise is simple in execution but powerful in effect when performed correctly. Stand with feet shoulder-width apart holding dumbbells at your sides. With a slight bend in your elbows, raise the weights out to the sides until your arms are parallel to the floor, then lower with control. The key mistake beginners make is using too much weight, which causes them to swing the weights up using momentum rather than deltoid strength. Start with surprisingly light weights—even 5-pound dumbbells can be challenging when used with proper form. Focus on feeling the middle deltoid working throughout the movement, and aim for slightly higher repetitions (12-15 per set) as this muscle responds well to higher volume training. Bicep curls are perhaps the most recognizable arm exercise and a staple in any arm workout for beginners. While simple in execution, proper form is crucial for maximum effectiveness and safety. Stand with feet shoulder-width apart holding dumbbells at your sides with palms facing forward. Keeping your upper arms stationary against your sides, curl the weights toward your shoulders by bending at the elbow. Squeeze your biceps at the top of the movement, then lower the weights with control. The most common mistake is using momentum by swinging the weights or leaning backward, which reduces tension on the biceps and can strain the lower back. Start with weights that allow for 10-12 controlled repetitions, and focus on the mind-muscle connection by consciously squeezing the biceps throughout the movement. Tricep dips effectively target the triceps muscles on the back of your upper arms, which make up approximately two-thirds of your arm mass. This bodyweight exercise can be performed using a sturdy chair, bench, or dedicated dip station. Sit on the edge of your support with hands gripping the edge, fingers pointing forward. Slide your buttocks off the edge, supporting your weight with your arms. Lower your body by bending your elbows to about 90 degrees, then push back up to the starting position. For beginners finding this too challenging, keep your feet flat on the floor with knees bent to reduce the amount of body weight you're lifting. As you gain strength, extend your legs further out to increase difficulty. Aim for 3 sets of 8-12 repetitions, focusing on keeping your shoulders down and away from your ears to protect the shoulder joint. Assisted pull-ups are the gateway to one of the most effective upper body exercises—the pull-up. While unassisted pull-ups may be out of reach for many beginners, assisted versions allow you to build the necessary strength progressively. You can use a resistance band for assistance (looped around the pull-up bar and your foot or knee), a pull-up machine at the gym, or even have a training partner support your legs. Grip the bar with hands wider than shoulder-width, palms facing away from you. Pull your body up until your chin clears the bar, focusing on driving your elbows down and back. Lower with control to a fully extended position. The key is to use just enough assistance to complete 5-8 quality repetitions, then gradually reduce the assistance as your strength improves. Pull-ups primarily target the latissimus dorsi but also engage the biceps, rear deltoids, and numerous other upper back muscles, making them incredibly efficient for overall upper body development. The shoulder press (or overhead press) is a compound movement that primarily targets all three heads of the deltoid muscles while also engaging the triceps and upper chest. This exercise can be performed seated or standing, with the standing version engaging more core muscles for stabilization. Hold dumbbells at shoulder height with palms facing forward. Press the weights overhead until your arms are fully extended (but not locked), then lower with control back to shoulder height. For beginners, the seated version provides more stability and allows for better focus on proper shoulder movement. Start with lighter weights to perfect your form, as shoulder injuries are common when using excessive weight or poor technique. Aim for 3 sets of 8-12 repetitions, and be particularly mindful of not arching your lower back during the movement. Chest flyes isolate the pectoral muscles more specifically than compound pressing movements, creating a stretch and contraction that's excellent for chest development. Lie on a flat bench holding dumbbells above your chest with palms facing each other and a slight bend in your elbows. Lower the weights out to the sides in a wide arc until you feel a stretch across your chest, then bring them back together in the same arc. The key is to maintain the same slight bend in your elbows throughout the movement—straightening or bending them further changes the exercise and can reduce its effectiveness. Many beginners use too much weight for flyes, which forces them to turn the movement into a press. Start with lighter weights than you might expect, focusing on the stretch and contraction in the chest muscles rather than the amount of weight lifted. The plank, while primarily known as a core exercise, engages numerous upper body muscles including the shoulders, chest, and serratus anterior. This isometric hold builds the stabilizing strength necessary for virtually all other upper body movements. Start in a push-up position, then lower onto your forearms with elbows directly beneath your shoulders. Hold your body in a straight line from head to heels, engaging your core and squeezing your glutes. Avoid common mistakes like allowing your hips to sag or pike up, and don't forget to breathe normally throughout the hold. For beginners, start with 3 sets of 20-30 second holds, gradually increasing duration as your strength improves. The plank builds the foundation of core stability that supports heavier lifting in other upper body exercises, making it an essential component of any comprehensive training program. Creating Your Beginner Workout Plan Designing an effective workout plan is where many beginners stumble, often falling into the trap of either doing too much too soon or not providing enough stimulus for progress. A well-structured upper body training for beginners plan balances adequate volume for growth with sufficient recovery time, all while being sustainable within your lifestyle. The goal isn't to create the most challenging program possible, but rather one that delivers consistent results while keeping you motivated and injury-free. For most beginners, a 2-day upper body split provides an excellent balance of stimulus and recovery. This approach allows you to train each muscle group twice per week—which research suggests is optimal for beginners—while still providing adequate recovery between sessions. A simple and effective structure divides your training into "push" and "pull" days. Push days focus on chest, shoulders, and triceps (muscles used in pushing movements), while pull days target the back and biceps (muscles used in pulling movements). This natural grouping allows for efficient workouts where the muscles being trained complement rather than interfere with each other. A sample push day might include push-ups (3 sets of 8-12 reps), dumbbell bench press (3 sets of 8-12 reps), shoulder press (3 sets of 8-12 reps), lateral raises (3 sets of 12-15 reps), tricep dips (3 sets of 8-12 reps), and finish with planks (3 sets of 20-30 seconds). This combination targets all the pushing muscles through a mix of compound and isolation movements, providing both strength development and muscle growth stimulus. For beginners, this volume—approximately 15 total sets for pushing muscles—strikes the right balance between providing adequate stimulus without overwhelming recovery capacity. Your pull day could consist of assisted pull-ups (3 sets of 5-8 reps), bent-over rows (3 sets of 10-12 reps), face pulls or reverse flyes for rear deltoids (3 sets of 12-15 reps), bicep curls (3 sets of 10-12 reps), and finish with a forearm exercise like reverse curls (3 sets of 12-15 reps). This workout hits all the major pulling muscles and balances the development of your upper body. Notice that both push and pull days include exercises for all the major muscle groups within that movement pattern, ensuring balanced development rather than overemphasizing certain "show muscles." When scheduling these workouts, aim for 2-3 sessions of each type per week with at least 48 hours between training the same muscle groups. A sample weekly schedule might be: Monday (Push), Tuesday (Pull), Wednesday (Rest or Lower Body), Thursday (Push), Friday (Pull), Weekend (Rest or active recovery). This frequency provides the optimal stimulus for beginners while allowing adequate recovery between sessions. Remember that muscles grow during recovery, not during the workout itself, so respecting these rest periods is crucial for progress. As a beginner, resist the temptation to add more exercises or training days in hopes of faster results. More is not better—better is better. Focus on perfect execution of these fundamental movements, progressive overload (which we'll discuss next), and consistency in your training schedule. A moderate program that you can sustain consistently will always produce better results than an extreme program that leads to burnout or injury. As your fitness improves over months of consistent training, you can gradually increase volume and frequency, but the fundamentals outlined here will serve you well even into intermediate stages of your fitness journey. Progressive Overload Principles Progressive overload is the single most important principle for continued improvement in your upper body training for beginners program. This concept, while simple to understand, is often poorly implemented by novice trainees. Progressive overload refers to the gradual increase of stress placed on the body during exercise, which forces adaptation in the form of increased strength, endurance, and muscle size. Without this progressive challenge, your body quickly adapts to the current stimulus and progress stalls, regardless of how intense your workouts feel. The most straightforward method of progressive overload is increasing the weight you lift. When you can complete the upper range of your target repetitions (e.g., 12 reps in an 8-12 rep range) with good form for all prescribed sets, it's time to increase the weight slightly. For beginners, this might mean adding just 2.5-5 pounds to each dumbbell or moving up to the next resistance band level. This incremental approach is far superior to making large jumps in weight, which often leads to form breakdown and increased injury risk. Track your weights carefully in a training log, and celebrate these small increases—they add up to significant progress over time. Before adding weight, however, consider increasing repetitions as your first progression strategy. If your program calls for 3 sets of 8-12 repetitions and you can only complete 8 reps per set, focus first on building up to 10, then 12 reps with the same weight before increasing load. This approach is particularly valuable for beginners as it allows more practice of the movement pattern while gradually building work capacity. Additionally, higher repetition ranges can be beneficial for joint health and hypertrophy (muscle growth), making this a safe and effective progression method for those new to strength training. Another effective progression strategy is increasing the number of sets you perform for each exercise. If you're currently doing 2-3 sets per exercise, adding an additional set increases the total volume of work without requiring heavier weights or more repetitions per set. This approach is especially useful when you've reached a plateau with a particular weight but don't feel ready to increase the load. For example, if you've been performing 3 sets of 12 dumbbell bench presses with 20-pound dumbbells and can't yet handle 25-pounders, try adding a fourth set with the 20-pound weights before attempting the heavier load in your next workout. Manipulating rest periods provides another dimension of progressive overload. As a beginner, you might start with 90-120 seconds of rest between sets to ensure adequate recovery for quality repetitions. As your conditioning improves, gradually reducing rest periods to 60-90 seconds increases the intensity of the workout by giving muscles less time to recover between efforts. This approach is particularly effective for building muscular endurance and work capacity, though it may temporarily reduce the amount of weight you can lift or repetitions you can perform. Balance this strategy with the others mentioned, as very short rest periods aren't always optimal for maximum strength development. Perhaps the most overlooked form of progression is improving exercise technique. Before focusing on adding weight or repetitions, ensure you're performing each movement with proper form through a full range of motion. Many beginners use partial ranges of motion or compensatory movements that reduce the effectiveness of exercises. Deepening your push-ups, achieving a better stretch at the bottom of a dumbbell press, or maintaining stricter form during bicep curls can all increase the effectiveness of an exercise without changing weight or repetitions. This quality-focused approach builds a foundation for long-term progress while reducing injury risk, making it perhaps the most important progression strategy for beginners. Nutrition for Upper Body Development Nutrition plays a crucial role in supporting your upper body training for beginners program, yet it's often overlooked in favor of focusing solely on workout routines. The reality is that without proper nutritional support, even the most perfectly designed training program will yield suboptimal results. Your body requires adequate fuel and building blocks to recover from workouts and build new muscle tissue, making nutrition just as important as the training itself for those seeking to develop their upper body. Protein intake stands as the most critical nutritional factor for muscle development. For beginners engaged in regular strength training, aim for 1.6-2.2 grams of protein per kilogram of bodyweight daily (or roughly 0.7-1.0 grams per pound). This amount provides the amino acids necessary for muscle repair and growth without being excessively high. Distribute this protein across 4-5 meals throughout the day to maximize muscle protein synthesis. Quality protein sources include lean meats, poultry, fish, eggs, dairy, legumes, and plant-based options like tofu and tempeh. For those struggling to meet protein requirements through whole foods alone, a quality protein supplement can be a convenient addition to your nutrition plan. Total caloric intake determines whether you'll build muscle, maintain your current physique, or lose body fat. For beginners looking to build muscle and strength, a slight caloric surplus of 250-500 calories above maintenance levels provides the energy necessary for muscle growth without excessive fat gain. Those seeking to lose fat while developing upper body strength should maintain a moderate caloric deficit of 300-500 calories below maintenance, coupled with adequate protein intake to preserve muscle mass. Finding your maintenance calorie level requires tracking your food intake and body weight for several weeks, then adjusting based on results. Numerous online calculators can provide a starting estimate, but individual metabolism varies significantly. Carbohydrates often get vilified in popular diet culture, but they play an essential role in fueling intense training sessions. Carbs are stored as glycogen in your muscles and liver, providing the primary energy source for high-intensity activities like strength training. For those engaged in regular upper body workouts, aim for 3-5 grams of carbohydrates per kilogram of bodyweight daily, with higher amounts on training days and slightly lower amounts on rest days. Focus on quality carbohydrate sources like whole grains, fruits, vegetables, and legumes, which provide not only energy but also fiber, vitamins, and minerals necessary for overall health and recovery. Dietary fat is essential for hormone production, including testosterone and growth hormone, which play significant roles in muscle development and recovery. Aim for 0.5-1 gram of fat per kilogram of bodyweight daily, with an emphasis on healthy sources like avocados, nuts, seeds, olive oil, and fatty fish rich in omega-3 fatty acids. Don't fall into the trap of extremely low-fat diets in an attempt to reduce body fat—this approach can impair hormone production and actually hinder your progress. Balance your fat intake with protein and carbohydrates to support overall health and performance. Meal timing, while less important than overall daily nutrition, can still optimize your training results. Try to consume a meal containing both protein and carbohydrates within 2 hours after your workout to support recovery and glycogen replenishment. Before training, a lighter meal containing easily digestible protein and carbohydrates about 1-2 hours pre-workout can provide energy without causing digestive discomfort. For those training early in the morning, a simple protein shake or banana might be sufficient pre-workout nutrition, with a more substantial meal following the session. Hydration is perhaps the most underrated aspect of nutrition for exercise performance. Even mild dehydration can significantly impair strength and endurance, reducing the quality of your workouts and hindering recovery. Aim to drink at least 3-4 liters of water daily, with additional fluid intake during and after training sessions. A simple way to monitor hydration status is to check urine color—it should be pale yellow rather than dark or completely clear. Consider adding electrolytes to your water during longer or more intense training sessions, especially if you sweat heavily or train in hot environments. Supplements for Upper Body Training While whole food nutrition should form the foundation of your diet, certain supplements can provide valuable support for your upper body training for beginners program. The supplement industry is notorious for exaggerated claims and marketing hype, so it's important to focus on evidence-based options with proven benefits rather than chasing the latest miracle product. A few select supplements, when used appropriately, can help fill nutritional gaps, enhance recovery, and potentially improve performance during your upper body workouts. Protein powder stands as perhaps the most practical supplement for those engaged in regular strength training. While not necessary if you can meet your protein requirements through whole foods, protein supplements offer convenience and can help you reach your daily protein targets when busy schedules or food preferences make this challenging. Whey protein is the most common and well-researched option, providing a complete amino acid profile with high bioavailability. For those with dairy sensitivities or following plant-based diets, quality pea, rice, or hemp protein blends can be effective alternatives. Aim for products with minimal additives and sugar, and use them to supplement your diet rather than replace whole food protein sources. For quality supplements that can enhance your training results, Smart Nutrition offers science-backed formulations designed specifically for fitness enthusiasts. Creatine monohydrate is one of the most thoroughly researched and effective supplements available for strength training. This naturally occurring compound helps regenerate ATP (adenosine triphosphate), your muscles' primary energy source during high-intensity, short-duration activities like weight lifting. Supplementing with 3-5 grams of creatine monohydrate daily has been shown to increase strength, power output, and muscle mass when combined with resistance training. Unlike many supplements, creatine has decades of research supporting both its efficacy and safety. The loading phase (taking 20g daily for a week) that was once commonly recommended is now considered unnecessary—consistent daily intake of 3-5g will saturate muscle creatine stores over time and maintain them effectively. Pre-workout supplements can enhance energy, focus, and performance during training sessions, which may be particularly beneficial for beginners still developing exercise habits. The primary active ingredient in most pre-workouts is caffeine, which has well-documented performance-enhancing effects for both strength and endurance activities. Other common ingredients include citrulline malate for improved blood flow, beta-alanine for enhanced muscular endurance, and various B vitamins for energy metabolism. If you choose to use a pre-workout, look for products with transparent labeling that clearly disclose the amount of each ingredient rather than hiding behind proprietary blends. Start with half the recommended dose to assess your tolerance, and be mindful of caffeine intake, particularly for afternoon or evening workouts that might affect sleep quality. Branched-chain amino acids (BCAAs)—leucine, isoleucine, and valine—are essential amino acids that play a key role in muscle protein synthesis and recovery. While complete protein sources already contain BCAAs, supplemental forms can be beneficial in certain scenarios, particularly when training in a fasted state or during very long training sessions. The most important BCAA is leucine, which acts as a primary trigger for muscle protein synthesis. If you're already consuming adequate protein throughout the day (including around your workouts), BCAA supplements likely provide minimal additional benefit. However, they can be useful as a between-meal supplement to boost daily protein quality or during fasted training to minimize muscle breakdown. Vitamin D and magnesium are two micronutrients worth considering as supplements, as deficiencies in both are common and can impact exercise performance and recovery. Vitamin D plays a crucial role in bone health, immune function, and even muscle performance, with some research suggesting it may influence testosterone levels. Magnesium is involved in over 300 enzymatic reactions in the body, including those related to muscle contraction, protein synthesis, and energy production. Before supplementing, consider getting blood work done to confirm deficiencies, as excessive intake of certain micronutrients can have negative effects. For most people, a high-quality multivitamin can provide insurance against minor deficiencies without the need for multiple individual supplements. Remember that supplements should complement, not replace, a solid foundation of proper training, nutrition, and recovery. No supplement will compensate for inconsistent training or poor dietary habits. Start by establishing these fundamentals, then consider adding supplements one at a time to assess their individual impact on your performance and recovery. This methodical approach helps you identify which supplements genuinely benefit your training and which might be unnecessary expenses. For those interested in optimizing their training with advanced nutritional strategies, Smart Nutrition offers science-backed approaches to fueling your workouts and recovery. Common Beginner Mistakes The path to upper body development is fraught with potential pitfalls, particularly for those new to resistance training. Avoiding these common mistakes will accelerate your progress and reduce your risk of injury or frustration. Being aware of these errors before they become habits can save you months or even years of suboptimal training and help you build a stronger, more balanced upper body from the start of your fitness journey. Perhaps the most prevalent mistake in upper body training for beginners is using excessive weight at the expense of proper form. The desire to lift impressive weights is understandable, but it often leads to compromised movement patterns, reduced muscle activation, and increased injury risk. When you use weights that are too heavy, your body naturally recruits additional muscles or alters the movement pattern to complete the lift, shifting stress away from the target muscles and potentially placing harmful stress on joints and connective tissues. The solution is simple but requires patience: start with lighter weights than your ego might prefer, perfect your form through full ranges of motion, and progress gradually. Remember that the weight on the bar or dumbbell is merely a tool to create the right stimulus for your muscles—it's not the goal itself. Neglecting back training in favor of "mirror muscles" like the chest and biceps creates both aesthetic and functional imbalances. This common beginner mistake stems from the natural tendency to focus on muscles we can easily see in the mirror, but it can lead to rounded shoulders, poor posture, and increased risk of shoulder injuries over time. A balanced upper body training for beginners program should include at least as much pulling volume (rows, pull-ups, face pulls) as pushing volume (presses, push-ups). This balance creates the structural integrity necessary for long-term progress while developing the coveted V-taper that makes the entire upper body look more impressive. Make back training a priority from the beginning of your fitness journey, and you'll build a stronger foundation for all other upper body development. Insufficient recovery between training sessions is a mistake that stems from the "more is better" mentality common among enthusiastic beginners. While consistency is crucial, muscles grow during recovery periods, not during the workout itself. Training the same muscle groups without adequate recovery (generally at least 48 hours for beginners) interferes with the adaptation process and can lead to overtraining symptoms like decreased performance, persistent soreness, and increased injury risk. This doesn't mean you need to be completely inactive between upper body sessions—alternating between upper and lower body training days is an excellent strategy that allows continuous training while providing adequate recovery for specific muscle groups. Program hopping—constantly switching between different workout routines before giving any single approach sufficient time to work—is another common mistake that severely limits progress. The fitness industry thrives on novelty, constantly promoting new "revolutionary" training methods that promise faster results. This creates a temptation to abandon your current program as soon as you see something that sounds better or when you don't experience immediate dramatic changes. The reality is that any well-designed program based on progressive overload principles will produce results if followed consistently for an adequate period. Give your upper body workout for beginners at least 8-12 weeks before considering significant changes, making only minor adjustments based on your individual response. Remember that the most effective program is the one you follow consistently over time. Ignoring pain signals represents a dangerous mistake that can transform a minor issue into a serious injury. Many beginners confuse the discomfort of challenging exercise (the "burn" of muscle fatigue) with the pain of injury. While some discomfort is normal during challenging sets, sharp, stabbing, or persistent pain is your body's warning system and should never be ignored. Learn to distinguish between productive training discomfort and potential injury signals. If you experience joint pain, asymmetrical pain (one side only), or pain that persists well after your workout, reduce the weight, modify the exercise, or consult with a healthcare professional. Taking a week off to address a minor issue is far better than being forced to take months off due to a serious injury that developed from ignoring warning signs. Neglecting proper warm-up and mobility work is a subtle mistake that compounds over time, gradually restricting your range of motion and increasing injury risk. Many beginners, eager to get to the "real workout," skip or rush through warm-up protocols. A proper warm-up increases blood flow to working muscles, elevates core temperature, lubricates joints, and activates the nervous system—all of which enhance performance and reduce injury risk. Spend 5-10 minutes on general cardiovascular warm-up (light cycling, rowing, or jogging) followed by dynamic mobility exercises specific to the movements you'll be performing. For upper body training, focus on shoulder, thoracic spine, and wrist mobility. This small time investment pays enormous dividends in both performance and longevity. Focusing exclusively on weight and repetitions while ignoring other progression variables limits your development potential. While tracking weight lifted and repetitions performed is important, other variables like tempo (speed of movement), range of motion, stability requirements, and rest periods can all be manipulated to create progressive overload. For example, slowing down the eccentric (lowering) portion of a bench press from one second to three seconds significantly increases time under tension and can stimulate new growth even without increasing weight. Similarly, performing an exercise on an unstable surface (like dumbbell presses on a stability ball) increases core engagement and stabilizer muscle activation. Expand your understanding of progression beyond simply adding weight to the bar for more comprehensive development. Tracking Progress Effective progress tracking is a cornerstone of successful upper body training for beginners that transforms your fitness journey from vague hopes to measurable achievements. Without objective tracking methods, it's difficult to determine whether your program is working optimally or requires adjustments. Human perception is notoriously unreliable—we tend to either overestimate or underestimate our progress based on mood, energy levels, and other subjective factors. Implementing systematic tracking methods provides the data needed for informed decisions about your training approach. Strength logs represent the most fundamental tracking method for resistance training. Record the exercise, weight used, sets, and repetitions for every workout in a dedicated notebook or digital app. This simple practice creates accountability and provides concrete evidence of progress over time. When reviewing your logs, look for patterns rather than focusing on day-to-day fluctuations, which can be influenced by sleep quality, nutrition, stress levels, and other variables. Progressive improvement over weeks and months is what matters most. Many beginners are surprised when reviewing their logs to discover they've doubled their strength in certain exercises within 3-6 months—progress that might have gone unnoticed without consistent tracking. Body measurements offer objective data about physical changes that mirror images might not clearly reveal. Using a flexible measuring tape, record the circumference of your chest (at nipple level), shoulders (at widest point), arms (both relaxed and flexed, at the midpoint of your upper arm), forearms (at widest point), and waist (at navel level). Take these measurements under consistent conditions—ideally first thing in the morning, before eating or drinking—and repeat every 4-6 weeks. Small changes of 0.25-0.5 inches can be significant when measured accurately. Remember that muscle growth occurs gradually; expecting dramatic changes in a few weeks will lead to disappointment. The value of measurements becomes apparent when comparing data over months, revealing the cumulative effect of consistent training. Progress photos provide visual evidence of changes that daily mirror checks might miss. Our brains adapt quickly to gradual changes in our appearance, making it difficult to notice improvements when we see ourselves every day. Take photos from the front, side, and back, wearing the same or similar clothing each time, under consistent lighting conditions. As with measurements, take these photos every 4-6 weeks rather than obsessively checking for changes. When comparing photos, look not just for size changes but also improvements in posture, muscle definition, and overall physique balance. Many beginners are pleasantly surprised when comparing current photos to those from 3-6 months earlier, seeing significant improvements that weren't apparent in day-to-day observations. Performance milestones provide concrete achievements to target and celebrate throughout your fitness journey. Examples include your first unassisted pull-up, reaching a specific weight on the bench press (such as 135 lbs or your bodyweight), performing 20 consecutive push-ups with perfect form, or holding a plank for 60 seconds. These milestones create motivation beyond aesthetic goals and acknowledge the functional improvements resulting from your training. Create a list of both short-term (achievable within 1-3 months) and long-term (6-12 months) milestones to pursue. Each achievement builds confidence and reinforces the effectiveness of your training approach, creating positive momentum that carries forward to your next goal. Subjective markers like energy levels, sleep quality, mood, and confidence are valuable complements to objective measurements. Consider keeping a brief journal entry after workouts noting how you felt during training, your energy throughout the day, and any changes in overall well-being. These subjective improvements often precede visible physical changes and provide motivation during periods when objective progress seems slow. Many beginners report significant improvements in confidence, reduced stress levels, and better sleep quality within weeks of starting a consistent training program—benefits that extend far beyond physical appearance but contribute significantly to quality of life and training adherence. Consistency tracking might be the most underrated form of progress monitoring. Simply recording whether you completed your planned workouts creates accountability and highlights patterns that might be affecting your progress. Use a calendar or habit-tracking app to mark each completed workout, aiming for at least 80-90% adherence to your planned schedule. This approach acknowledges that perfect adherence is unrealistic for most people while still maintaining the consistency necessary for results. If your tracking reveals frequent missed workouts, look for patterns—are they occurring on specific days of the week or during certain life circumstances? This information allows you to adjust your schedule or approach to improve adherence rather than falling into an all-or-nothing mentality that leads many beginners to abandon their programs entirely. Advanced Techniques As you progress beyond the novice stage in your upper body training for beginners journey, incorporating advanced techniques can reignite progress and overcome plateaus. These methods should be introduced gradually after you've established a solid foundation of strength, technique, and consistency with basic training principles. Think of these techniques as powerful tools to be used strategically rather than as replacements for the fundamental approaches that built your initial progress. Supersets involve performing two exercises back-to-back with minimal or no rest between them, then resting after both exercises are complete. This technique increases workout density (more work in less time) while creating a powerful metabolic stimulus. Antagonistic supersets pair opposing muscle groups—like chest and back, or biceps and triceps—allowing one muscle group to recover while the other works. For example, alternating between bench press and bent-over rows, or bicep curls and tricep extensions. This approach maintains performance on both exercises while significantly reducing total workout time. Agonist supersets, which target the same muscle group with different exercises, create greater fatigue and metabolic stress, potentially enhancing muscle growth. For instance, performing dumbbell bench press immediately followed by push-ups challenges the chest muscles through different movement patterns and resistance profiles. Begin by incorporating supersets for just 1-2 exercise pairs per workout before expanding their use. Drop sets extend a set beyond initial failure by immediately reducing the weight and continuing repetitions without rest. This technique increases total volume and time under tension while challenging muscle fibers that might not be fully recruited during standard sets. For example, after reaching failure with 30-pound dumbbells on lateral raises, immediately switch to 20-pound dumbbells and continue until reaching failure again. Some advanced lifters perform multiple drops, reducing weight 2-3 times within a single extended set. Drop sets are particularly effective for isolation exercises like lateral raises, bicep curls, and tricep extensions, though they can also be applied to compound movements with appropriate caution. Due to their intensity, limit drop sets to 1-2 exercises per workout and use them primarily on your final set of those exercises. Tempo training manipulates the speed of repetitions to change the training stimulus and challenge muscles in new ways. Standard repetitions typically involve a 1-2 second concentric (lifting) phase and a 1-2 second eccentric (lowering) phase. By deliberately slowing certain phases—particularly the eccentric portion—you increase time under tension and emphasize different aspects of strength development. A common tempo prescription might be written as 3-1-2-0, indicating a 3-second eccentric phase, 1-second pause at the bottom, 2-second concentric phase, and no pause at the top. Slower eccentric phases (3-5 seconds) can enhance muscle damage and subsequent growth, while pauses at various points in the range of motion eliminate momentum and increase motor control. Experiment with different tempos for exercises where you've reached plateaus, but be prepared to reduce the weight significantly—a proper 4-second eccentric phase makes even light weights feel substantially heavier. Isometric holds maintain a static muscle contraction without changing joint angle, creating intense tension without movement. These can be incorporated at various points in an exercise's range of motion to overcome sticking points or increase time under tension. For example, pausing for 3-5 seconds at the bottom of a push-up or holding the midpoint of a bicep curl challenges stability and creates a different stimulus than standard repetitions. Isometrics can also be used as standalone exercises, such as wall sits or plank variations. One particularly effective approach is the "iso-dynamic" method, where you perform an isometric hold at a challenging position in the range of motion (such as the midpoint of a dumbbell press), then immediately transition to dynamic repetitions. This pre-fatigues the muscles and creates a novel stimulus that can break through plateaus in both strength and muscle development. Mechanical drop sets change the exercise leverage or mechanics rather than the weight to extend a set beyond initial failure. Unlike traditional drop sets that require multiple weights or equipment changes, mechanical drops can often be performed with the same weight by altering body position or grip. For example, after reaching failure on incline dumbbell presses, immediately move to flat bench presses with the same weight, then to decline presses if possible. The changing angles shift emphasis to different portions of the muscle and alter the mechanical advantage, allowing continued work despite fatigue. For push-ups, you might progress from deficit push-ups (hands elevated) to standard push-ups to incline push-ups (feet elevated) as fatigue increases. This technique is particularly valuable for home training where weight options might be limited, as it allows you to extend the challenge of a set without requiring additional equipment. Rest-pause training breaks a single set into multiple mini-sets with brief rest intervals, allowing you to perform more total repetitions with a given weight. After reaching near-failure (1-2 reps short) with a challenging weight, rest for 15-20 seconds, then perform as many additional repetitions as possible. Repeat this process 2-3 times to significantly increase total volume with heavy weights. For example, instead of performing 8 repetitions with a given weight, you might achieve 8 reps, rest 15 seconds, get 3-4 more reps, rest again, and finish with 2-3 final repetitions—nearly doubling your total volume with the same weight. This technique works well for compound exercises like bench press, shoulder press, and rows, but use it judiciously as it creates significant fatigue and can impact recovery if overused. Conclusion The journey of upper body training for beginners represents more than just physical transformation—it's a process of developing discipline, self-knowledge, and a deeper understanding of how your body responds to different stimuli. Throughout this comprehensive guide, we've explored the fundamental principles that govern effective upper body development, from anatomy and exercise selection to nutrition, recovery, and advanced techniques. By implementing these evidence-based approaches consistently over time, you'll build not just aesthetic muscle and functional strength, but also the confidence that comes from mastering new skills and witnessing your body's remarkable capacity for adaptation. Remember that progress in strength training follows a nonlinear path, with periods of rapid improvement followed by plateaus that require patience and strategic adjustments. This natural rhythm of development applies to everyone, from beginners to elite athletes. The key difference between those who achieve their goals and those who don't isn't genetics or access to equipment—it's consistency and the willingness to trust the process during challenging periods. By focusing on gradual, sustainable progress rather than quick transformations, you build a foundation that supports lifelong physical development rather than temporary changes. The principles outlined in this guide—progressive overload, balanced training across all movement patterns, adequate recovery, supportive nutrition, and technique refinement—remain relevant regardless of how advanced you become. As you progress from beginner to intermediate and beyond, the application of these principles becomes more nuanced, but their fundamental importance never diminishes. Master these basics before pursuing advanced techniques or specialized approaches, as they provide the foundation upon which all sustainable progress is built. Remember that your fitness journey is uniquely yours, with individual factors influencing your optimal approach and rate of progress. Avoid the trap of comparing your development to others, especially those you see on social media who may have years of training experience, genetic advantages, or even performance-enhancing assistance. Instead, measure your progress against your previous self, celebrating improvements in strength, technique, consistency, and overall well-being as the meaningful milestones they truly are. As you continue your upper body development journey, maintain curiosity and openness to learning. The field of exercise science constantly evolves, with new research refining our understanding of optimal training approaches. By combining timeless principles with evidence-based innovations, you'll continue making progress long after the beginner phase, building a strong, functional, and aesthetically pleasing upper body that serves you well in both physical activities and daily life. See more articles that may interest you: Best Calisthenics Workout Body Weight Squat Upper Body Weight Exercises Calisthenics Workout Plan for Beginners Calisthenics Workout Plan Body Weight Pilates Postpartum Bodyweight Workout Full Body Workout Routine at Home Without Equipment Prenatal Bodyweight Workout CrossFit Chest Workouts Leg Day Training Dumbbell Bench Press Back and Shoulder Workout Routine Circuit Training: The Ultimate Guide to Efficient, Full-Body Fitness Stanozolol for Women Pilates Body Shaun T Workouts Group Fitness Classes One and Done Workout Dance Workout Online Pilates Classes Burning 1000 Calories a Day HIIT Classes Body Pump Workout 30 Minute Full Body Workout with Weights: Fast, Effective Strength and Fat Loss Full Body Pump Workout at Home: The Ultimate Guide for Muscle, Fat Loss, and Convenience 8 Week Full Body Workout Plan: The Ultimate Guide for Muscle, Strength, and Fat Women’s Full Body Lifting Routine: The Ultimate Guide for Strength, Muscle, and Fat Loss Full Body Workout Low Impact: The Ultimate Guide for Fitness, Bodybuilding, and Sports Performance Postpartum Full Body Workout: The Ultimate Guide for Safe Recovery, Fitness, and Strength After Pregnancy Best Full Body Mobility Routine Best Low Impact Full Body Workout
- 5 Anabolic Steroids That Give More Collaterals: A Comprehensive Guide for Bodybuilders and Athletes
In the world of bodybuilding and competitive sports, anabolic steroids have long been a topic of intense discussion and controversy. While these powerful compounds can offer significant performance enhancements, they also come with a host of potential side effects, or "collaterals," that users must carefully consider. This comprehensive guide delves deep into the realm of high-collateral anabolic steroids, focusing on the top five compounds known for their potent effects – both desired and undesired. What You'll Discover in This In-Depth Steroid Guide: Understanding Collateral Effects Decode the science behind steroid side effects Top 5 Anabolic Steroids with Significant Collateral Effects Explore Trenbolone, Anadrol, Dianabol, Halotestin, and Winstrol Comparative Analysis See how these powerful steroids stack up against each other Mitigating Collateral Effects Learn strategies to minimize risks while maximizing gains Legal and Ethical Considerations Navigate the complex landscape of steroid use in sports Alternatives to High-Collateral Steroids Discover safer options for performance enhancement Anabolic steroids have been a game-changer in the fitness and sports world, pushing the boundaries of human physical potential. However, with great power comes great responsibility, and understanding the full spectrum of effects – both positive and negative – is crucial for anyone considering their use. This guide focuses on the top five anabolic steroids known for their significant collateral effects, providing a balanced view of their impact on performance, physique, and overall health. From the muscle-building prowess of Trenbolone to the rapid strength gains of Anadrol, we'll explore why these compounds are so sought after despite their potential for serious side effects. We'll dive into the science behind these steroids, their specific collateral effects, and how they compare to each other in terms of risk-to-benefit ratio. Whether you're a competitive bodybuilder, an athlete looking to enhance performance, or simply someone interested in the science of anabolic steroids, this guide offers valuable insights into the world of high-collateral compounds. We'll explore not just the risks, but also strategies for mitigating these risks, as well as alternative options for those seeking safer paths to performance enhancement. Prepare for an in-depth journey into the world of potent anabolic steroids, their collateral effects, and the crucial information you need to make informed decisions about their use. Let's uncover the truth about these powerful compounds and their impact on the human body and athletic performance. Disclaimer: The information provided in this article is intended for educational and informational purposes only and is not meant to replace professional medical advice, diagnosis, or treatment. Aromasin (exemestane) is a prescription medication that should only be used under the direct supervision and guidance of a healthcare professional. The views and opinions expressed in this article are those of the author and do not necessarily reflect the official policy or position of any medical or health authority. While we strive to provide accurate and up-to-date information, the medical and fitness landscapes are continually evolving. Therefore, we encourage readers to consult with healthcare professionals for personalized advice and to conduct their own research before making any decisions regarding their health, particularly when considering the use of prescription medications like Aromasin in their fitness regimen. The experiences and outcomes discussed in this article may vary significantly from individual to individual. No guarantee is made regarding the effectiveness or safety of Aromasin or any other substance mentioned herein for bodybuilding or any other purpose. Readers are encouraged to share their experiences and engage in discussions via comments, but it's important to remember that these should not be seen as medical advice. Always prioritize safety, well-being, and professional guidance in your health and fitness journey. Understanding Collateral Effects In the world of anabolic steroids, the term "collateral effects" refers to the unintended consequences or side effects that accompany the desired muscle-building and performance-enhancing benefits. These collaterals can range from mild inconveniences to severe health risks, making it crucial for users to fully understand what they're getting into when considering steroid use. The complexity of these effects stems from the way anabolic steroids interact with various bodily systems, often going beyond their primary purpose of muscle growth and strength enhancement. Anabolic steroids work by mimicking the effects of testosterone, the primary male sex hormone responsible for muscle growth, bone density, and various other masculine characteristics. When introduced into the body in supraphysiological doses, these compounds can dramatically accelerate muscle protein synthesis, increase nitrogen retention, and enhance recovery times. However, this hormonal manipulation doesn't come without a cost. The body's endocrine system is a delicate balance, and the introduction of exogenous hormones can lead to a cascade of effects throughout the body. One of the primary reasons some steroids have more pronounced collaterals than others is their androgenic potency. Androgenic effects refer to the development of male characteristics, which can be problematic for both male and female users. Steroids with high androgenic ratings are more likely to cause side effects such as acne, hair loss (in those genetically predisposed), and the development of male features in women (virilization). Additionally, the method of administration can influence the severity of collateral effects. Oral steroids, for instance, must pass through the liver, potentially causing more stress on this vital organ compared to injectable compounds. The duration and dosage of steroid use also play significant roles in the development of collateral effects. Prolonged use and high doses increase the likelihood and severity of side effects. This is why many users opt for cycling – periods of use followed by periods of abstinence – in an attempt to mitigate long-term health risks. However, even with careful cycling, certain high-potency steroids can still cause significant collaterals due to their powerful nature. Understanding collateral effects is not just about knowing what side effects might occur; it's about comprehending the underlying mechanisms that cause these effects. This knowledge is crucial for users to make informed decisions about which compounds to use, how to structure their cycles, and what precautions to take. It's also important to note that individual responses to steroids can vary greatly. Factors such as genetics, overall health status, age, and concurrent use of other substances can all influence how a person's body reacts to anabolic steroids. 5 Anabolic Steroids with Significant Collateral Effects 1. Trenbolone Trenbolone, often referred to as "Tren" in bodybuilding circles, is renowned for its powerful anabolic effects and equally potent collateral impacts. This steroid stands out for its ability to dramatically increase muscle mass and strength while simultaneously promoting fat loss, making it a favorite among competitive bodybuilders and athletes. However, its powerful nature comes with a significant price in terms of side effects. One of the most notorious collaterals of Trenbolone is its impact on cardiovascular health. Users often report severe cardiovascular strain, including increased blood pressure and negative changes in cholesterol levels. This can lead to an increased risk of heart-related issues, especially when used for extended periods or at high doses. Additionally, Trenbolone is known for causing significant suppression of natural testosterone production, which can lead to hormonal imbalances and associated symptoms like mood swings, libido issues, and potential long-term fertility problems. Trenbolone is also infamous for its neurological side effects. Many users report experiencing "Tren cough," a sudden, intense coughing fit that can occur immediately after injection. More concerning are the psychological effects, including increased aggression, anxiety, and even paranoia in some cases. Insomnia is another common complaint, with users reporting difficulty sleeping and vivid, often disturbing dreams when they do manage to sleep. The androgenic properties of Trenbolone can lead to severe acne, accelerated male pattern baldness in those genetically predisposed, and significant virilization effects in women. These androgenic effects make Trenbolone particularly risky for female athletes and bodybuilders. Furthermore, Trenbolone is known to have a significant impact on liver and kidney function, necessitating careful monitoring of these organs during use. Despite these severe collaterals, Trenbolone remains popular due to its unparalleled effectiveness in building lean muscle mass and improving body composition. Users often report dramatic changes in physique even at relatively low doses, which can make the risk-reward calculation tempting for those seeking rapid results. However, the severity of its side effects means that Trenbolone use should be approached with extreme caution, if at all, and ideally under the supervision of knowledgeable healthcare professionals. 2. Anadrol (Oxymetholone) Anadrol, known scientifically as Oxymetholone, is another powerful anabolic steroid that has gained notoriety for both its impressive muscle-building capabilities and its significant collateral effects. Originally developed to treat anemia and osteoporosis, Anadrol quickly found its way into the world of bodybuilding due to its ability to rapidly increase muscle mass and strength. However, its potent nature comes with a host of side effects that users must carefully consider. One of the primary concerns with Anadrol use is its impact on liver health. As an oral steroid, Anadrol must pass through the liver, and its 17-alpha-alkylated structure makes it particularly hepatotoxic. Users often experience elevated liver enzymes, and prolonged use can lead to more severe liver damage. This hepatotoxicity is one of the main reasons why Anadrol cycles are typically kept short, usually not exceeding 4-6 weeks. Anadrol is also known for causing significant water retention, which can lead to a bloated appearance and increased blood pressure. This water retention, while contributing to impressive size gains, can mask true muscle gains and pose cardiovascular risks. The increased blood pressure, combined with Anadrol's tendency to negatively impact cholesterol levels, can significantly increase the risk of cardiovascular issues, especially in those predisposed to heart problems. Hormonal disruptions are another major concern with Anadrol use. It can cause severe suppression of natural testosterone production, leading to testicular atrophy and potential long-term endocrine system issues. Some users also report gynecomastia (development of breast tissue in males) as a side effect, despite Anadrol not directly converting to estrogen. This is thought to be due to its interaction with estrogen receptors or its potential to increase estrogen production through other pathways. Despite these serious collaterals, Anadrol remains popular in bodybuilding circles due to its ability to produce rapid and dramatic increases in size and strength. Users often report gaining significant amounts of weight within the first few weeks of use, although much of this can be attributed to water retention. The strength gains from Anadrol are particularly notable, with many users reporting substantial increases in lifting capacity, making it a favorite among powerlifters as well as bodybuilders. 3. Dianabol (Methandrostenolone) Dianabol, also known as Methandrostenolone or simply "Dbol," is one of the most iconic anabolic steroids in the bodybuilding world. Developed in the 1950s to help U.S. athletes compete with Soviet athletes who were using testosterone, Dianabol quickly became a staple in the bodybuilding community due to its powerful muscle-building effects. However, like other potent anabolic steroids, Dianabol comes with a significant array of collateral effects that users must contend with. One of the primary concerns with Dianabol use is its impact on liver health. As an oral steroid, Dianabol is 17-alpha-alkylated, which allows it to survive first-pass metabolism through the liver but also makes it hepatotoxic. Users often experience elevated liver enzymes, and prolonged use can lead to more severe liver damage. This hepatotoxicity is one of the main reasons why Dianabol cycles are typically kept short, usually not exceeding 4-6 weeks. Dianabol is notorious for causing significant water retention, which contributes to its rapid weight gain effects but can also lead to a bloated appearance and increased blood pressure. This water retention can mask true muscle gains and pose cardiovascular risks. The increased blood pressure, combined with Dianabol's tendency to negatively impact cholesterol levels (lowering HDL and raising LDL), can significantly increase the risk of cardiovascular issues. Hormonal disruptions are another major concern with Dianabol use. It can cause severe suppression of natural testosterone production, leading to testicular atrophy and potential long-term endocrine system issues. Dianabol also has a high tendency to aromatize (convert to estrogen), which can lead to gynecomastia (development of breast tissue in males) and further exacerbate water retention issues. Despite these serious collaterals, Dianabol remains popular due to its ability to produce rapid gains in size and strength. Users often report significant increases in muscle mass and strength within the first few weeks of use, which can be highly motivating for athletes and bodybuilders. The psychological effects of Dianabol, including increased confidence and a general sense of well-being, also contribute to its popularity. However, these positive effects must be weighed against the potential for serious health consequences, especially with long-term or improper use. 4. Halotestin (Fluoxymesterone) Halotestin, known chemically as Fluoxymesterone, is one of the most potent anabolic steroids available and is infamous for its extreme androgenic properties. While not as commonly used as some other steroids due to its harsh nature, Halotestin has found a niche among competitive bodybuilders and strength athletes due to its ability to dramatically increase strength and aggression without significant water retention. However, its powerful effects come with equally powerful collateral impacts that make it one of the riskiest steroids to use. One of the most significant collateral effects of Halotestin is its impact on liver health. As an oral steroid, it is 17-alpha-alkylated, making it highly hepatotoxic. Users often experience severe elevations in liver enzymes, and the risk of liver damage is substantial, even with short-term use. This extreme liver toxicity is one of the primary reasons why Halotestin cycles are typically very short, often not exceeding 2-4 weeks. Halotestin's extreme androgenic properties can lead to severe side effects related to male characteristics. Users may experience aggressive acne outbreaks, accelerated male pattern baldness (in those genetically predisposed), and in women, severe virilization effects can occur rapidly. The androgenic nature of Halotestin also contributes to its reputation for increasing aggression and irritability in users, which can be problematic both in and out of the gym. Cardiovascular health is another major concern with Halotestin use. It can cause significant negative changes in cholesterol levels, dramatically lowering HDL (good cholesterol) while increasing LDL (bad cholesterol). This, combined with its potential to increase blood pressure, puts users at a higher risk for cardiovascular issues. The strain on the cardiovascular system is particularly concerning given the short-term nature of Halotestin cycles, as these negative impacts can occur rapidly. Despite these severe collaterals, Halotestin remains in use among a subset of bodybuilders and athletes due to its unparalleled effects on strength and aggression. It's particularly favored by competitive powerlifters and bodybuilders in the final weeks before a competition due to its ability to increase muscle hardness and definition without water retention. However, the extreme nature of its side effects means that Halotestin use should be approached with the utmost caution, if at all, and ideally under close medical supervision. 5. Winstrol (Stanozolol) Winstrol, also known as Stanozolol, rounds out our list of top 5 anabolic steroids with significant collateral effects. Popular among both bodybuilders and athletes in various sports, Winstrol is known for its ability to promote lean muscle growth, enhance strength, and improve athletic performance without significant water retention. However, its use comes with a range of side effects that users must carefully consider. One of the primary concerns with Winstrol use is its impact on joint health. Unlike many anabolic steroids that can lead to water retention and potentially cushion joints, Winstrol has a drying effect on the body. This can lead to joint pain and increased risk of injury, particularly when engaging in heavy lifting or high-impact activities. Many users report experiencing joint discomfort even at moderate doses, which can significantly impact training quality and overall athletic performance. Liver toxicity is another major collateral effect of Winstrol, especially when taken orally. As a 17-alpha-alkylated steroid, it puts significant stress on the liver, leading to elevated liver enzymes and potential long-term damage with prolonged use. Even the injectable form of Winstrol can cause liver stress, as it's one of the few injectable steroids that is also 17-alpha-alkylated. This hepatotoxicity necessitates careful monitoring of liver function and typically limits cycle lengths to 6-8 weeks. Cardiovascular health is also a concern with Winstrol use. It can cause significant negative changes in lipid profiles, dramatically lowering HDL (good cholesterol) while potentially increasing LDL (bad cholesterol). This effect on cholesterol, combined with its potential to increase hematocrit levels (thickening the blood), puts users at an increased risk for cardiovascular issues. The impact on cardiovascular health is particularly concerning given Winstrol's popularity among athletes who may already be putting significant strain on their hearts through intense training. Hormonal disruption is another significant collateral effect of Winstrol. Like many anabolic steroids, it can suppress natural testosterone production, leading to testicular atrophy and potential long-term endocrine system issues. In women, even small doses of Winstrol can lead to virilization effects, including deepening of the voice, body hair growth, and clitoral enlargement. These effects can occur rapidly and may be irreversible if use is not discontinued promptly. Despite these serious collaterals, Winstrol remains popular due to its effectiveness in promoting a lean, hard physique and enhancing athletic performance. It's particularly favored by bodybuilders in cutting cycles and by athletes in sports where speed and strength without added bulk are advantageous. However, the severity of its side effects, particularly its impact on joint health and cardiovascular system, means that Winstrol use should be approached with caution and ideally under the guidance of knowledgeable healthcare professionals. Alternatives to High-Collateral Steroids As awareness grows about the significant risks associated with high-collateral anabolic steroids, many individuals in the bodybuilding and fitness communities are seeking safer alternatives to achieve their performance and physique goals. These alternatives range from lower-risk anabolic compounds to entirely natural approaches, each offering a unique balance of benefits and considerations. One category of alternatives includes milder anabolic steroids that are known for having fewer side effects. Compounds like Anavar (Oxandrolone) and Primobolan (Methenolone) are often considered "safer" options in the steroid world. Anavar, for instance, is popular among both men and women due to its relatively mild nature and lower risk of virilization in females. It's known for promoting lean muscle gains and strength increases without significant water retention. Primobolan is another compound often cited for its milder side effect profile, particularly in terms of androgenic effects. However, it's crucial to note that while these steroids may have fewer side effects compared to the high-collateral options, they still carry risks and are subject to the same legal restrictions as other anabolic steroids. Selective Androgen Receptor Modulators (SARMs) have gained popularity as a potential alternative to traditional anabolic steroids. These compounds are designed to selectively target androgen receptors in muscle and bone tissue while minimizing effects on other organs, potentially reducing the risk of side effects. Popular SARMs include Ostarine (MK-2866), Ligandrol (LGD-4033), and Testolone (RAD-140). While early research on SARMs is promising, it's important to note that these compounds are still relatively new, and their long-term effects are not fully understood. Additionally, SARMs are not approved for human use in most countries and exist in a legal gray area. Peptides represent another category of performance-enhancing substances that some users turn to as alternatives to high-risk steroids. Compounds like Growth Hormone Releasing Peptides (GHRPs) and Growth Hormone Secretagogues (GHSs) are used to stimulate the body's natural production of growth hormone. These peptides are thought to offer some of the benefits of anabolic steroids, such as increased muscle mass and improved recovery, with potentially fewer side effects. However, like SARMs, peptides are still the subject of ongoing research, and their long-term safety profile is not fully established. For those looking to avoid synthetic compounds altogether, natural testosterone boosters have become a popular alternative. These supplements typically contain ingredients like D-Aspartic Acid, Fenugreek, Tribulus Terrestris, and Zinc, which are believed to support the body's natural testosterone production. While these supplements are generally considered safe, their effectiveness can vary widely, and they typically do not produce results comparable to anabolic steroids. However, for individuals looking for a modest boost in testosterone levels without the risks associated with exogenous hormones, these can be a viable option. Creatine is perhaps one of the most well-researched and widely accepted alternatives to anabolic steroids. This naturally occurring compound has been shown to increase muscle strength, power, and size, particularly when combined with resistance training. Creatine is legal, widely available, and has a strong safety profile, making it a popular choice among athletes and bodybuilders looking for performance enhancement without the risks associated with steroids. Beta-Alanine and Branched-Chain Amino Acids (BCAAs) are other popular supplements that can offer performance benefits without the risks associated with anabolic steroids. Beta-Alanine has been shown to improve muscular endurance, while BCAAs can support muscle protein synthesis and reduce muscle soreness. These supplements, while not as potent as anabolic steroids, can provide meaningful benefits when used consistently alongside proper training and nutrition. Conclusion As we conclude this comprehensive exploration of the top 5 anabolic steroids known for their significant collateral effects, it's clear that the world of performance enhancement is fraught with complex trade-offs between potential benefits and serious risks. Trenbolone, Anadrol, Dianabol, Halotestin, and Winstrol each offer powerful performance-enhancing effects that have made them popular in bodybuilding and athletic circles. However, these benefits come at a considerable cost to health and well-being, with each compound presenting its own array of severe side effects. The key takeaways from this analysis include: Potency vs. Risk: While these steroids are undeniably effective for building muscle, increasing strength, and enhancing athletic performance, their potency is matched by the severity of their potential side effects. Varied Collateral Effects: Each steroid has a unique profile of side effects, ranging from cardiovascular and liver issues to hormonal imbalances and psychological disturbances. Mitigation Strategies: While there are methods to potentially reduce some risks associated with these steroids, no approach can eliminate all dangers. Legal and Ethical Concerns: The use of these substances raises significant legal and ethical issues, particularly in competitive sports and professional environments. Alternatives Exist: There are safer alternatives available, both in terms of milder anabolic compounds and natural supplements, though they may not match the potency of high-collateral steroids. It's crucial to emphasize that the use of these high-collateral anabolic steroids carries substantial risks to both short-term and long-term health. The decision to use such powerful compounds should never be taken lightly and should always involve careful consideration of the potential consequences. For many, the risks associated with these steroids far outweigh any potential benefits. For those involved in competitive sports or professional bodybuilding, it's essential to be aware of the legal ramifications and ethical considerations surrounding steroid use. The potential for disqualification, loss of titles, and damage to one's career and reputation are significant factors to consider alongside the health risks. Ultimately, the pursuit of physical excellence and enhanced performance should not come at the cost of one's health and well-being. There are numerous ways to improve athletic performance and build an impressive physique without resorting to high-risk anabolic steroids. Proper nutrition, rigorous training, adequate rest, and potentially safer supplementation can lead to significant improvements without the severe risks associated with the steroids discussed in this article. For those who are considering or currently using anabolic steroids, it's imperative to seek guidance from qualified medical professionals who can provide informed advice and monitoring. Regular health check-ups, including comprehensive blood work, are essential for anyone using these substances. In conclusion, while the allure of rapid gains and enhanced performance offered by high-collateral anabolic steroids may be tempting, the potential for severe and lasting health consequences cannot be overstated. As research continues to evolve, it's becoming increasingly clear that the risks associated with these powerful compounds often outweigh their benefits. The path to achieving one's fitness and performance goals should prioritize long-term health and sustainable practices over short-term gains that may come with a heavy price. See More:⤵ Anavar for Women Top 5 steroids for weight loss Top 6 Steroids for Women - A Comprehensive Guide Top 5 Steroids for Your First Cycle Clenbuterol: The Powerhouse Performance Enhancer What is Deca? Nandrolona: A Powerful Steroid Oxandrolone Side Effects: What You Need to Know Winstrol Cycle: The Ultimate Guide Anastrozole: Benefits, Side Effects, and Uses Sustanon 250: Everything You Need to Know Trenbolone: The Ultimate Guide to This Powerful Steroid Testosterone Cypionate Cycle: Beginner's Guide Deca-Durabolin: The Pros and Cons of This Powerful Steroid Proviron: Complete Guide Primobolan: Steroid for Lean Muscle Gains Dianabol: Ultimate Guide Anadrol: The Ultimate Guide to this Powerful Steroid Equipoise: Understanding Dosages and Side Effects for Safe Use Deca-Durabolin: The Pros and Cons of This Powerful Steroid Testosterone Undecanoate: What You Need to Know Testosterone Cypionate: Dosage and Cycle Length Recommendations Testosterone Enanthate: Cycles, Dosage and Benefits Testosterone Propionate: Complete Guide Are you prepared to unlock the secret formula for sculpting a magnetic physique that not only captures attention but radiates undeniable charisma? Prepare to embark on a transformative journey that will elevate your attractiveness and allure to new heights. Introducing the ultimate guide, " Secret Guide to Anabolic Steroids, " your passport to becoming an irresistibly appealing version of yourself. Imagine possessing a body that commands attention as you walk into a room – a body that speaks volumes even before you utter a word. Our e-book is not just a guide ; it's a treasure trove of strategies that will propel you into a league of your own. With every turn of the page, you'll uncover the keys to turning heads and igniting sparks of admiration. " Secret Guide to Anabolic Steroids " isn't just a collection of words – it's the blueprint for metamorphosing into a more captivating and attractive you. Dive deep into its contents to unravel the mysteries of different steroid types and their effects. Learn to wield them safely and effectively, enhancing your journey towards a body that exudes magnetism and confidence. Are you ready to step into a world where your body becomes a masterpiece, a canvas that draws gazes and sparks conversations? Your opportunity to make this transformation begins now. With " Secret Guide to Anabolic Steroids ," you're equipped with the wisdom that empowers you to redefine your physical presence. Don't let this chance slip through your fingers. Embrace the journey towards having a body that's not only visually stunning but also magnetic in its appeal. Secure your copy of "Secret Guide to Anabolic Steroids" today by clicking the link below. Your path to becoming an irresistible force of attraction starts now.
- Seated Low Row: Form, Muscles Worked, Handle Variations & Programming
The Seated Low Row Exercise stands as a cornerstone movement in the realm of back development and overall upper body strength. This comprehensive guide will delve into every aspect of this powerful exercise, providing you with the knowledge and techniques to maximize your back gains and enhance your overall physique. Whether you're a beginner just starting your fitness journey or an experienced lifter aiming to refine your back workouts, this guide offers valuable insights for all fitness levels. We'll explore proper form, variations, programming strategies, and much more to help you harness the full potential of the Seated Low Row Exercise. Get ready to transform your back workouts and achieve the muscular, powerful physique you've always desired. Let's dive into the world of Seated Low Rows and unlock your back's true potential! Table of Contents: Introduction to Seated Low Row Exercise Anatomy and Muscles Worked Proper Form and Technique Variations of Seated Low Row Exercise Programming Seated Low Rows Seated Low Rows for Different Fitness Goals Advanced Techniques Nutrition to Support Back Development Conclusion: Maximizing Your Results In this guide, we'll cover each of these topics in detail, providing you with a comprehensive understanding of the Seated Low Row Exercise. From the basics of proper form to advanced techniques for breaking through plateaus, you'll find everything you need to master this essential back exercise. Let's begin our journey to building a stronger, more defined back with the Seated Low Row Exercise as our powerful ally! Introduction to Seated Low Row Exercise The Seated Low Row Exercise stands as a pinnacle movement in the realm of back development, offering a unique blend of compound action and targeted muscle engagement. This powerful exercise has gained traction among fitness enthusiasts, bodybuilders, and strength athletes alike, cementing its place in back-focused workout routines worldwide. At its core, the Seated Low Row Exercise involves pulling a weight or resistance towards your midsection while seated, typically using a cable machine or specialized rowing equipment. This movement primarily targets the latissimus dorsi, rhomboids, and trapezius muscles, making it an invaluable tool for those seeking to build impressive back width and thickness. The origins of the Seated Low Row Exercise can be traced back to the early days of resistance training and bodybuilding. As gym equipment evolved, the seated cable row machine became a staple in fitness centers, providing a controlled environment for performing this effective back exercise. Over time, variations and adaptations have emerged, but the core principles of the Seated Low Row Exercise remain unchanged. One of the primary advantages of the Seated Low Row Exercise is its ability to isolate the back muscles effectively. The seated position minimizes the involvement of the lower body, allowing lifters to focus intensely on their back muscles throughout the movement. This isolation makes the Seated Low Row Exercise particularly effective for those looking to target specific areas of the back or correct muscular imbalances. Moreover, the Seated Low Row Exercise offers excellent versatility. By adjusting grip width, hand position, and the type of attachment used, lifters can target different areas of the back and address specific weaknesses or goals. This adaptability has contributed to the exercise's enduring popularity across various fitness disciplines. Incorporating Seated Low Rows into your workout routine can yield numerous benefits. Firstly, it can significantly enhance back strength and size, contributing to a more balanced and aesthetic physique. Secondly, a strong back plays a crucial role in many compound lifts and everyday activities, potentially improving overall performance and reducing the risk of injury. Additionally, the Seated Low Row Exercise can be an excellent tool for improving posture. In our increasingly sedentary society, many individuals suffer from rounded shoulders and weak upper back muscles. Regular practice of Seated Low Rows can help counteract these issues by strengthening the muscles responsible for maintaining proper posture. As we delve deeper into this comprehensive guide, we'll explore the intricate details of proper form, variations, programming strategies, and much more. Whether you're a seasoned lifter looking to refine your technique or a newcomer eager to incorporate this powerful exercise into your routine, this guide will equip you with the knowledge and tools to maximize your results with the Seated Low Row Exercise. Stay tuned as we uncover the secrets to mastering this essential back exercise and unlock your back's potential. The journey to a stronger, more defined back begins here, with the Seated Low Row Exercise as your guide and ally in the pursuit of physical excellence. Anatomy and Muscles Worked in Seated Low Row Exercise Understanding the anatomy and muscles engaged during the Seated Low Row Exercise is crucial for maximizing its effectiveness and appreciating its role in comprehensive back development. This exercise primarily targets several key muscle groups in the back while also engaging supporting muscles throughout the upper body and core. The star of the show in the Seated Low Row Exercise is undoubtedly the latissimus dorsi, often referred to as the "lats." These large, fan-shaped muscles span from the mid-back to the lower back and play a crucial role in creating the coveted V-taper physique. During the Seated Low Row Exercise, the lats are responsible for the primary pulling motion, bringing the handle or bar from an extended position to your midsection. The development of strong, well-defined lats not only contributes to back width but also enhances overall upper body strength and aesthetics. Another key muscle group targeted by the Seated Low Row Exercise is the rhomboids. Located between the shoulder blades, the rhomboids are essential for scapular retraction - the action of pulling the shoulder blades together. This movement is critical in the Seated Low Row Exercise and contributes significantly to upper back thickness and improved posture. Strong rhomboids help counteract the forward-rounded shoulder posture common in today's desk-bound society. The trapezius muscle, particularly the middle and lower fibers, also receives substantial stimulation during the Seated Low Row Exercise. The "traps" are responsible for scapular elevation and depression, playing a crucial role in stabilizing the shoulder blades throughout the rowing motion. Well-developed traps contribute to the appearance of a thick, powerful upper back. While the back muscles are the primary movers in the Seated Low Row Exercise, several other muscle groups play important supporting roles. The biceps brachii, located on the front of the upper arm, assist in the flexion of the elbow joint during the pulling motion. This secondary engagement of the biceps makes the Seated Low Row Exercise an excellent compound movement for overall arm development. The forearm muscles, including the brachioradialis and various wrist flexors and extensors, are heavily involved in gripping the handle or bar. This grip engagement not only contributes to forearm development but also enhances overall grip strength, which can translate to improved performance in other lifting exercises. Core muscles, including the rectus abdominis, obliques, and transverse abdominis, work isometrically to stabilize the torso throughout the Seated Low Row Exercise. This core engagement is crucial for maintaining proper form and protecting the lower back during the exercise. Regular practice of Seated Low Rows can contribute to improved core strength and stability. The posterior deltoids, while not primary movers, are also engaged during the Seated Low Row Exercise. These muscles at the back of the shoulders assist in the pulling motion and contribute to overall shoulder development and stability. Understanding the biomechanics of the Seated Low Row Exercise is essential for maximizing its benefits. As you pull the handle or bar towards your midsection, the scapulae retract, bringing the shoulder blades closer together. Simultaneously, the elbows flex, bringing the upper arms closer to the torso. This compound movement allows for significant muscle activation throughout the back and arms. The unique nature of the Seated Low Row Exercise, with its seated position and controlled range of motion, places the back muscles in an optimal position for activation throughout the movement. This mechanical advantage can potentially lead to greater muscle growth compared to exercises where the resistance profile is less favorable. Moreover, the stability provided by the seated position allows for significant overload of the back muscles. This increased load capacity can lead to greater strength gains and muscle hypertrophy compared to some other rowing variations. As we progress through this guide, keep in mind the complex interplay of these muscle groups during the Seated Low Row Exercise. This understanding will inform proper technique, help in selecting complementary exercises, and ultimately lead to more effective and targeted back development. The Seated Low Row Exercise is not just an exercise; it's a powerful tool for sculpting a well-defined and strong back, rooted in a deep understanding of human anatomy and biomechanics. Proper Form and Technique for Seated Low Row Exercise Mastering the proper form and technique of the Seated Low Row Exercise is paramount for maximizing its benefits and minimizing the risk of injury. This section will provide a detailed, step-by-step guide to executing this exercise with precision, ensuring you get the most out of every repetition. Begin by adjusting the seat of the rowing machine or positioning yourself on a bench in front of a cable machine. Your feet should be firmly planted on the footrests or floor, with your knees slightly bent. This stable base is crucial for maintaining proper form throughout the movement. Reach forward and grasp the handle or bar with an overhand grip, hands slightly wider than shoulder-width apart. If using a cable machine, ensure the cable is attached at a height that allows for a straight line of pull to your midsection. Your arms should be fully extended, and your torso should be upright with a slight lean backward, maintaining a straight back. Before initiating the pull, take a deep breath and engage your core muscles. This bracing action helps stabilize your spine and protect your lower back throughout the movement. Keep your chest up and shoulders pulled back slightly, establishing a strong, stable posture. To begin the Seated Low Row Exercise, initiate the movement by retracting your shoulder blades. This action engages your upper back muscles right from the start. As you pull the handle or bar towards your midsection, focus on driving your elbows back, keeping them close to your body. As the handle approaches your midsection, squeeze your back muscles intensely. The handle or bar should make contact with your abdomen or lower chest, depending on your arm length and the specific variation you're performing. At this point of peak contraction, hold the position briefly to maximize muscle engagement. Throughout the pulling motion, maintain a slight backward lean with your torso. Avoid using momentum or swinging your body to move the weight. The power should come from your back muscles, not from body English or leg drive. Slowly return the handle or bar to the starting position, maintaining control throughout the eccentric (lowering) phase of the movement. This controlled return is vital for muscle growth and strength development, as it keeps tension on the muscles for a longer duration. Breathing technique is crucial for proper execution of the Seated Low Row Exercise. Exhale as you pull the handle towards your midsection, and inhale as you return to the starting position. This breathing pattern helps maintain core stability and can enhance overall performance. One common mistake to avoid is rounding your back during the exercise. This can put unnecessary stress on your spine and reduce the effectiveness of the movement. Always maintain a neutral spine throughout the Seated Low Row Exercise. Another crucial aspect of proper form is maintaining a stable torso position. Avoid rocking back and forth as you perform the exercise. Your upper body should remain relatively stationary, with the movement occurring primarily in your arms and shoulder blades. For those new to the Seated Low Row Exercise, it's advisable to start with lighter weights to perfect the form before progressing to heavier loads. Remember, proper technique is far more important than the amount of weight used when it comes to muscle development and injury prevention. As you become more comfortable with the basic movement, you can incorporate advanced techniques such as paused reps, where you hold the contraction at your midsection for 2-3 seconds. This technique can enhance muscle fiber recruitment and improve overall strength. It's also worth noting that the range of motion in the Seated Low Row Exercise can be adjusted based on individual flexibility and comfort. While a full range of motion is generally recommended for maximum muscle engagement, it's essential to work within your limits to prevent strain or injury. By focusing on proper form and technique in the Seated Low Row Exercise, you set the foundation for impressive back development. Each repetition performed with precision brings you closer to your goals of a stronger, more defined back. As we progress through this guide, keep these technical points in mind, as they form the basis for all variations and advanced applications of this powerful exercise. Variations of Seated Low Row Exercise The Seated Low Row Exercise, while powerful in its standard form, offers a variety of variations that can enhance your back workout and target different aspects of back development. These variations not only add diversity to your training regimen but also allow for continued progress and muscle confusion, essential elements for ongoing growth and strength gains. The Wide-grip Seated Low Row is a popular variation that emphasizes the outer lats and helps create the illusion of a wider back. To perform this variation, use a long straight bar attachment and grip it with your hands placed wider than shoulder-width apart. This wider grip shifts more emphasis to the lateral aspects of your back muscles, contributing to that coveted V-taper appearance. Conversely, the Close-grip Seated Low Row places more emphasis on the inner back muscles, particularly the lower traps and rhomboids. For this variation, use a narrow grip on the handle or a V-bar attachment. This grip adjustment shifts the focus to the middle of your back, helping to create that desirable thickness and definition between your shoulder blades. The Single-arm Seated Low Row is an excellent unilateral exercise that can help address muscle imbalances and enhance core stability. To perform this variation, use a single handle attachment and focus on one side at a time. This unilateral movement allows for a greater range of motion and can help improve your mind-muscle connection with each side of your back independently. For those looking to engage more of the biceps while still primarily targeting the back, the Rope attachment Seated Low Row is an excellent option. The rope allows for a neutral grip and a slight outward flare of the hands at the end of the movement, which can increase bicep activation while still maintaining focus on the back muscles. The Resistance band Seated Low Row is a versatile variation that can be performed anywhere, making it ideal for home workouts or when traveling. Secure a resistance band to a sturdy object at about chest height and perform the rowing motion as you would with a cable machine. This variation provides variable resistance throughout the movement, with the tension increasing as the band stretches. For those seeking to increase time under tension, the Tempo Seated Low Row is an excellent variation. This involves manipulating the speed of both the concentric and eccentric phases of the lift. For example, you might take three seconds to pull the handle to your midsection, pause for one second at the peak contraction, then take three seconds to return to the starting position. This variation can enhance muscle growth by increasing metabolic stress and mechanical tension on the muscle fibers. The Partial Rep Seated Low Row is another advanced variation that can help break through plateaus. This involves performing the exercise through a limited range of motion, often focusing on either the stretched position or the peak contraction. Partial reps can help overload specific portions of the strength curve and can be particularly useful for developing power in certain ranges of motion. For those seeking to maximize hypertrophy, the Drop Set Seated Low Row can be an intense and effective variation. This involves performing a set to near failure, then immediately reducing the weight and continuing for additional repetitions. This technique can push muscle fibers to their limit and stimulate significant growth. The Isometric Hold Seated Low Row involves holding the handle stationary at various points in the range of motion. This can be particularly effective for improving mind-muscle connection and strengthening specific portions of the movement. For a more dynamic approach, the Explosive Seated Low Row focuses on moving the weight as explosively as possible while maintaining control. This variation can improve power output and is particularly beneficial for athletes in sports requiring explosive back strength. Each of these variations of the Seated Low Row Exercise offers its own set of benefits and challenges. Incorporating them strategically into your training program can help prevent plateaus, target specific weaknesses, and provide the variety necessary for continued progress. As with any new exercise variation, it's important to start with lighter weights to familiarize yourself with the movement pattern before progressing to heavier loads. By exploring these variations, you can customize your Seated Low Row Exercise routine to align perfectly with your specific goals, whether they be strength, hypertrophy, or improved athletic performance. The versatility of the Seated Low Row Exercise, combined with these variations, makes it an indispensable tool in any serious back development program. Programming Seated Low Rows in Your Workout Effectively programming Seated Low Rows into your workout routine is crucial for maximizing its benefits and achieving your fitness goals. Whether you're aiming for strength, hypertrophy, or overall back development, strategic implementation of this exercise can significantly enhance your results. For strength-focused athletes, Seated Low Rows can be programmed as a primary or secondary movement in your back or pull day routine. A typical strength-building protocol might involve 3-5 sets of 4-6 repetitions with heavy loads, around 80-85% of your one-repetition maximum (1RM). This low-rep, high-intensity approach stimulates neural adaptations and maximal force production. Rest periods between sets should be longer, typically 2-3 minutes, to allow for adequate recovery and maintenance of intensity across sets. Those prioritizing muscle hypertrophy should consider a moderate rep range of 8-12 repetitions for 3-4 sets. This rep range has been shown to be optimal for muscle growth, balancing mechanical tension and metabolic stress. The weight used should be challenging, typically around 70-80% of your 1RM. Rest periods can be shorter, around 60-90 seconds, to maintain metabolic stress on the muscles. For endurance and muscular definition, higher rep ranges of 12-15 or even up to 20 repetitions can be effective. This approach, using lighter weights (around 60-70% of 1RM), can improve muscular endurance and create a significant pump in the back muscles. Shorter rest periods of 30-60 seconds between sets can enhance the cardiovascular benefits of this training style. Frequency of Seated Low Rows in your program depends on your overall training split and recovery capacity. For a typical bodybuilding-style split, incorporating this exercise 1-2 times per week is often sufficient. If you're following an upper/lower or push/pull/legs split, you might perform Seated Low Rows on each pull or back day, which could amount to 2-3 times per week. Periodization is a key concept in programming Seated Low Rows for long-term progress. A linear periodization model might start with higher rep ranges and gradually decrease reps while increasing weight over several weeks. For example: Week 1-3: 3 sets of 12-15 reps Week 4-6: 4 sets of 8-10 reps Week 7-9: 5 sets of 5-6 reps Alternatively, undulating periodization varies the rep ranges and intensities more frequently, even within the same week. This approach can provide varied stimuli to the muscles and prevent adaptation plateaus. The placement of Seated Low Rows within your workout is also important. As a compound movement targeting a large muscle group, it's often best performed early in the workout when energy levels are highest. This allows you to lift heavier weights and generate maximum force output. However, it can also be effective as a finishing exercise to thoroughly fatigue the back muscles after other compound movements. For a comprehensive back development program, consider pairing Seated Low Rows with complementary exercises. A sample back workout might look like this: Deadlifts: 4 sets of 5 reps Seated Low Rows: 3 sets of 8-10 reps Pull-Ups or Lat Pulldowns: 3 sets of 10-12 reps Face Pulls: 3 sets of 12-15 reps This combination targets the back from multiple angles and with varied movement patterns, promoting balanced development. Progressive overload is crucial for continued progress with Seated Low Rows. This can be achieved by gradually increasing the weight, adding more reps or sets, decreasing rest periods, or improving the quality of each repetition. Keep a detailed log of your workouts to track progress and inform future programming decisions. Deload weeks should be programmed every 4-6 weeks to allow for recovery and prevent overtraining. During a deload week, reduce the volume and/or intensity of Seated Low Rows by about 40-50%. This gives your body time to recover and can lead to improved performance when you return to regular training. For athletes in specific sports, Seated Low Rows can be programmed to align with their sport's demands. For example, a rower might focus on higher rep ranges to improve muscular endurance, while a powerlifter might prioritize lower rep ranges with heavier weights to build maximum strength. Remember that individual response to training can vary, so it's important to listen to your body and adjust your programming accordingly. Pay attention to recovery, sleep, and nutrition, as these factors significantly impact your ability to progress in Seated Low Rows. By thoughtfully programming Seated Low Rows, you can ensure consistent progress, prevent plateaus, and achieve your back development goals. Whether you're a beginner establishing a foundation of strength or an advanced lifter fine-tuning your physique, strategic implementation of this exercise can be a game-changer in your fitness journey. Seated Low Rows for Different Fitness Goals Seated Low Rows are a versatile exercise that can be adapted to suit a wide range of fitness goals. Whether you're aiming for strength, hypertrophy, endurance, or sport-specific performance, this exercise can be tailored to meet your needs. Let's explore how to optimize Seated Low Rows for different fitness objectives. For strength building, Seated Low Rows offer an excellent opportunity to lift heavy weights and develop overall back strength. When strength is the primary goal, focus on lower repetition ranges, typically 4-6 reps per set, with heavier weights around 80-85% of your one-rep maximum (1RM). Incorporate techniques like cluster sets or heavy negatives to further challenge your strength. For example, perform 5 sets of 4 reps with a 3-second negative phase, resting 2-3 minutes between sets. This approach maximizes neural adaptations and increases your ability to recruit high-threshold motor units. Hypertrophy, or muscle growth, is perhaps where Seated Low Rows truly shine. To optimize for hypertrophy, aim for moderate rep ranges of 8-12 per set, using weights around 70-80% of your 1RM. This rep range balances mechanical tension and metabolic stress, two key factors in muscle growth. Implement techniques like drop sets or rest-pause sets to increase time under tension and metabolic stress. For instance, perform 4 sets of 10 reps, followed by a drop set where you reduce the weight by 20% and perform as many reps as possible. This approach ensures maximum muscle fiber recruitment and stimulates the release of muscle-building hormones. For those focusing on muscular endurance, higher repetition ranges with Seated Low Rows can be highly effective. Aim for 15-20 reps per set, or even higher, using lighter weights around 50-60% of your 1RM. This approach improves the muscle's ability to perform work over extended periods and can enhance definition. Consider incorporating supersets or circuit training with Seated Low Rows to further challenge your endurance. For example, perform 3 sets of 20 reps on Seated Low Rows, immediately followed by 20 bodyweight rows, with minimal rest between exercises. Athletes looking to improve sport-specific performance can tailor Seated Low Rows to their needs. For explosive power, focus on moving the weight as quickly as possible in the concentric phase while maintaining control. This can benefit athletes in sports like rowing or swimming. For sports requiring muscular endurance, like rock climbing or wrestling, higher rep ranges with moderate weights can be beneficial. Incorporate sport-specific angles or movement patterns to make the exercise more relevant to your athletic demands. For overall fitness and body composition improvements, a mixed approach can be effective. Alternate between strength-focused weeks (lower reps, higher weight) and volume-focused weeks (higher reps, moderate weight). This variation prevents adaptation and targets different aspects of fitness. Include Seated Low Rows in circuit training or HIIT workouts for a cardiovascular benefit alongside strength training. Those recovering from injuries or with specific limitations can also benefit from Seated Low Rows. The seated position provides stability and support, making it an excellent option for individuals with lower back issues. Start with very light weights and focus on perfect form and pain-free movement. Gradually increase the load as strength and confidence improve. For bodybuilders or physique competitors, Seated Low Rows are invaluable for sculpting a well-defined back. Focus on mind-muscle connection and controlled movements to maximize muscle engagement. Incorporate techniques like partial reps at the end of a set or isometric holds at different points in the range of motion to further stress the muscle fibers. Powerlifters can use Seated Low Rows as an accessory movement to improve their deadlift performance. Focus on explosive concentric movements and slow, controlled eccentrics to build strength and power in the back muscles, which can translate to improved performance in competition lifts. For general health and functional fitness, Seated Low Rows contribute to upper body pulling strength, important for daily activities. Incorporate them into a well-rounded program that includes exercises for all major muscle groups. Focus on proper form and controlled movements rather than maximal weights. Regardless of your specific fitness goal, proper progression is key with Seated Low Rows. Gradually increase the weight, reps, or sets over time to continue challenging your muscles and making progress. Keep detailed records of your workouts to track progress and inform future training decisions. Remember, Seated Low Rows should be part of a comprehensive training program. Combine them with other back exercises, as well as exercises for opposing muscle groups, to ensure balanced development and reduce the risk of injury. By tailoring Seated Low Rows to your specific fitness goals, you can maximize their effectiveness and accelerate your progress. Whether you're looking to build strength, increase muscle size, improve endurance, or enhance athletic performance, this versatile exercise can be a cornerstone of your training regimen. The key is to align the exercise parameters – weight, reps, sets, and techniques – with your specific objectives, and to consistently challenge yourself within the framework of a well-designed program. Comparing Seated Low Rows to Other Back Exercises Seated Low Rows, while a powerful exercise in their own right, exist within a broader spectrum of back exercises. Understanding how they compare to other popular back movements can help you make informed decisions about their place in your workout routine. Let's explore how Seated Low Rows stack up against other back exercises, highlighting their unique benefits and potential drawbacks. Comparing Seated Low Rows to Bent-over Rows reveals several key differences. Bent-over Rows engage more of the lower back and core muscles due to the standing position and require more overall body stabilization. However, Seated Low Rows allow for heavier loads to be lifted due to the supported position, potentially leading to greater overall strength gains in the upper back. Seated Low Rows also place less stress on the lower back, making them a safer option for those with lower back issues. When compared to Cable Rows performed in a standing position, Seated Low Rows offer a more stable platform for lifting. This stability can lead to better isolation of the back muscles and potentially allow for heavier weights to be used. However, standing Cable Rows engage more of the core and lower body, providing a more functional, full-body workout. The Seated Low Row differs from Pull-Ups or Lat Pulldowns in terms of the plane of motion and muscle emphasis. While Pull-Ups and Lat Pulldowns primarily target the lats in a vertical pulling motion, Seated Low Rows work the back muscles through a horizontal plane. This horizontal pull is crucial for overall back development and can complement vertical pulling exercises in a well-rounded program. Compared to T-Bar Rows, Seated Low Rows offer more stability and potentially allow for heavier loads to be used. T-Bar Rows require more balance and engage more stabilizer muscles, which can be beneficial for functional strength. However, the fixed path of motion in Seated Low Rows can help lifters focus solely on the target muscles without worrying about balance, potentially leading to greater muscle isolation and hypertrophy. One unique aspect of Seated Low Rows is their ability to effectively target the entire back musculature in a single movement. While exercises like Face Pulls or Rear Delt Flyes may isolate specific areas of the upper back more effectively, Seated Low Rows provide comprehensive back development in a time-efficient manner. In terms of muscle activation, electromyography (EMG) studies have shown that Seated Low Rows can provide high levels of back muscle activation comparable to or exceeding many other row variations. However, it's worth noting that muscle activation can vary based on individual factors and exercise execution. Seated Low Rows also offer unique benefits in terms of progressive overload potential. The ability to easily adjust the weight stack or resistance level makes it simple to incrementally increase the load over time. This is in contrast to some bodyweight exercises like Pull-Ups, where progression can be more challenging once a certain level of strength is achieved. When it comes to sports-specific training, Seated Low Rows can be highly transferable due to their ability to develop overall back strength and power. Many sports require strong pulling motions, which can be effectively trained with Seated Low Rows. For those concerned with time efficiency, Seated Low Rows can be advantageous. As a compound movement that engages multiple muscle groups simultaneously, Seated Low Rows provide significant bang for your buck in terms of workout efficiency. It's worth noting that Seated Low Rows may not be suitable for everyone. Individuals training in home gyms without access to a cable machine or rowing equipment might find other row variations more practical. Additionally, some advanced lifters may find that they need to supplement Seated Low Rows with free weight exercises to continue challenging their back muscles as they progress. In terms of functional strength development, while Seated Low Rows excel in training the horizontal pulling motion, exercises like Deadlifts or Power Cleans might have a slight edge in developing overall posterior chain strength due to their compound nature and involvement of the lower body. The versatility of Seated Low Rows in terms of grip variations and handle attachments allows for targeting the back muscles from slightly different angles. This versatility is not as readily available in many free-weight back exercises, making Seated Low Rows a valuable tool for comprehensive back development. In conclusion, while Seated Low Rows offer unique benefits in terms of muscle isolation, safety, and progressive overload potential, they should not be seen as a complete replacement for other back exercises. Rather, they're a valuable tool that can complement a well-rounded back training program. The ideal approach often involves incorporating a variety of exercises, including Seated Low Rows, to target the back muscles from multiple angles and with different types of resistance. This comprehensive approach ensures balanced development, reduces the risk of overuse injuries, and keeps workouts engaging and effective. Advanced Techniques for Seated Low Rows As you progress in your Seated Low Row journey, incorporating advanced techniques can help break through plateaus and stimulate new muscle growth. These methods are designed to challenge your muscles in novel ways, enhancing both strength and hypertrophy. However, it's crucial to approach these techniques with caution and proper preparation. Drop sets are a powerful technique to increase muscle fatigue and stimulate growth. Begin with your normal working weight for Seated Low Rows. After reaching near failure, quickly reduce the weight by 20-30% and continue rowing to failure again. You can repeat this process 2-3 times, creating a cascade of muscle fatigue. This technique floods the muscle with blood, potentially enhancing nutrient delivery and metabolic stress, key factors in muscle hypertrophy. Partial reps focus on specific portions of the Seated Low Row movement. You might perform reps in just the top half of the movement to emphasize peak contraction, or focus on the bottom half to improve your stretch reflex. Partial reps allow you to handle heavier weights in a limited range of motion, potentially leading to strength gains that transfer to your full-range rowing. Isometric holds introduce a static component to Seated Low Rows. Hold the handle at various points in the range of motion for 5-10 seconds. This technique can improve mind-muscle connection and strengthen sticking points in your row. For example, holding the handle an inch from your torso for 10 seconds before completing the rep can significantly challenge your back muscles. Tempo manipulation involves changing the speed of different phases of the Seated Low Row. A common approach is to slow down the eccentric (lowering) phase, taking 3-4 seconds to return the handle, then explosively pulling. This increased time under tension can lead to greater muscle damage and subsequent growth. Alternatively, you can focus on an explosive concentric phase to improve power output. Cluster sets are an advanced technique that allows you to handle near-maximal weights for more total reps. Perform 2-3 reps, rest for 10-15 seconds, then repeat for a total of 3-4 clusters. This method allows you to maintain high intensity throughout the set, potentially leading to greater strength gains. Cluster sets are particularly effective for breaking through strength plateaus in Seated Low Rows. The mechanical drop set involves changing the exercise variation to target the muscles from different angles as fatigue sets in. Start with a wide grip row, then move to a close grip row, and finally to a single-arm row, all without rest in between. This technique ensures complete muscle fiber recruitment across the entire back. Rest-pause sets can increase the total volume of your Seated Low Row workout without extending its duration. Perform a set to near failure, rest for 15-20 seconds, then perform additional reps. Repeat this process 2-3 times. This technique allows you to push past your normal rep limits, potentially stimulating greater muscle growth. Pre-exhaustion is a technique where you perform an isolation exercise for the back, like straight-arm pulldowns, immediately before Seated Low Rows. This pre-fatigues the lats, ensuring they are the limiting factor in the row, rather than other assisting muscles. This can lead to greater back muscle activation and growth. Accommodating resistance involves adding bands to the Seated Low Row setup. Attach resistance bands to the weight stack or handle and secure them to the machine's base. This creates a variable resistance profile, with the exercise becoming harder as you pull. This technique can help improve lockout strength and provide a novel stimulus to the muscles. The one-and-a-half rep technique involves performing a full rep of the Seated Low Row, followed by a half rep, counting as one total rep. This increases time under tension and can be particularly effective for targeting the back muscles at their peak contraction point. Eccentric overload training focuses on the lowering phase of the Seated Low Row. Use a weight that's 10-20% heavier than your normal working weight, and use momentum or assistance to pull the handle to your torso, then control the weight back slowly. This technique can lead to significant strength gains and muscle growth due to the high tension placed on the muscles during the eccentric phase. Unilateral training with Seated Low Rows can help address muscle imbalances and improve overall stability. Perform the exercise one arm at a time, focusing on maintaining proper form and engaging your core to prevent rotation. This technique can enhance mind-muscle connection and help identify and correct any strength discrepancies between sides. Superset Seated Low Rows with a complementary exercise to increase workout intensity and efficiency. For example, pair Seated Low Rows with Face Pulls to target both the back and rear deltoids in rapid succession. This technique can lead to a greater overall training stimulus and a significant muscle pump. When implementing these advanced techniques, it's crucial to use them judiciously. Incorporate one or two techniques into your Seated Low Row routine at a time, and cycle them over several weeks. This approach prevents overtraining and ensures continued progress. Always prioritize proper form and safety, especially when trying new and challenging techniques. Remember, these advanced techniques for Seated Low Rows are intense and should be used sparingly. They're best suited for intermediate to advanced lifters who have mastered the basic form of the exercise. Beginners should focus on perfecting their technique and building a solid strength base before attempting these methods. It's also important to note that recovery becomes even more critical when implementing advanced techniques. Ensure you're providing your body with adequate nutrition, sleep, and rest between workouts to support muscle growth and prevent overtraining. By intelligently incorporating these advanced techniques into your Seated Low Row routine, you can continue to challenge your muscles, break through plateaus, and achieve new levels of back development. The key is to use these methods strategically, always listening to your body and adjusting as needed. With patience and consistency, these advanced techniques can take your Seated Low Row performance and back development to new heights. Nutrition to Support Back Development and Seated Low Row Performance Proper nutrition plays a crucial role in maximizing the results of your Seated Low Row workouts and overall back development. A well-structured nutritional plan supports muscle growth, aids in recovery, and provides the energy necessary for intense training sessions. Let's explore the key nutritional components that can enhance your back development when combined with a consistent Seated Low Row routine. Protein intake is paramount for muscle growth and repair. Aim for 1.6 to 2.2 grams of protein per kilogram of body weight daily. High-quality protein sources such as lean meats, fish, eggs, dairy, and plant-based options like legumes and quinoa should form the cornerstone of your diet. Distribute your protein intake evenly throughout the day to maintain a positive protein balance and support continuous muscle protein synthesis. Consider consuming a protein-rich meal or shake within 30 minutes after your Seated Low Row workout to kickstart the recovery process. Carbohydrates are essential for fueling your Seated Low Row sessions and replenishing glycogen stores post-workout. Complex carbohydrates like whole grains, sweet potatoes, and oats provide sustained energy and should make up the majority of your carb intake. Include some simple carbohydrates immediately before and after your workout to provide quick energy and aid in recovery. Aim for 3-5 grams of carbohydrates per kilogram of body weight daily, adjusting based on your activity level and body composition goals. Healthy fats are crucial for hormone production, including testosterone, which plays a significant role in muscle growth. Include sources of omega-3 fatty acids like fatty fish, flaxseeds, and walnuts in your diet. Monounsaturated fats from avocados, nuts, and olive oil also support overall health and recovery. Aim for about 0.5-1 gram of fat per kilogram of body weight daily. Meal timing can significantly impact your Seated Low Row performance and recovery. Consume a balanced meal containing protein and carbohydrates 2-3 hours before your workout to ensure adequate energy levels. Post-workout, aim to eat a meal rich in protein and carbohydrates within 1-2 hours to support muscle recovery and glycogen replenishment. Hydration is often overlooked but is crucial for optimal performance in Seated Low Rows. Dehydration can lead to decreased strength and increased fatigue. Aim to drink at least 3-4 liters of water daily, increasing this amount on training days. Consider adding electrolytes to your water during intense workouts to maintain proper fluid balance. Micronutrients play a vital role in muscle growth and recovery. Ensure your diet is rich in vitamins and minerals, particularly vitamin D, calcium, and magnesium, which are crucial for muscle function and bone health. Consume a variety of colorful fruits and vegetables to obtain a wide range of antioxidants that can aid in recovery from intense Seated Low Row sessions. Creatine monohydrate is one of the most researched and effective supplements for enhancing strength and muscle growth. It can be particularly beneficial for exercises like Seated Low Rows, where power output is crucial. Consider supplementing with 3-5 grams of creatine daily to support your back development goals. Branched-chain amino acids (BCAAs) can be beneficial, especially when training in a fasted state or during long, intense workouts. BCAAs can help reduce muscle breakdown and support muscle protein synthesis. Consider consuming 5-10 grams of BCAAs before or during your Seated Low Row workout. Beta-alanine is another supplement that can enhance performance in Seated Low Rows, particularly when performing higher rep ranges. It helps buffer lactic acid buildup, potentially allowing you to perform more reps before fatigue sets in. A typical dose is 3-5 grams daily. Caffeine can be a powerful ergogenic aid, potentially improving strength and power output in exercises like Seated Low Rows. Consider consuming 200-400mg of caffeine about 30 minutes before your workout for optimal effects. However, be mindful of your individual tolerance and avoid consuming caffeine too close to bedtime. While focusing on these nutritional strategies, it's crucial to maintain a slight caloric surplus if your goal is to build muscle mass in your back. Aim for a surplus of 300-500 calories above your maintenance level. This provides the energy necessary for muscle growth without excessive fat gain. Regularly assess your progress and adjust your caloric intake as needed. Remember, nutrition is highly individual. What works best for one person may not be optimal for another. Experiment with different nutritional strategies and pay attention to how your body responds. Keep a food diary and track your progress in Seated Low Rows to identify the nutritional approach that yields the best results for you. Lastly, consistency is key in both nutrition and training. The most effective nutritional plan is one that you can stick to long-term. Focus on developing sustainable eating habits that support your Seated Low Row performance and overall fitness goals. With the right nutritional support, you can maximize the muscle-building potential of your Seated Low Row workouts and achieve impressive back development. Common Questions About Seated Low Rows As Seated Low Rows gain popularity among fitness enthusiasts, several common questions arise. Addressing these queries can help users better understand and optimize their use of this powerful exercise. Let's explore some frequently asked questions about Seated Low Rows, providing expert insights and debunking common myths. Q1: Are Seated Low Rows better than other row variations? A: Seated Low Rows aren't necessarily better, but they offer unique benefits. They allow for a stable position and potentially heavier loads compared to some other row variations. However, the best row variation depends on individual goals, preferences, and equipment availability. A well-rounded program often includes various row types for comprehensive back development. Q2: Can Seated Low Rows replace deadlifts in my workout? A: While both exercises target the back muscles, they serve different purposes. Seated Low Rows primarily focus on the upper back muscles, while deadlifts are a compound movement that engages the entire posterior chain, including the lower back, glutes, and hamstrings. For complete back development, it's recommended to include both exercises in your routine, rather than replacing one with the other. Q3: How often should I perform Seated Low Rows? A: The frequency depends on your overall training program and recovery capacity. For most individuals, performing Seated Low Rows 1-2 times per week is sufficient. If you're following a split routine that has multiple back workouts per week, you might include it in each session. Always ensure adequate recovery time between sessions to prevent overtraining. Q4: I feel my biceps more than my back during Seated Low Rows. What am I doing wrong? A: This is a common issue that usually stems from improper form. Focus on driving the movement with your elbows rather than pulling with your arms. Imagine your hands as hooks and your elbows as the primary movers. Additionally, ensure you're retracting your shoulder blades at the start of each rep and maintaining this position throughout the movement. Q5: Can Seated Low Rows help improve my posture? A: Yes, Seated Low Rows can significantly contribute to improved posture. They strengthen the muscles of the upper back, including the rhomboids and lower trapezius, which play a crucial role in maintaining proper posture. Regular practice of this exercise, combined with stretching of the chest muscles, can help counteract the forward-rounded shoulder posture common in today's sedentary society. Q6: Are Seated Low Rows suitable for beginners? A: Seated Low Rows can be suitable for beginners, especially when using a machine with adjustable resistance. However, proper form is crucial. Beginners should start with lighter weights to master the technique before progressing to heavier loads. It may be beneficial for novice lifters to work with a trainer initially to ensure proper form and technique. Q7: I've heard Seated Low Rows can cause lower back pain. Is this true? A: When performed correctly, Seated Low Rows should not cause lower back pain. In fact, the seated position provides support for the lower back. However, improper form, such as rounding the lower back or using excessive weight, can lead to strain. Ensure you maintain a neutral spine throughout the movement and use a weight that allows you to maintain proper form. If you experience persistent lower back pain, consult a fitness professional or healthcare provider to assess your technique and overall back health. Q8: Can I use Seated Low Rows for cardio? A: While Seated Low Rows are primarily a strength-building exercise, they can be incorporated into high-intensity interval training (HIIT) or circuit training for a cardiovascular benefit. Using lighter weights and higher repetitions with shorter rest periods can elevate heart rate and provide a cardio workout. However, traditional cardio exercises are generally more efficient for improving cardiovascular fitness. Q9: How do I know if I'm making progress with Seated Low Rows? A: Progress can be measured in several ways. The most straightforward is an increase in the weight you can lift for a given number of repetitions. Other indicators include improved form, the ability to perform more repetitions with a given weight, or a decrease in perceived exertion when lifting a specific load. Additionally, visible changes in back muscle development and improved performance in other back exercises can indicate progress. Q10: Can women benefit from Seated Low Rows, or will it make them too bulky? A: Women can absolutely benefit from Seated Low Rows without fear of becoming overly muscular. This exercise helps develop a strong, toned back, improves posture, and contributes to overall upper body strength. The "bulky" appearance many women fear requires specific training protocols, very high calorie intakes, and often genetic predisposition. Regular strength training, including Seated Low Rows, will contribute to a lean, toned physique for most women. By addressing these common questions, we hope to dispel myths and provide clarity on the proper use and benefits of Seated Low Rows. Remember, while general guidelines are helpful, individual experiences may vary. Always listen to your body and consult with fitness professionals when in doubt about any aspect of your training regimen. Conclusion: Maximizing Your Results with Seated Low Rows As we conclude this comprehensive guide to Seated Low Rows, it's clear that this exercise is a powerful tool for back development and overall upper body strength. By understanding its mechanics, benefits, and proper execution, you can harness the full potential of this movement to transform your back workouts and achieve impressive results. Seated Low Rows offer a unique combination of compound movement and targeted muscle engagement, making them suitable for a wide range of fitness levels and goals. Whether you're a beginner looking to build a foundation of back strength, an intermediate lifter aiming to break through plateaus, or an advanced athlete seeking to fine-tune your back development, this exercise has something to offer. Key takeaways from this guide include the importance of proper form and technique. Maintaining a neutral spine, focusing on scapular retraction, and driving the movement with your elbows are crucial for maximizing muscle activation and minimizing the risk of injury. Remember that variations in grip width and handle attachments can target different areas of the back, so don't be afraid to experiment with various techniques to find what works best for your body and goals. Progression is vital for continued growth and improvement. Implement the principles of progressive overload by gradually increasing weight, reps, or sets over time. Utilize the various advanced techniques discussed, such as drop sets, pause reps, and tempo variations, to continually challenge your muscles and prevent adaptation plateaus. Nutrition and recovery are equally important components of your success with Seated Low Rows. Ensure you're fueling your body with adequate protein, carbohydrates, and healthy fats to support muscle growth and recovery. Prioritize sleep and manage stress to optimize your body's ability to adapt and grow stronger. Remember that Seated Low Rows, while effective, should be part of a balanced back training program. Combine them with other back exercises, as well as exercises for opposing muscle groups, to ensure overall upper body balance and development. For those dealing with special considerations, such as injuries or specific fitness goals, don't hesitate to modify the exercise or seek guidance from a qualified professional. The versatility of Seated Low Rows allows for numerous adaptations to suit individual needs. Tracking your progress is essential for long-term success. Use the methods discussed to monitor your improvements in strength, muscle growth, and overall performance. Celebrate your achievements, no matter how small, and use setbacks as learning opportunities to refine your approach. As you continue your fitness journey with Seated Low Rows, stay curious and open to learning. The field of fitness is constantly evolving, with new research and techniques emerging regularly. Stay informed about the latest developments and be willing to adjust your approach as you gain more experience and knowledge. Lastly, remember that consistency is key. The most effective workout plan is one that you can stick to long-term. Make Seated Low Rows a regular part of your back training routine, but also listen to your body and allow for adequate rest and recovery. By applying the knowledge and strategies outlined in this guide, you're well-equipped to maximize your results with Seated Low Rows. Whether your goal is to build a stronger, more defined back, improve your overall pulling strength, or enhance your athletic performance, this exercise can play a crucial role in your success. Embrace the challenge, stay dedicated to your goals, and enjoy the process of sculpting your back with Seated Low Rows. Your journey to a more powerful, aesthetically pleasing physique starts now. Remember, every rep brings you closer to your goals, so approach each session with focus, intensity, and a commitment to excellence. Here's to your success and the impressive back development that awaits you! See More: ⤵ Machine Rows: Ultimate Guide Single Arm Row Machine: A Comprehensive Guide to Unilateral Back Strength Top 5 Rows for Back Development: A Comprehensive Guide Discover the Best Row Exercise for Your Back How many reps should I do for T bar rows? Top Pullup Alternatives: Boost Your Back Without a Bar Perfect Your Form: Expert Guide on How to Do a Rear Delt Workout Back and Shoulder Workout Routine Bent-Over Raises: Your Ultimate Guide Face Pulls: The Complete Guide Chin-Ups Mastery: Your Ultimate Guide to Perfecting the Pull Dumbbell Rows: A Back-Building Powerhouse Bent Over Supinated Row: Basic Execution Guide Back Workouts: Build a Strong and Sculpted Upper Body T-Bar Rows: Row Your Way to a Back Worth Flexing! Bent-Over Rows: Get that Strong and Back Single-Arm Dumbbell Rows: The Ultimate Guide Pull-Ups: Your Path to Upper Body Strength Lat Pulldown: How To Do, Variations and More Machine High Row: Unleash Your Back's Potential for Gains! Pull-Ups: Exploring Effective Alternatives Unveiling the Power of the Seated Low Row Exercise Back Rows: Definitive guide How To Gorilla Row: Complete Guide How To Pendlay Row: Complete Guide T-Bar Row exercise: Complete Guide Barbell Row: A Complete Guide to Mastering the Ultimate Back Exercise Row Exercise: A Comprehensive Guide Hammer Strength Row : Unlocking the Power of Your Back Muscles
- Best 5 steroids for beginners
In the world of bodybuilding and athletic performance enhancement, anabolic steroids have long been a topic of intense interest and debate. For beginners considering venturing into this realm, it's crucial to approach the subject with caution, knowledge, and a deep understanding of both the potential benefits and risks involved. This comprehensive guide aims to shed light on the "Best 5 Steroids for Beginners," providing essential information for those contemplating their first steroid cycle. Before delving into the specifics, it's important to emphasize that the use of anabolic steroids without proper medical supervision is illegal in many countries and carries significant health risks. This article is intended for educational purposes only and does not endorse or encourage the use of illegal substances. Always consult with a healthcare professional before considering any performance-enhancing regimen. Throughout this guide, we'll explore the mechanisms of action, benefits, potential side effects, and proper usage protocols for five steroids often considered suitable for beginners. We'll also discuss crucial topics such as post-cycle therapy, safety measures, and legal alternatives. Our goal is to provide a balanced, informative resource that prioritizes safety and education above all else. Remember, the decision to use anabolic steroids should not be taken lightly. It requires careful consideration of legal, ethical, and health implications. We strongly encourage exploring natural methods of enhancing performance and physique before considering steroid use. Table of Contents: Understanding Steroids for Beginners Top 5 Steroids for Beginners Steroid Stacks for Beginners Proper Administration and Safety Protocols Post-Cycle Therapy (PCT) for Beginners Legal and Safe Alternatives to Anabolic Steroids Conclusion Frequently Asked Questions As we navigate through these topics, we'll provide in-depth information to help you make informed decisions about your fitness journey. Whether you're a curious beginner or simply seeking to expand your knowledge, this guide aims to be a comprehensive resource on the subject of beginner-friendly steroids. Let's begin our exploration of this complex and often misunderstood aspect of performance enhancement. Disclaimer: The information provided herein is intended for educational and informational purposes only and should not be construed as advocating or endorsing the use of anabolic steroids or any other substance prohibited in sports by relevant authorities. The legal status of steroid use varies by country and may be subject to stringent regulations. It is important to note that the use of anabolic steroids without a prescription is illegal in many jurisdictions and can lead to significant legal consequences. Additionally, the use of steroids is strictly prohibited in most sports and can result in severe penalties, including disqualification and bans from competition, as dictated by sports governing bodies and anti-doping agencies. Anabolic steroids and other performance-enhancing drugs carry potential health risks and side effects, which can range from mild to severe, and in some cases, life-threatening. These risks include, but are not limited to, cardiovascular issues, liver damage, hormonal imbalances, psychological effects, and the potential for dependency. The impact of steroid use can vary widely among individuals, and the long-term health consequences are often not fully understood. Given the significant legal and health implications associated with steroid use, it is strongly advised that individuals consider these factors carefully and thoroughly research any substances they are considering. Most importantly, it is crucial to seek professional medical advice before beginning any new supplement or drug regimen. A healthcare provider can offer guidance based on an individual's specific health status, medical history, and personal goals. This professional advice is invaluable in ensuring that any decision made is informed and prioritizes the individual's health and well-being. In summary, while the pursuit of physical enhancement or performance improvement is understandable, it should never come at the expense of one's health or legal standing. Responsible decision-making, informed by credible information and professional medical advice, is essential in navigating the c omplexities surrounding the use of steroids and other performance-enhancing substances. Understanding Steroids for Beginners For those new to the world of performance enhancement, understanding steroids is crucial. Anabolic steroids are synthetic substances related to testosterone, the primary male sex hormone. These compounds promote muscle growth, enhance athletic performance, and influence various physiological processes in the body. Steroids work by binding to androgen receptors in muscle cells, stimulating protein synthesis and promoting muscle growth. This process, known as anabolism, is what gives steroids their muscle-building reputation. Additionally, steroids can increase red blood cell production, enhancing oxygen delivery to muscles and improving endurance. While the potential benefits of steroid use are appealing, it's essential to understand the associated risks. Side effects can range from mild issues like acne and hair loss to more severe problems such as liver damage, cardiovascular complications, and hormonal imbalances. For beginners, it's crucial to start with milder compounds and lower doses to minimize these risks. Proper dosage and cycling are fundamental aspects of responsible steroid use. A cycle typically lasts 6-12 weeks, followed by a period of abstinence to allow the body to recover. Post-cycle therapy (PCT) is essential to help restore natural hormone production and maintain gains. It's important to note that in many countries, the non-medical use of anabolic steroids is illegal. Always research the legal status in your area and consider the potential consequences before deciding to use steroids. Legal alternatives and natural methods of enhancing performance should always be explored first. Understanding Steroids for Beginners Anabolic steroids, synthetic substances related to testosterone, have been a subject of fascination and controversy in the fitness world for decades. For beginners considering their use, it's crucial to understand what these compounds are and how they work. Anabolic steroids primarily function by mimicking the effects of testosterone in the body, promoting protein synthesis and muscle growth at a rate far beyond what is naturally possible. The history of steroid use in bodybuilding and athletics dates back to the 1950s, with their popularity surging in subsequent decades. These substances quickly gained notoriety for their ability to dramatically enhance physical performance and muscle mass. However, along with these benefits came a host of potential side effects and health risks, leading to their regulation and eventual prohibition in many sports. For beginners, the allure of rapid muscle gains and enhanced performance can be tempting. However, it's essential to approach steroid use with a comprehensive understanding of both the benefits and risks involved. Potential benefits include increased muscle mass, strength, and recovery time. On the flip side, risks can range from mild issues like acne and hair loss to more severe health problems such as liver damage, cardiovascular issues, and hormonal imbalances. Proper dosage and cycling are paramount for those who decide to use steroids. Beginners should start with lower doses and shorter cycles to assess their body's response and minimize potential side effects. Cycling refers to the practice of using steroids for a specific period, followed by a period of abstinence or reduced use. This approach aims to maximize benefits while giving the body time to recover and natural hormone production to resume. It's crucial for beginners to be aware of the legal status of anabolic steroids. In many countries, including the United States, anabolic steroids are classified as controlled substances, making their non-prescribed use illegal. This legal status not only poses risks of legal consequences but also makes it challenging to obtain safe, pharmaceutical-grade products. As a result, many individuals turn to underground markets, which can introduce additional risks related to product quality and purity. Top 5 Steroids for Beginners When it comes to selecting steroids for beginners, certain compounds are often recommended due to their relatively mild side effect profiles and effectiveness. The top 5 steroids for beginners typically include Testosterone, Anavar, Dianabol, Deca-Durabolin, and Primobolan. Each of these steroids offers unique benefits and considerations for novice users. Testosterone is often considered the foundation of any steroid cycle, especially for beginners. Available in various esters such as Enanthate, Cypionate, and Propionate, testosterone is well-tolerated and provides a good balance of muscle gains and strength increases. For beginners, a typical cycle might involve 300-500mg per week for 12-16 weeks. Post-cycle therapy (PCT) is crucial after a testosterone cycle to help restore natural hormone production. Anavar, also known as Oxandrolone, is popular among beginners due to its mild nature and low risk of side effects. It's particularly favored for cutting cycles and promoting lean muscle gains. Anavar is one of the few steroids that can be used by both men and women with relatively low risk of virilization in females. A typical beginner's dose might range from 20-50mg per day for men and 5-10mg per day for women, with cycles lasting 6-8 weeks. Dianabol (Methandrostenolone) is renowned for its ability to promote rapid gains in muscle mass and strength. It's often used in bulking cycles and can provide dramatic results in a short period. However, it comes with a higher risk of side effects, including water retention and liver stress. Beginners might start with a dose of 20-30mg per day for 4-6 weeks. Due to its potential for liver toxicity, cycle length is typically shorter, and liver support supplements are recommended. Deca-Durabolin (Nandrolone Decanoate) is valued for its joint-healing properties and steady, quality muscle gains. It's often stacked with testosterone for synergistic effects. Deca is known for causing less water retention compared to other bulking steroids. A typical beginner's dose might be 200-300mg per week for 12-16 weeks. It's important to note that Deca can cause significant testosterone suppression, making proper PCT crucial. Primobolan (Methenolone) rounds out our top 5 as a mild steroid favored for its ability to promote lean muscle gains with minimal side effects. It's available in both oral and injectable forms, with the injectable version being more potent. Primobolan is often used in cutting cycles and can be suitable for both men and women. A typical dose for beginners might be 300-400mg per week for men and 50-100mg per week for women, with cycles lasting 8-12 weeks. Testosterone Testosterone stands out as the cornerstone for beginners venturing into the world of anabolic steroids, primarily due to its fundamental role in natural muscle growth and body composition. As a naturally occurring hormone, testosterone is the blueprint on which many synthetic steroids are based, making it a logical and safer starting point for those new to steroid use. Its well-documented effects on muscle mass, strength, and recovery, coupled with a relatively predictable side effect profile, make it a preferred choice among the best 5 steroids for beginners. Initiating steroid use with testosterone allows beginners to monitor how their bodies react to anabolic substances, providing a critical learning curve for understanding personal tolerance levels and the importance of dosage control. Diving deeper into the realm of testosterone, one encounters various esters of the hormone, such as testosterone enanthate and testosterone cypionate. These esters do not alter the fundamental effects of testosterone; instead, they affect the release rate and half-life of the hormone in the body. For instance, testosterone enanthate has a longer half-life, allowing for less frequent injections, typically once a week, which can be more convenient for beginners. On the other hand, testosterone cypionate requires similar dosing frequency but may vary slightly in its release pattern. These differences in dosing frequency can significantly impact a beginner's experience by influencing not just the physical results but also the ease of maintaining a consistent dosing schedule, which is crucial for optimizing the benefits while minimizing potential side effects. Understanding the potential side effects of testosterone use is essential for anyone considering it as part of their regimen. Common side effects include acne, hair loss, and an increased risk of cardiovascular diseases. Moreover, testosterone can suppress the body's natural hormone production, making post-cycle therapy (PCT) an indispensable part of any cycle. PCT helps to restore natural hormone levels, mitigate side effects, and preserve gains made during the cycle. The inclusion of testosterone in the best 5 steroids for beginners is not only due to its effectiveness but also because it introduces the user to the concept of PCT, instilling good practices from the onset. The responsible use of testosterone, combined with a well-planned PCT, lays a solid foundation for beginners, guiding them towards achieving their fitness goals while minimizing health risks. Anavar (Oxandrolone) Anavar, scientifically known as Oxandrolone, holds a unique place among the best 5 steroids for beginners due to its reputation for being one of the mildest steroids available. This mild nature significantly lowers the risk of side effects, making it an appealing choice for those new to the world of anabolic steroids. Unlike more potent steroids that can introduce a harsh introduction to side effects, Anavar offers a gentler initiation. Its chemical design reduces the potential for estrogenic side effects, such as gynecomastia and water retention, which are common concerns among steroid users. Furthermore, its mild impact makes it a suitable option for both men and women, broadening its appeal. The lower risk associated with Anavar does not mean it's entirely free from side effects, but its profile is considerably less daunting, providing a safer starting point for beginners. The popularity of Anavar among beginners can also be attributed to its notable effects on strength and fat loss, which are key components of body composition goals. Anavar facilitates the increase in strength without a significant spike in body weight, making it an excellent choice for athletes and bodybuilders looking to enhance performance in weight categories or sports where added mass can be a disadvantage. Additionally, its ability to promote fat loss while preserving muscle mass is highly valued, especially in cutting cycles where the aim is to achieve a lean, defined physique. This dual action of supporting strength gains and encouraging fat reduction, all while maintaining lean muscle mass, positions Anavar as a versatile and effective steroid for beginners aiming to achieve comprehensive physique improvements. However, despite its milder profile, the importance of monitoring liver health cannot be overstated when using Anavar. Like many oral steroids, Anavar is metabolized by the liver, and prolonged use or high doses can strain this vital organ. Regular liver function tests are recommended to ensure that any potential liver stress is identified early and managed effectively. Additionally, abstaining from alcohol consumption during Anavar cycles is crucial , as alcohol can exacerbate liver strain, leading to heightened risks. Responsible use, including adherence to recommended dosages, cycle lengths, and the incorporation of liver support supplements, can mitigate these risks. This cautious approach underscores the importance of health monitoring and moderation, principles that are vital for beginners as they embark on their journey with anabolic steroids, ensuring they can achieve their goals while prioritizing their well-being. Dianabol (Methandrostenolone) Dianabol, also known by its chemical name Methandrostenolone, has a storied history that dates back to the 1950s when it was developed to enhance the performance of athletes. Its introduction marked a significant milestone in the use of anabolic steroids in sports and bodybuilding, offering users rapid gains in muscle mass and strength. This quick-acting steroid works by increasing nitrogen retention in the muscle tissue, facilitating an accelerated synthesis of proteins, which is the building block of muscle growth. For beginners looking into the best 5 steroids to kickstart their journey in bodybuilding, Dianabol stands out for its efficiency in delivering visible results in a relatively short period. The allure of fast gains makes it a popular choice, yet it's the understanding and management of its potent effects that underscore its use among novices. However, the impressive gains associated with Dianabol do not come without their drawbacks. One of the notable side effects is significant water retention, which can mask muscle gains and affect the overall appearance. Moreover, its potent estrogenic effects can lead to gynecomastia, a condition characterized by the enlargement of breast tissue in men. To mitigate these side effects, the use of an aromatase inhibitor is often recommended. This class of drugs works by preventing the conversion of testosterone into estrogen, helping to control the balance of hormones and reduce the risk of developing unwanted side effects. For beginners exploring the best 5 steroids, understanding the importance of managing side effects is crucial, as it ensures a more controlled and positive experience with their use. Given Dianabol's potent nature , it is typically used in short cycles to minimize the risk of adverse effects, particularly on the liver. Dianabol is a 17-alpha-alkylated compound, which allows it to pass through the liver without being broken down, making it effective but also hepatotoxic. Therefore, protecting the liver is paramount during Dianabol cycles, necessitating the incorporation of liver support supplements and keeping cycles short, usually within a 4 to 6-week range. Additionally, monitoring liver health through regular blood tests is advised to prevent long-term damage. For beginners venturing into the realm of anabolic steroids, starting with Dianabol necessitates a well-planned approach , emphasizing cycle length and liver health to maximize benefits while minimizing potential harm. This careful consideration ensures that those new to steroids can make informed decisions, aligning with their goals and health priorities. Deca Durabolin (Nandrolone Decanoate) Deca Durabolin, scientifically known as Nandrolone Decanoate, stands out in the realm of anabolic steroids for its unique properties that benefit both muscle building and joint health. Renowned for its ability to significantly increase muscle mass, Deca Durabolin also has the added advantage of providing relief to aching joints, making it a dual-purpose steroid. This characteristic is especially beneficial for athletes and bodybuilders who engage in heavy lifting, as it can help mitigate the risk of injury and reduce recovery times. Furthermore, Deca promotes nitrogen retention in the muscles, a crucial factor for muscle growth and repair. Its anabolic nature also stimulates the appetite, aiding users in consuming the necessary calories to fuel muscle gain. For beginners exploring the best 5 steroids to start their bodybuilding journey, Deca Durabolin presents a compelling option, offering a blend of muscle-enhancing and therapeutic benefits. Despite its advantages, Deca Durabolin is known for its slower-acting nature , which often leads users to stack it with faster-acting steroids like testosterone to optimize results. This combination can accelerate muscle growth and enhance strength gains while allowing the body to adapt to the effects of Deca Durabolin gradually. Stacking also helps in maintaining optimal hormonal balance, as the use of Deca alone can lower the body's natural testosterone production. This strategic approach to steroid use, incorporating both Deca Durabolin and testosterone, can create a synergistic effect, maximizing the benefits of each compound. For beginners seeking the best 5 steroids, understanding the importance of stacking and the complementary nature of different steroids is crucial for achieving desired results safely and effectively. However, one of the potential side effects associated with Deca Durabolin use is the infamous 'Deca Dick' , a condition characterized by reduced libido and erectile dysfunction. This side effect is primarily due to the imbalance between testosterone and estrogen levels in the body. To mitigate this risk, it is essential to balance Deca Durabolin with the right dosage of testosterone. Ensuring an appropriate ratio helps maintain sexual function and libido, highlighting the importance of hormonal balance in steroid use. For beginners delving into the best 5 steroids, awareness of potential side effects and the measures to counteract them is vital. Properly balancing Deca Durabolin with testosterone not only enhances the effectiveness of the cycle but also safeguards against undesirable side effects, paving the way for a successful and safe introduction to steroid use. Turinabol Turinabol, a derivative of Dianabol, emerges as a compelling choice among the best steroids for beginners, thanks to its finely tuned balance of benefits and reduced risk profile. While it shares a common ancestry with Dianabol, offering the potential for significant muscle gains and enhanced performance, Turinabol is distinguished by its milder androgenic effects. This modification not only minimizes the risk of side effects commonly associated with more potent androgenic steroids but also makes Turinabol a more manageable and appealing option for those new to steroid use. Its ability to provide steady, quality muscle gains without the water retention often seen with its predecessor makes it an attractive choice for beginners seeking to improve their physique and athletic performance in a more controlled manner. The appeal of Turinabol lies in its balanced nature, striking an ideal harmony between anabolic and androgenic effects. This balance ensures that users can enjoy the benefits of increased muscle mass and strength, without the heightened risk of side effects that come with steroids having a stronger androgenic profile. For beginners, this makes Turinabol an excellent entry point into the world of performance enhancement, offering a gentler introduction to the potent effects of anabolic steroids. Its relatively mild impact on the body's hormonal balance also means that beginners can focus on achieving their fitness goals with a lower likelihood of experiencing the more severe side effects associated with stronger steroids. However, despite its milder profile, Turinabol is not without its risks, particularly concerning liver health. Like many oral anabolic steroids, Turinabol can be hepatotoxic , necessitating the need for liver protection strategies during cycles. Beginners are advised to incorporate liver support supplements and to monitor their liver health through regular blood tests. This proactive approach ensures that any potential liver stress can be identified and addressed promptly, maintaining overall health and well-being. For those exploring the best steroids for beginners, understanding the importance of liver protection and regular health monitoring is crucial. By taking these precautions, beginners can safely experience the benefits of Turinabol, making it a worthy consideration for those looking to enhance their physical performance and body composition. Steroid Stacks for Beginners Steroid stacking, the practice of combining multiple steroids to enhance their overall effect, is an advanced technique that beginners should approach with caution. While stacking can potentially lead to more significant gains, it also increases the risk of side effects and complications. For those new to steroid use, it's generally recommended to start with single compound cycles to assess individual responses before considering stacks. A popular beginner bulking stack might combine Testosterone Enanthate with Dianabol. This stack leverages the steady gains from testosterone with the rapid muscle-building effects of Dianabol. A typical protocol might involve 500mg of Testosterone Enanthate per week for 12 weeks, with 20-30mg of Dianabol daily for the first 4-6 weeks. This stack can lead to significant increases in muscle mass and strength but requires careful management of potential side effects, particularly those related to estrogen conversion. For those focused on cutting and lean muscle preservation, a beginner-friendly cutting stack might combine Testosterone Propionate with Anavar. This stack aims to maintain muscle mass while promoting fat loss. A sample protocol could include 100mg of Testosterone Propionate every other day for 8 weeks, combined with 40-50mg of Anavar daily for the last 6 weeks of the cycle. This stack is generally well-tolerated but still requires proper PCT and monitoring of lipid profiles. It's crucial to emphasize that even these "beginner" stacks carry increased risks compared to single compound cycles. The interaction between multiple compounds can lead to synergistic effects, both in terms of benefits and side effects. Beginners should have a thorough understanding of each compound, its effects, and potential risks before considering a stack. Proper support supplements and on-cycle therapy are essential when stacking steroids. This may include aromatase inhibitors to manage estrogen-related side effects, liver support supplements for oral steroids, and compounds to support cardiovascular health. Regular blood work becomes even more critical when using steroid stacks to monitor various health markers and adjust the cycle as needed. Proper Administration and Safety Protocols Proper administration of anabolic steroids is crucial for maximizing benefits while minimizing risks. For injectable steroids, which are common in beginner cycles, learning proper injection techniques is essential. This includes understanding the different injection sites (such as glutes, quadriceps, and deltoids), proper sterilization procedures, and correct needle sizes. Rotating injection sites helps prevent localized irritation and the formation of scar tissue. Oral steroids, while more convenient, pass through the liver and can cause hepatic stress. When using oral steroids, it's important to adhere strictly to recommended dosages and cycle lengths. Liver support supplements like Milk Thistle or N-Acetyl Cysteine (NAC) are often recommended. It's also crucial to avoid alcohol and other hepatotoxic substances during oral steroid cycles. Regular blood work is a non-negotiable aspect of responsible steroid use. Before starting a cycle, comprehensive blood tests should be conducted to establish baseline health markers. These tests should include hormone levels, lipid profiles, liver enzymes, and kidney function markers. During the cycle, periodic blood work helps monitor any changes and allows for adjustments if necessary. Post-cycle blood work is crucial to ensure a return to normal physiological function. Common side effects of steroid use include acne, hair loss, mood changes, and sexual dysfunction. Managing these side effects often involves a combination of preventive measures and targeted treatments. For instance, using anti-androgen shampoos can help mitigate hair loss, while proper skincare routines can help manage acne. It's important to be prepared for these potential side effects and have strategies in place to address them. Perhaps the most critical safety protocol is the implementation of post-cycle therapy (PCT). PCT helps restore natural hormone production, which is suppressed during steroid use. Failure to properly implement PCT can lead to prolonged hormonal imbalances, loss of gains, and potential long-term health issues. Common PCT protocols involve the use of selective estrogen receptor modulators (SERMs) like Nolvadex or Clomid, often combined with hCG to stimulate natural testosterone production. Planning Your First Cycle: Tips and Considerations When embarking on the journey of your first steroid cycle, it's paramount to approach it with a strategy that prioritizes health and safety. One of the most crucial steps in this process is starting with a low dose. This conservative approach allows you to gauge your body's response to the steroids, which is essential for minimizing potential side effects. For beginners, the body's reaction to anabolic steroids can be unpredictable. By starting with a lower dose, you provide yourself the opportunity to observe how your body adapts, ensuring that any adverse reactions can be managed promptly and effectively. This method not only helps in safeguarding your health but also aids in identifying the optimal dosage that yields the best results with minimal side effects. Another significant aspect of planning your first steroid cycle is the inclusion of Post Cycle Therapy (PCT). After completing a steroid cycle, your body needs help to restore its natural hormone levels. A PCT plan is indispensable in this regard, as it aids in the recovery of your natural testosterone production. The cessation of steroid use can lead to a hormonal imbalance, potentially causing symptoms such as fatigue, loss of muscle gains, and decreased libido. A well-structured PCT plan not only helps mitigate these issues but also ensures that you maintain the gains achieved during your cycle. It's a critical step that should not be overlooked by anyone looking to explore the use of steroids. Consulting with a healthcare professional before starting any steroid cycle cannot be overstated. A medical expert can provide invaluable insights into how steroids might interact with your unique physiological makeup. They can also advise on the best steroids for beginners, taking into account factors such as pre-existing health conditions, potential drug interactions, and individual health goals. This professional guidance is instrumental in devising a cycle that is both safe and effective. Moreover, a healthcare professional can monitor your health throughout the cycle, offering advice and adjustments as needed to ensure your well-being. Understanding the importance of these considerations is key to a successful and safe first steroid cycle. Starting with a low dose allows for a personalized approach, letting you find the balance that works best for your body. The implementation of a PCT plan is crucial for hormonal balance and maintaining gains post-cycle. Moreover, the guidance of a healthcare professional ensures that your cycle is tailored to your specific health needs and goals. In planning your first cycle, it's also wise to research and select the best steroids for beginners, those known for their milder effects and lower risk profiles. Steroids like Turinabol, mentioned earlier, are often recommended for first-timers due to their balanced nature and reduced risk of severe side effects. This selection process is crucial, as choosing the right steroid can significantly impact your overall experience and results. Lastly, patience and realistic expectations are vital. Steroid use is not a shortcut to achieving your dream physique but rather a tool that, when used responsibly and in conjunction with proper diet and exercise, can enhance your efforts. Remember, the goal of your first cycle should not only be about gaining muscle or increasing performance but also about learning how your body responds to these substances. With careful planning, attention to health and safety, and professional guidance, your first steroid cycle can be a positive step towards achieving your fitness goals. Post-Cycle Therapy (PCT) for Beginners Post-Cycle Therapy (PCT) is a crucial phase for anyone using anabolic steroids, especially beginners. The primary goal of PCT is to help the body restore its natural hormone production, which is suppressed during steroid use. Without proper PCT, users risk experiencing prolonged periods of low testosterone, which can lead to loss of muscle gains, fatigue, depression, and other health issues. The timing and duration of PCT depend on the specific steroids used, cycle length, and individual response. Generally, PCT should begin once the steroids have cleared the system. For most beginner cycles, this is typically 2-3 weeks after the last injection of long-estered steroids or a few days after the last dose of short-estered or oral steroids. A standard PCT protocol often lasts 4-6 weeks, though some may require longer periods. Common PCT protocols for beginners often involve the use of Selective Estrogen Receptor Modulators (SERMs) such as Nolvadex (Tamoxifen) or Clomid (Clomiphene). These drugs help stimulate the production of luteinizing hormone (LH) and follicle-stimulating hormone (FSH), which in turn promote natural testosterone production. A typical Nolvadex PCT might involve 40mg daily for the first two weeks, followed by 20mg daily for the next two weeks. In addition to SERMs, some PCT protocols incorporate human Chorionic Gonadotropin (hCG). HCG mimics LH in the body, stimulating the testes to produce testosterone. It's often used during the cycle or immediately after, before starting SERMs. However, the use of hCG is more advanced and may not be necessary for all beginner cycles. Beyond medication, supporting natural testosterone recovery involves lifestyle and dietary adjustments. This includes ensuring adequate sleep, managing stress levels, and consuming a diet rich in nutrients that support hormone production. Supplements like Vitamin D, Zinc, and Magnesium can also play a role in supporting testosterone levels. It's important to remember that full hormonal recovery can take time, and patience is key during this period. Legal and Safe Alternatives to Anabolic Steroids For those seeking to enhance their physique and performance without the legal and health risks associated with anabolic steroids, there are several legal alternatives worth considering. These alternatives aim to mimic some of the benefits of steroids while offering a safer profile and remaining within the bounds of the law. One popular category of legal alternatives is natural testosterone boosters. These supplements often contain ingredients like D-Aspartic Acid, Fenugreek, and Tribulus Terrestris, which are believed to support natural testosterone production. While the effects are not as dramatic as those of anabolic steroids, these supplements can help optimize hormone levels, potentially leading to improvements in muscle mass, strength, and overall well-being. Another approach is the use of legal steroid alternatives, sometimes referred to as "legal steroids" or "steroid-like supplements." These products often contain natural ingredients that are believed to have anabolic properties. For example, supplements containing ecdysterone, a phytoecdysteroid found in plants, have shown promise in scientific studies for enhancing muscle growth and athletic performance without the side effects associated with anabolic steroids. Protein supplements and Branched-Chain Amino Acids (BCAAs) are fundamental for anyone looking to build muscle naturally. While not direct alternatives to steroids, ensuring adequate protein intake and optimal amino acid profiles can significantly support muscle growth and recovery. Creatine monohydrate, one of the most studied supplements in sports nutrition, has been shown to enhance strength and muscle mass when combined with resistance training. It's crucial to emphasize that the effectiveness of these legal alternatives is generally much milder compared to anabolic steroids. However, they offer the advantage of being safe for long-term use and free from the legal and health risks associated with steroid use. Success with these alternatives often depends on their use in conjunction with a well-designed training program and proper nutrition. Ultimately, the most effective and safest approach to building muscle and enhancing performance is through optimizing natural methods. This includes following a structured resistance training program, ensuring adequate nutrition with a focus on protein intake, getting sufficient sleep, and managing stress levels. While these methods may not produce results as rapidly as steroids, they provide sustainable, healthy progress without the associated risks. Conclusion As we conclude this comprehensive guide on the "Best 5 Steroids for Beginners," it's crucial to reiterate the importance of education, safety, and responsible decision-making. While anabolic steroids can offer significant benefits in terms of muscle growth and performance enhancement, they come with substantial risks that cannot be overlooked. Throughout this article, we've explored the mechanisms of popular beginner steroids like Testosterone, Anavar, Dianabol, Deca-Durabolin, and Primobolan. We've discussed their potential benefits, side effects, and proper usage protocols. However, it's important to remember that even these "milder" steroids carry risks and should not be used without careful consideration and, ideally, medical supervision. The importance of proper administration, safety protocols, and post-cycle therapy cannot be overstated. These practices are not just recommendations but necessities for anyone considering steroid use. Regular blood work, adherence to recommended dosages and cycle lengths, and a comprehensive approach to PCT are all critical components of responsible steroid use. For many individuals, the legal and health risks associated with anabolic steroids may outweigh the potential benefits. In such cases, exploring legal alternatives and focusing on optimizing natural methods of muscle building and performance enhancement is the wisest course of action. Remember, impressive physiques and athletic performances are achievable through proper training, nutrition, and recovery, without the need for prohibited substances. Ultimately, the decision to use anabolic steroids is a personal one that carries significant responsibilities and potential consequences. It's crucial to approach this decision with a full understanding of the risks involved, a commitment to safety protocols, and realistic expectations. For most individuals, especially beginners, focusing on maximizing natural potential through proven training and nutritional strategies remains the safest and most sustainable path to achieving fitness goals. Frequently Asked Questions Q1: Are steroids safe for beginners? A: While certain steroids are considered "milder" and potentially more suitable for beginners, no anabolic steroid use is without risk. Even the steroids discussed in this guide as potentially appropriate for beginners carry significant health risks and potential side effects. It's crucial to understand that "safer" in the context of steroids is relative, and all steroid use carries inherent risks. Q2: How long should a beginner's first steroid cycle be? A: For beginners, it's generally recommended to start with a shorter cycle to assess how your body responds. A typical first cycle might last 8-12 weeks, depending on the specific compounds used. However, some milder steroids like Anavar might be used for shorter 6-8 week cycles. It's crucial to remember that longer cycles increase the risk of side effects and make recovery more challenging. Q3: Do I need Post Cycle Therapy (PCT) after every steroid cycle? A: In most cases, yes. PCT is crucial after cycles involving compounds that suppress natural testosterone production, which includes most anabolic steroids. The only exceptions might be very short cycles of extremely mild compounds, but even then, some form of PCT is often recommended. Always plan your PCT before starting a cycle. Q4: Can women use the same steroids as men? A: While some steroids can be used by both men and women, women generally need to be more cautious due to the risk of virilization (development of male characteristics). Steroids like Anavar and Primobolan are often considered more suitable for women due to their milder androgenic effects. However, even these should be used with caution and at lower doses compared to men. Q5: Are there any legal steroids that work? A: The term "legal steroids" is often used to describe supplements that aim to mimic the effects of anabolic steroids without the legal issues. While some of these products may offer mild benefits, they are not steroids in the true sense and will not produce results comparable to anabolic steroids. Legal supplements can support muscle growth and performance when combined with proper training and nutrition, but their effects are generally much milder than those of anabolic steroids. Are you prepared to unlock the secret formula for sculpting a magnetic physique that not only captures attention but radiates undeniable charisma? Prepare to embark on a transformative journey that will elevate your attractiveness and allure to new heights. Introducing the ultimate guide, " Secret Guide to Anabolic Steroids, " your passport to becoming an irresistibly appealing version of yourself. Imagine possessing a body that commands attention as you walk into a room – a body that speaks volumes even before you utter a word. Our e-book is not just a guide ; it's a treasure trove of strategies that will propel you into a league of your own. With every turn of the page, you'll uncover the keys to turning heads and igniting sparks of admiration. " Secret Guide to Anabolic Steroids " isn't just a collection of words – it's the blueprint for metamorphosing into a more captivating and attractive you. Dive deep into its contents to unravel the mysteries of different steroid types and their effects. Learn to wield them safely and effectively, enhancing your journey towards a body that exudes magnetism and confidence. Are you ready to step into a world where your body becomes a masterpiece, a canvas that draws gazes and sparks conversations? Your opportunity to make this transformation begins now. With " Secret Guide to Anabolic Steroids ," you're equipped with the wisdom that empowers you to redefine your physical presence. Don't let this chance slip through your fingers. Embrace the journey towards having a body that's not only visually stunning but also magnetic in its appeal. Secure your copy of "Secret Guide to Anabolic Steroids" today by clicking the link below. Your path to becoming an irresistible force of attraction starts now. See More:⤵ Anavar for Women Top 5 steroids for weight loss Top 6 Steroids for Women - A Comprehensive Guide Top 5 Steroids for Your First Cycle SARMS: COMPLETE AND ULTIMATE GUIDE FOR BEGINNERS Novaldex: Uses, Side Effects, Dosage, and Interactions Arimidex: Everything You Need to Know About Clomid: Everything You Need to Know About Testolone (RAD-140): A Comprehensive Guide Nandrolona: A Powerful Steroid Turinabol: Exploring the Benefits, Side Effects, and Alternatives HGH: The Potential Side Effects MK-2866 (Ostarine): Benefits, Side Effects, and Considerations Anavar: Discover 10 benefits of this anabolic steroid Winstrol Cycle: The Ultimate Guide Anastrozole: Benefits, Side Effects, and Uses Sustanon 250: Everything You Need to Know Trenbolone: The Ultimate Guide to This Powerful Steroid Testosterone Cypionate Cycle: Beginner's Guide Anavar Side Effects: The Ultimate Guide Deca-Durabolin: The Pros and Cons of This Powerful Steroid Proviron: Complete Guide Primobolan: Steroid for Lean Muscle Gains Dianabol: Ultimate Guide Anadrol: The Ultimate Guide to this Powerful Steroid Equipoise: Understanding Dosages and Side Effects for Safe Use Testosterone Undecanoate: What You Need to Know Testosterone Cypionate: Dosage and Cycle Length Recommendations Testosterone Enanthate: Cycles, Dosage and Benefits Testosterone Propionate: Complete Guide Wolf Tattoo: Unleashing the Wild and Free Nipple Tattoos: A Comprehensive Guide to Areola Reconstruction and Decorative Designs Polynesian Tattoo: A Comprehensive Guide Hip Tattoos: The Ultimate Guide to Choosing and Caring for Your Sexy Hip Ink Magic Tattoos: Enchanting Designs for Body Art Enthusiasts Divergent Tattoos: A Comprehensive Guide to Choosing, Placing, and Caring for Your Ink Fine Line Tattoos: Everything You Need to Know Head Tattoos: Bold Designs and Placement Ideas Rabbit Tattoos
- Triceps Workout Routine Guide: How to do it, Muscles Worked and Benefits [2025]
When it comes to sculpting a physique that exudes strength and balance, the triceps play a pivotal role in achieving well-rounded arm development. Often overshadowed by their bicep counterparts, the triceps brachii muscles are not only aesthetically significant but are key contributors to functional arm strength. In this comprehensive guide, we delve into the vital realm of tricep development, emphasizing its importance in the pursuit of overall arm prowess. The triceps, situated at the back of the upper arm, consist of three heads—long, lateral, and medial—that collectively govern arm extension and stability. While biceps showcase the front and center of the arm, it is the triceps that contribute to the lion's share of arm strength and girth. Neglecting their development can result in an imbalanced, less powerful physique. In the pursuit of a robust and aesthetically pleasing upper body, a meticulous tricep workout routine becomes the linchpin of success. This article is crafted with a specific focus: to provide you with a detailed and effective tricep workout routine that goes beyond the mundane. Whether you are a fitness novice or a seasoned gym enthusiast, our goal is to guide you through a structured routine designed for optimal muscle growth and strength gains. As we unravel the intricacies of each tricep head and unveil the exercises tailored to target them, consider this guide your passport to sculpting triceps that not only impress in the mirror but also empower your daily activities. Get ready to embark on a journey toward a well-defined, powerful set of triceps that will elevate your overall arm strength and aesthetic appeal. Understanding the Triceps Muscles: (credits: Jeff Nippard) The triceps muscles, located at the back of the upper arm, are crucial for pushing, extending, and stabilizing movements. Consisting of three distinct heads – the lateral, medial, and long heads – the triceps contribute significantly to upper body strength and aesthetics. To maximize the benefits of your triceps workouts, understanding the anatomy and function of each head is essential. Triceps Anatomy: Lateral Head The lateral head, also known as the outer head, is primarily responsible for lateral arm movement and visible when viewing the arm from the side. Developing the lateral head creates the appearance of width and fullness, contributing to the overall size and shape of the arm. Incorporating targeted exercises, such as lateral cable raises and overhead triceps extensions, into your triceps workout routine can effectively engage and grow the lateral head. Triceps Anatomy: Medial Head The medial head, or middle head, lies between the lateral and long heads, running along the humerus bone's posterior aspect. While less noticeable than the lateral head, the medial head plays a significant role in elbow extension and adds mass to the upper arm. Focusing on exercises that involve rotation or twisting motions, such as reverse-grip push-ups and EZ bar curls, can specifically target and develop the medial head during your triceps workouts. Triceps Anatomy: Long Head The long head, the largest of the three heads, originates at the infraglenoid tubercle of the scapula and runs down the back of the humerus. It plays a critical role in both elbow extension and shoulder flexion. Engaging the long head during your triceps workout is essential for overall arm strength and functionality. Exercises like behind-the-head pull-downs, French presses, and straight-arm pulldowns effectively target the long head. Triceps Function During Push-Ups Push-ups, a popular compound exercise, engage all three triceps heads, making them an excellent addition to any triceps workout routine. As you lower your body towards the ground, the triceps eccentrically contract, controlling the descent. Upon pushing back up, the triceps concentrically contract, extending the elbows and returning your body to the starting position. Modifying push-up variations, such as decline or close-grip push-ups, can place increased emphasis on the triceps, amplifying their engagement and development. Triceps Function During Dips Dips, another effective compound exercise, primarily target the triceps while also engaging the chest and shoulders. Performing dips with your body leaned forward targets the chest, while keeping your torso upright shifts the focus to the triceps. During dips, the triceps control the descent and extension of the elbows, making them an ideal addition to your triceps workout plan. Triceps Function During Overhead Extensions Overhead triceps extensions, performed with either a barbell, dumbbell, or cable machine, isolate the long and lateral heads of the triceps. As you lift the weight above your head and extend your elbows, the triceps contract, building strength and definition. Including overhead extensions in your triceps workout regimen ensures adequate stimulation of the long and lateral heads, promoting balanced triceps development. Triceps Function During Skull Crushers Skull crushers, also known as lying triceps extensions, target the long and lateral heads of the triceps by requiring elbow extension against resistance. Lying flat on a bench, holding a barbell or dumbbells above your forehead, and slowly lowering the weight towards your skull before extending your elbows activates the triceps. Adding skull crushers to your triceps workout program guarantees focused engagement of the long and lateral heads. Triceps Function During Cable Pushes Cable pushes, often overlooked in favor of free weights, offer unique advantages for triceps development. Using a cable machine allows for continuous tension throughout the entire range of motion, ensuring consistent engagement of the triceps. Performing cable pushes with various grips and angles, such as rope pushes or straight-bar pushes, targets different aspects of the triceps, adding diversity to your triceps workout schedule. In summary, understanding the anatomy and function of the triceps muscles is crucial for designing effective triceps workout plans . Targeting each head through various exercises and techniques ensures balanced development, improved strength, and enhanced overall arm aesthetics. With this knowledge, you're now equipped to create a triceps workout routine that meets your individual goals and needs. Key Principles of an Effective Tricep Workout Routine: (credits: Jeremy Ethier) Progressive overload is a fundamental principle in strength training, including triceps workouts. It involves gradually increasing the stress placed upon the muscles over time, encouraging growth and adaptation. This can be achieved through various methods, such as increasing weight, reps, sets, or exercise difficulty. By consistently applying progressive overload, you ensure continued triceps development and prevent plateaus in your triceps workout journey. Full Range of Motion Utilizing a full range of motion during triceps workouts ensures that the muscles are thoroughly engaged and challenged throughout the entire exercise. This not only improves muscular strength and endurance but also promotes flexibility and joint health. When performing triceps exercises, aim for a full stretch and contraction of the muscle, avoiding partial repetitions that may limit gains and increase the risk of injury. Proper Form and Technique Maintaining proper form and technique during triceps workouts is essential for safety, effectiveness, and preventing injuries. Ensure that you are correctly executing each exercise, focusing on the mind-muscle connection and engaging the triceps rather than compensating with other muscle groups. Utilize mirrors, videos, or personal trainers to monitor and correct your form, optimizing your triceps workout routine. Balanced Programming Designing a balanced triceps workout program that includes various exercises, rep ranges, and intensities ensures optimal triceps development. Include exercises that target each head of the triceps, utilizing both compound and isolation movements. Additionally, incorporate a mix of heavy, moderate, and light loads to challenge the muscle fibers differently and promote overall strength and hypertrophy. Frequency and Volume Determining the appropriate frequency and volume for your triceps workout routine depends on your individual goals, experience level, and recovery abilities. Generally, training the triceps once or twice per week with sufficient volume is recommended for most individuals seeking strength and size gains. Adjust the frequency and volume according to your progress, ensuring that you allow adequate rest and recovery between sessions. Prioritization and Periodization Prioritizing and periodizing your triceps workout routine can lead to improved results and more efficient training. Consider dedicating specific phases or blocks of your training cycle to focusing on triceps development, adjusting the volume, intensity, and exercise selection accordingly. This approach allows for concentrated efforts on triceps growth while still maintaining balance and variation in your overall workout program. Warm-Up and Cool Down Proper warm-up and cool-down practices are crucial for preparing your body for triceps workouts and facilitating recovery. Begin with light cardiovascular activity and dynamic stretches to increase blood flow and elevate core temperature. After completing your triceps workout, perform static stretches and foam rolling to reduce muscle soreness and improve flexibility. Tracking and Assessment Regularly tracking and assessing your progress in triceps workouts enables you to identify areas for improvement, set realistic goals, and adjust your training program as needed. Document your workouts, including weight lifted, reps, sets, and rest periods. Periodically reassess your strength, endurance, and overall triceps development to ensure that you are making progress towards your goals. Consistency and Patience Consistently adhering to your triceps workout routine and being patient with your progress is vital for long-term success. Building muscle takes time, effort, and dedication. Stay committed to your training program, focusing on gradual improvements and adjustments rather than expecting immediate results. With consistency and patience, you will achieve the strong, defined triceps you desire. Essential Exercises for Tricep Development: (credits: Chris Bumstead) Exercise 1: Close-Grip Bench Press The close-grip bench press is a compound exercise that primarily targets the triceps while also engaging the chest and shoulders. Positioned on a flat bench, grip the bar with your hands shoulder-width apart or slightly closerLower the bar to your chest, ensuring your elbows remain close to your body. Press the bar back up, focusing on contracting the triceps. Incorporating the close-grip bench press into your triceps workout routine promotes overall strength and muscle development. Exercise 2: Triceps Dips Triceps dips are a versatile bodyweight exercise that effectively engages the triceps and upper body. Using parallel bars or dip apparatus, position yourself with your arms fully extended and feet either on the floor or elevated on a platform. Lower your body until your upper arms are parallel to the ground, then push back up, focusing on the contraction of the triceps. Adjusting the intensity by leaning forward or keeping your torso upright allows you to target different aspects of the triceps, making dips a valuable addition to any triceps workout plan . Exercise 3: Overhead Triceps Extension The overhead triceps extension is an isolation exercise that targets the long and lateral heads of the triceps. Utilizing a barbell, dumbbell, or cable machine, hold the weight above your head with your elbows fully extended. Slowly lower the weight behind your head by bending at the elbows, then extend your elbows to return to the starting position. Including overhead extensions in your triceps workout regimen ensures adequate stimulation of the long and lateral heads, promoting balanced triceps development. Exercise 4: Skull Crushers (Lying Triceps Extensions) Skull crushers, also known as lying triceps extensions, are another effective isolation exercise targeting the long and lateral heads of the triceps. Lying flat on a bench, hold a barbell or dumbbells above your forehead with your elbows slightly bent. Lower the weight towards your skull by extending your elbows, then contract your triceps to return to the starting position. Adding skull crushers to your triceps workout program guarantees focused engagement of the long and lateral heads. Exercise 5: Cable Pushes Cable pushes, performed using a cable machine, offer unique advantages for triceps development due to continuous tension throughout the entire range of motion. Perform cable pushes with various grips and angles, such as rope pushes or straight-bar pushes, to target different aspects of the triceps. Incorporating cable pushes into your triceps workout schedule adds diversity and challenges the muscles in new ways, promoting overall growth and strength. Exercise 6: Diamond Push-Ups Diamond push-ups, also known as close-grip push-ups, place increased emphasis on the triceps compared to traditional push-ups. Position your hands together directly under your chest, forming a diamond shape with your thumbs and index fingers. Lower your body until your chest nearly touches the ground, keeping your elbows close to your sides. Press back up, focusing on the contraction of the triceps. Adding diamond push-ups to your triceps workout routine provides an additional compound exercise option for engaging the triceps. Exercise 7: Reverse-Grip Barbell Row Reverse-grip barbell rows primarily target the upper back but also engage the triceps during the pulling phase. Hold a barbell with an underhand grip, bend at the hips and knees, and pull the bar towards your waist while keeping your elbows close to your body. Lower the bar back down, completing a full range of motion. The reverse-grip row offers a pulling movement alternative for your triceps workout plan , ensuring balance between pushing and pulling exercises. Exercise 8: Kickbacks Kickbacks are a simple yet effective isolation exercise that targets the lateral head of the triceps. Using a dumbbell or cable machine, lean forward at the hips and support yourself with one arm. Keeping your elbow tucked close to your side, extend your forearm backward, focusing on contracting the triceps. Return to the starting position and repeat for the desired number of repetitions before switching arms. Including kickbacks in your triceps workout schedule promotes targeted development of the lateral head. Exercise 9: Pushdowns Pushdowns are a popular cable exercise that isolates the lateral head of the triceps. Attach a rope, straight bar, or V-bar to a high pulley and grasp it with an overhand grip. Standing or kneeling in front of the cable machine, extend your elbows and press the attachment downward, focusing on contracting the triceps. Return to the starting position and repeat for the desired number of repetitions. Adding pushdowns to your triceps workout routine ensures variety and specific engagement of the lateral head. Sample Tricep Workout Routine: Achieving sculpted and powerful triceps requires a well-structured workout routine that targets each tricep head effectively. Here's a sample tricep workout routine that incorporates essential exercises, includes warm-up and cool-down, and provides suggestions for sets and repetitions based on different fitness levels. Warm-Up: Jumping Jacks (5 minutes): Engages the entire body and increases heart rate. Prepares the joints and muscles for the upcoming workout. Arm Circles (2 minutes each direction): Focuses on shoulder mobility and warms up the triceps. Gradually increases range of motion. Dynamic Stretching (5 minutes): Incorporate arm swings and stretches to enhance flexibility. Prepares the triceps for the workout ahead. Tricep Workout: Tricep Dips (Compound Movement): Beginner: 3 sets x 10-12 reps Intermediate: 4 sets x 12-15 reps Advanced: 5 sets x 15-20 reps Close-Grip Bench Press (Medial Head Emphasis): Beginner: 3 sets x 8-10 reps Intermediate: 4 sets x 10-12 reps Advanced: 5 sets x 12-15 reps Tricep Kickbacks (Lateral Head Isolation): Beginner: 3 sets x 12-15 reps Intermediate: 4 sets x 15-18 reps Advanced: 5 sets x 18-20 reps Overhead Tricep Extension (Long Head Focus): Beginner: 3 sets x 10-12 reps Intermediate: 4 sets x 12-15 reps Advanced: 5 sets x 15-20 reps Cool-Down: Tricep Stretch (2 minutes each arm): Gently stretch each tricep to enhance flexibility and reduce muscle tension. Shoulder Rolls (3 minutes): Relaxes the shoulder muscles and promotes circulation. Full Arm Stretch (2 minutes each arm): Stretches the entire arm, including the triceps and shoulders. Deep Breathing (5 minutes): Encourages relaxation and aids in the recovery process. Notes: Ensure proper form and technique for each exercise. Rest for 60-90 seconds between sets for optimal recovery. Adjust weights and intensity based on individual capabilities. Progress gradually by increasing sets, repetitions, or weight. Important Considerations: Listen to your body and modify the routine as needed. If you experience pain (not to be confused with muscle fatigue), stop and consult a fitness professional or healthcare provider. Stay hydrated throughout the workout. This sample tricep workout routine is designed to cater to individuals of varying fitness levels. Consistency and gradual progression are key to achieving desired results. Adjustments can be made based on personal preferences, time constraints, and overall fitness goals. Conclusion: As we conclude this exploration into the realm of tricep development, let's reiterate the crucial role that well-defined triceps play in fostering overall arm strength and aesthetics. The journey to sculpting powerful triceps extends beyond the confines of vanity; it is a testament to your commitment to functional strength and holistic well-being. The triceps, with their three distinctive heads, stand as the cornerstone of arm strength. A well-developed tricep not only enhances the visual symmetry of your arms but also plays a pivotal role in daily activities—lifting, pushing, and maintaining stability. It is the fulcrum upon which overall arm strength pivots. Armed with the knowledge of essential exercises and a structured workout routine, the path to powerful triceps is within reach. I encourage you to seamlessly integrate the provided tricep workout routine into your regular fitness regimen. Consistency is the key to unlocking the transformative potential of your triceps. In the spirit of community and continuous improvement, I extend an invitation to share your experiences, insights, and variations within the fitness community. Your journey is unique, and by exchanging ideas, we contribute to a collective pool of knowledge that propels us all forward. Remember, the pursuit of powerful triceps is not a sprint but a journey. It's an ongoing commitment to self-improvement and a celebration of the strength that resides within you. Embrace the challenge, relish the process, and let the powerful triceps you cultivate become a testament to your dedication and resilience. Here's to the journey of sculpting not just strong triceps but a resilient, powerful you. See Related Articles : ⤵ Seated One-Arm Dumbbell Triceps Extension: Your Ultimate Guide to Sculpted Arms Triceps Dips on Floor: The Ultimate Guide to Arm Strength Cable Tricep Kickback: The Ultimate Exercise for Defined Arms Mastering the Lying Barbell Triceps Extension: Your Ultimate Guide to Sculpted Arms Mastering the Lever Triceps Dip: A Path to Peak Arm Strength Elevate Your Arm Strength with Cable Rope Overhead Triceps Extension Unlocking Arm Definition: One Arm Lying Triceps Extension Triceps Dips: The Ultimate Guide to Arm Sculpting Mastery Bench Dips: The Ultimate Exercise for Tricep Development Mastering the Push-Down: A Comprehensive Guide for Peak Arm Strength One Arm Reverse Pushdown: Your Ultimate Guide to Tricep Training Mastering the Dumbbell Kickback: A Comprehensive Guide One Arm Triceps Pushdown: The Ultimate Guide to Sculpting Your Arms Tricep Workout Routine Guide Triceps with one arm on a pulley: what it is for and how to do it 9 Best Triceps Exercises Tricep Dips: Proper Form and Technique Cable Tricep Pushdowns Tricep Extensions with Dumbbells Tricep Workouts for Sculpted Arms: Get Ready to Tone! Best 10 Triceps Workout
![Human Growth Hormone: Side Effects - A Comprehensive Guide [2025]](https://static.wixstatic.com/media/2edbed_db80d0e32a8441568847bc3815334a84~mv2.webp/v1/fit/w_176,h_124,q_80,usm_0.66_1.00_0.01,blur_3,enc_auto/2edbed_db80d0e32a8441568847bc3815334a84~mv2.webp)


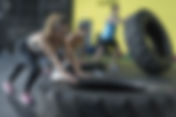


![Triceps Workout Routine Guide: How to do it, Muscles Worked and Benefits [2025]](https://i.ytimg.com/vi/popGXI-qs98/maxresdefault.jpg)